
 OFFER
OFFER


Drive sales on autopilot with ecommerce-focused features
See FeaturesA Shopify order confirmation email is more than a receipt — it’s your best chance to reassure customers right after they buy, when they’re most attentive and looking for details.
Beyond the basics (order summary, totals, shipping address, and timing), a strong confirmation email reduces “Where’s my order?” tickets, sets clear expectations, and can gently drive the next step — like creating an account, discovering care tips, or adding a complementary product — without feeling pushy.
Besides the obvious purpose of the confirmation emails, they can also showcase product recommendations, share exclusive offers, and reinforce your brand identity. With their exceptionally high open rates, these messages create prime opportunities to build customer trust while introducing complementary products that drive additional revenue.
In this post, we’ll cover everything about Shopify order confirmation, from initial setup to advanced automation strategies. You’ll learn how to edit order confirmation emails in Shopify, troubleshoot delivery issues, and optimize for engagement.
Quick sign up | No credit card required
How to set up Shopify order confirmation emails?
Shopify automatically sends order confirmation emails when customers make purchases. Setting up your Shopify order confirmation email properly ensures customers receive immediate purchase acknowledgment, helping you build trust from the first transaction.
The platform sends confirmations for all paid orders by default. Shopify Plus users can disable this feature, but standard plans keep it active automatically.
Here’s a step-by-step Shopify order confirmation email setup guide:
1. Navigate to your admin panel
Go to Shopify admin > Settings > Notifications
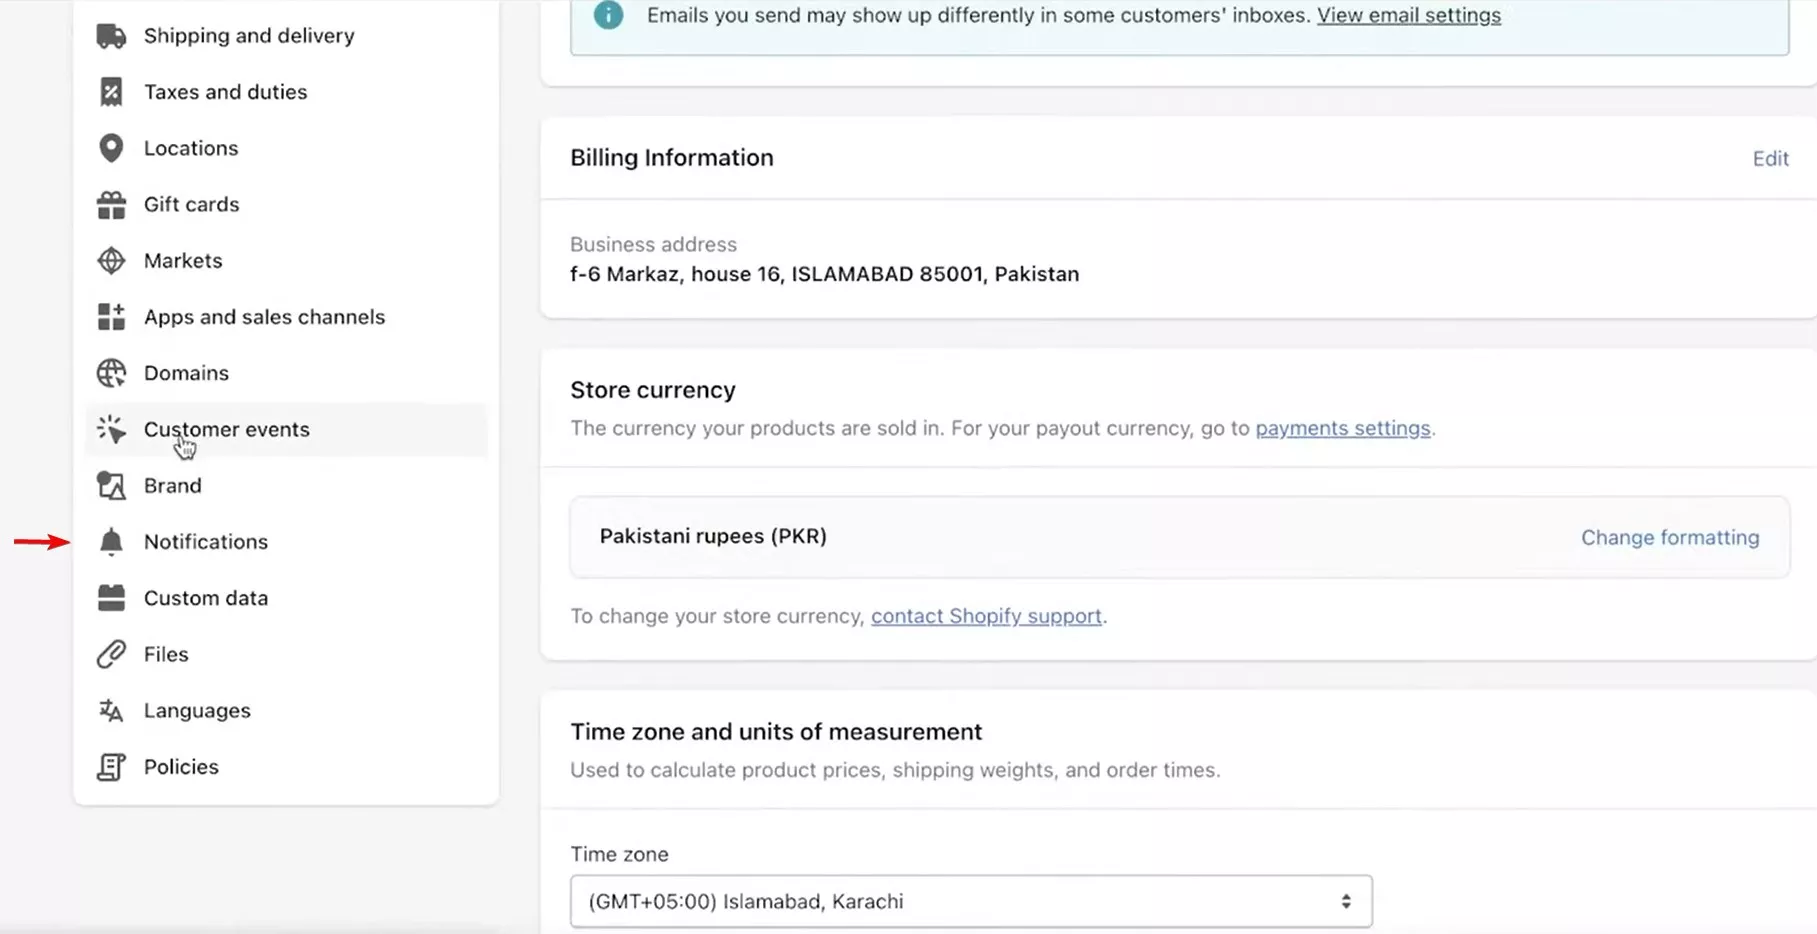
2. Locate the template
Find Order confirmation in the customer notifications section
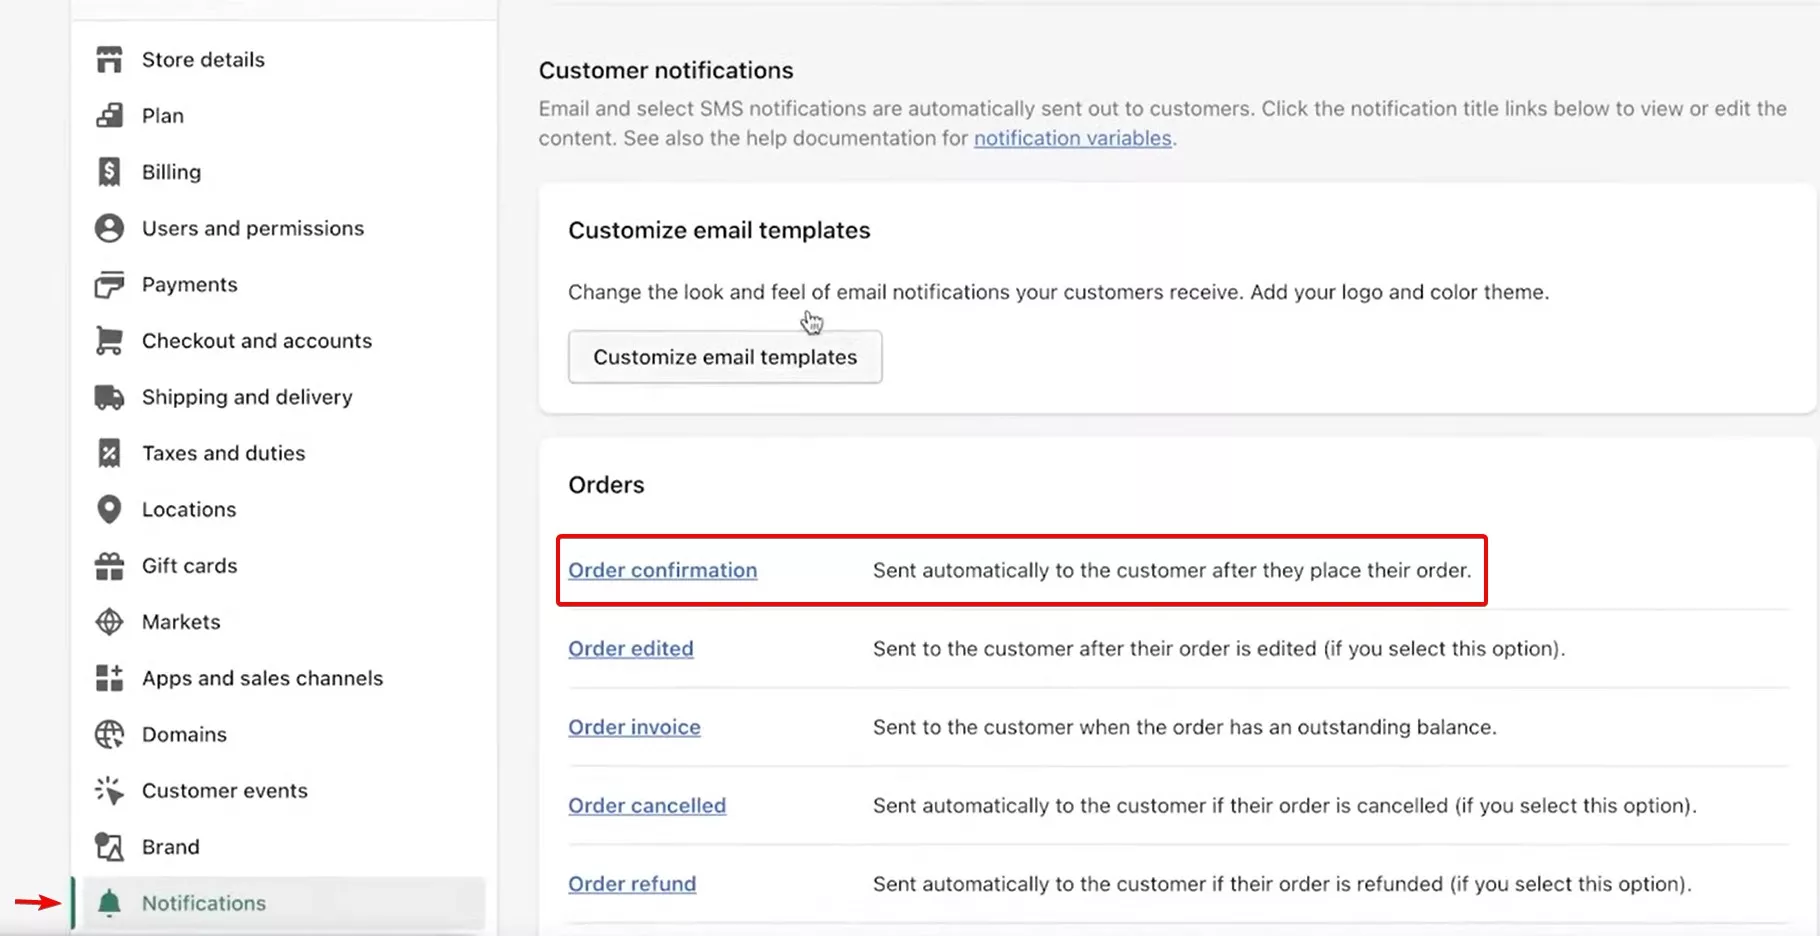
3. Customize email templates
Click to edit: Select the template to access customization options
4. Send test emails
Use Actions > Send test email to preview results
Shopify’s default editor offers basic customization options. You can modify colors, upload logos, and adjust text content. However, the platform doesn’t offer drag-and-drop and advanced design features. Instead, the template system relies on Liquid code for dynamic content.
“I’m currently working on improving the customer experience for my Shopify store and would like to customize the notification emails — such as order confirmation and shipping updates. What would you say is the best way to configure these emails?” — Shopify Community user
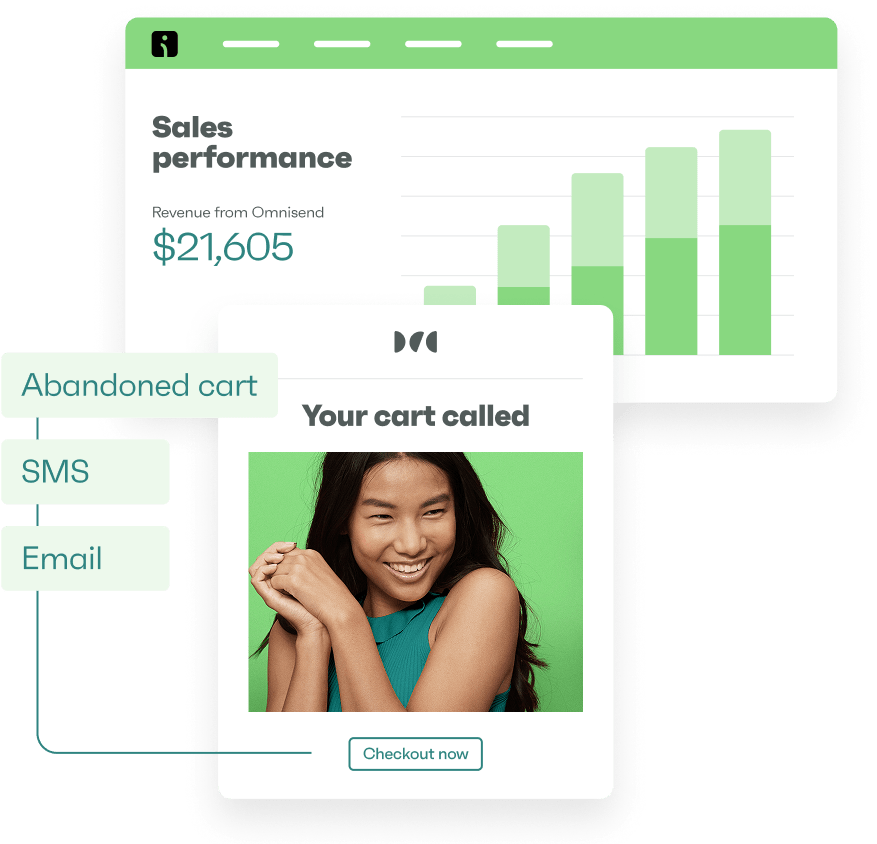
Many businesses choose third-party solutions for more capabilities. Platforms like Omnisend provide intuitive drag-and-drop builders, A/B testing, and comprehensive analytics.
“Omnisend is the best email marketing software I have ever used. Its ease of use and compatibility with Shopify stores make it a breeze to send those weekly emails and it has fantastic automations.” — Shopify App Store user
The key difference lies in flexibility and ease of use. While Shopify covers basic needs, specialized platforms offer professional-grade tools for businesses serious about improving email marketing performance.
Watch this video to learn how to create original Shopify order confirmation emails in minutes:
How to edit Shopify order confirmation emails?
To edit your Shopify order confirmation email templates, you must go to the notification settings and understand the available customization options. Here’s how to modify each component effectively.
Here’s a step-by-step Shopify order confirmation email edit guide:
- Edit the subject line
- Customize the email body
- Add branding elements (logo, colors)
- Update for taxes, duties, and Liquid changes
1. Edit the subject line
Access your template editor and locate the subject line field at the top. Shopify allows dynamic variables like Order {{name}} confirmed to personalize each message.
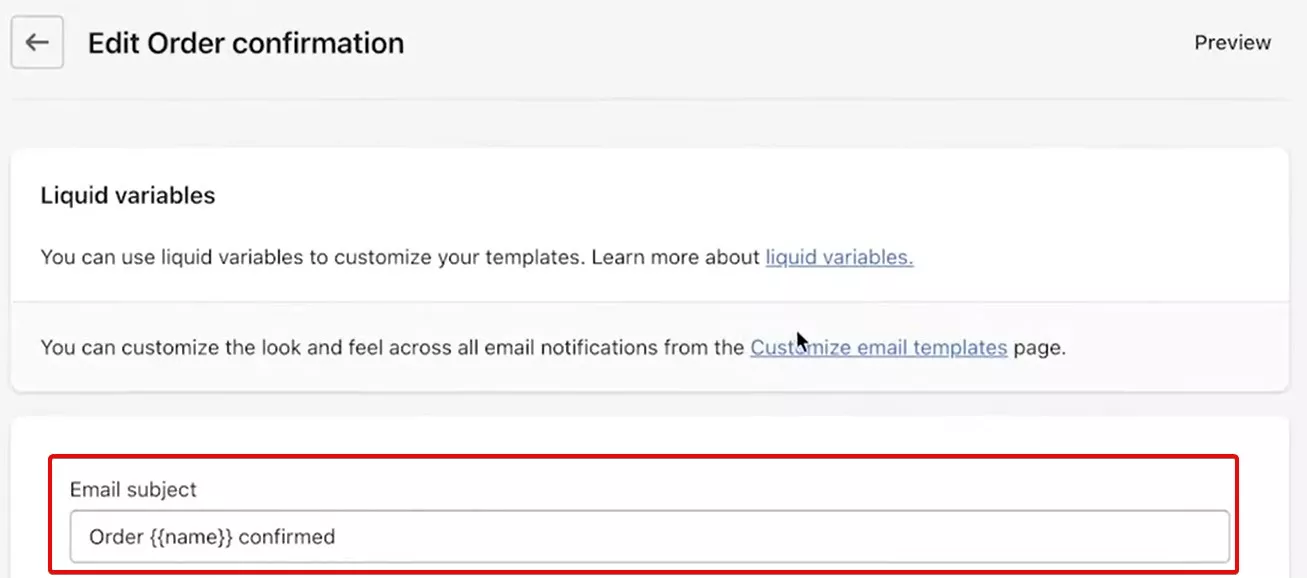
You can include your brand name or order number for clarity and easy customer reference. Try to keep subject lines under 50 characters to optimize for mobile.
2. Customize the email body
The email body editor lets you modify greeting text, thank-you messages, and reorder prompts. Add Liquid variables like {{ customer.first_name }} for personalization and {{ order_status_url }} for order tracking links.
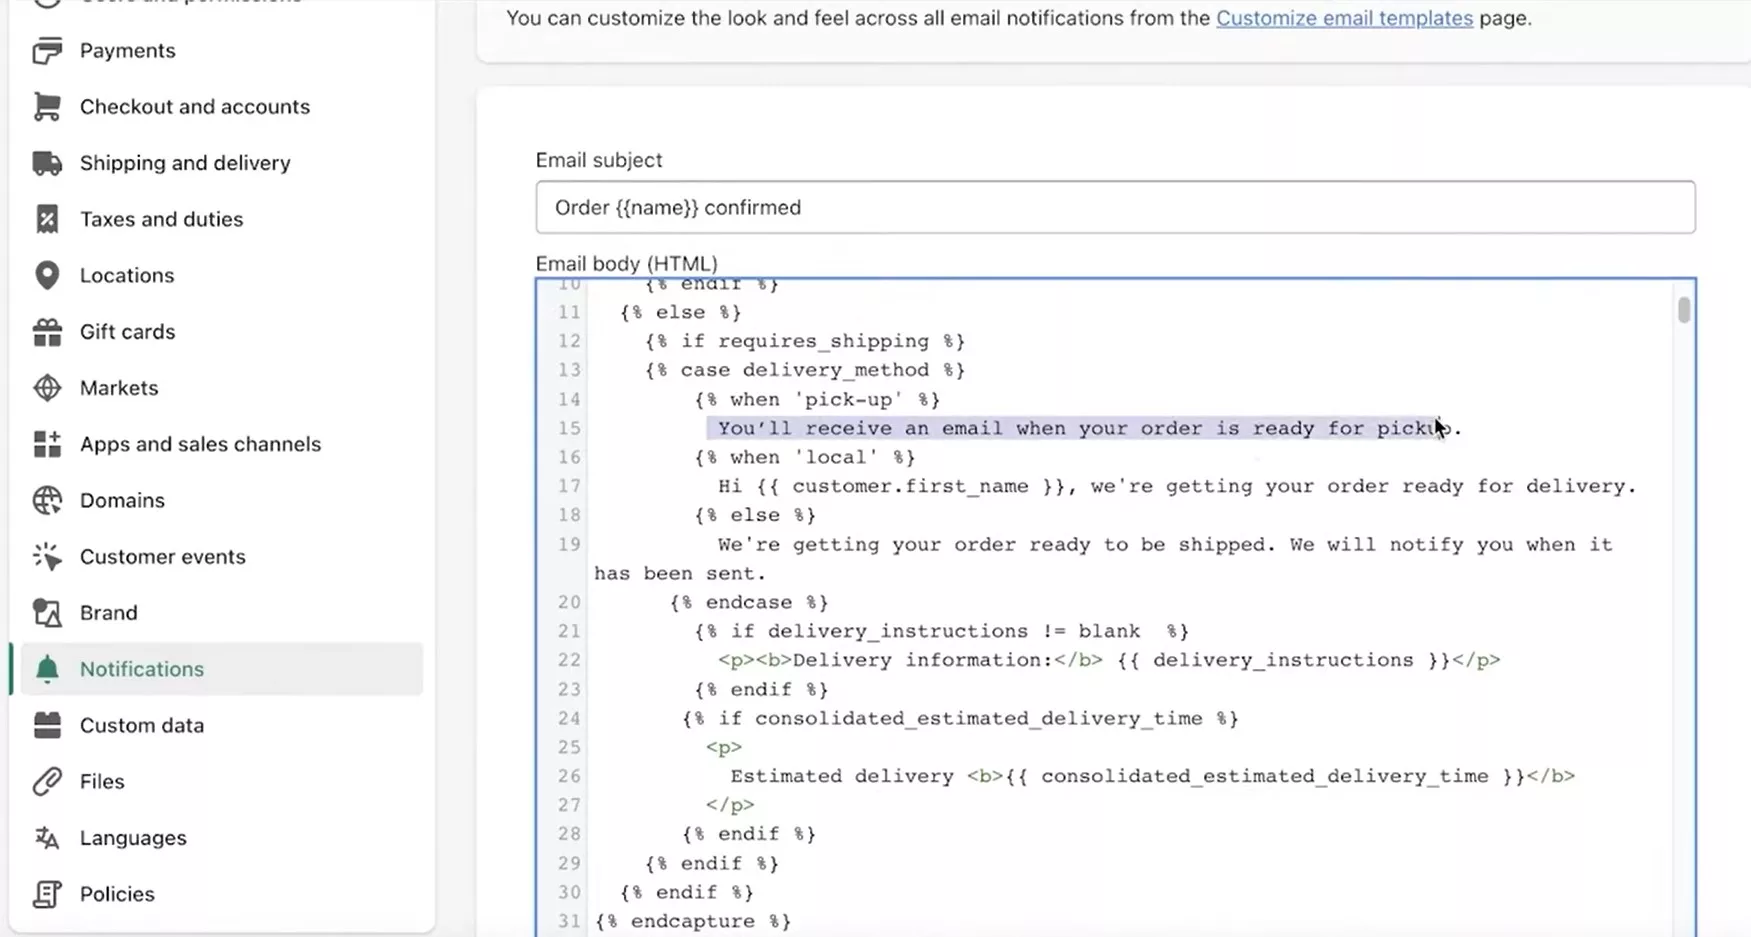
Navigate to the HTML section for advanced customization. You can adjust font styles, colors, and layout structure. However, changes require basic coding knowledge.
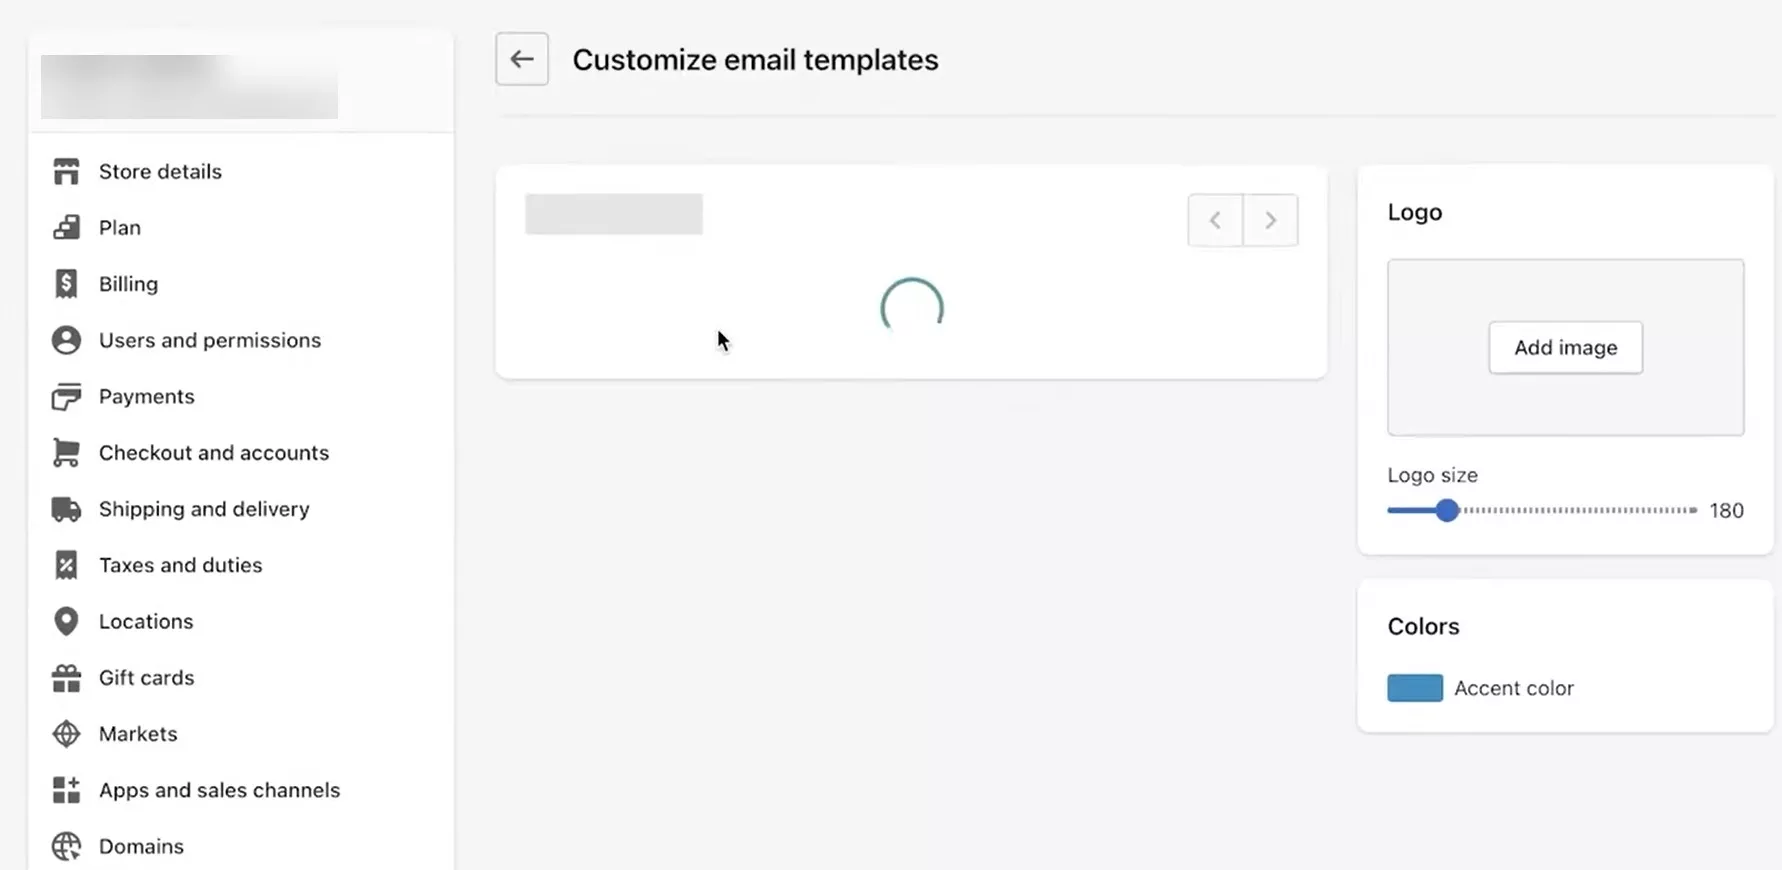
3. Add branding elements (logo, colors)
Use Shopify’s Customize template interface to upload your logo and select accent colors. The logo upload tool accepts common image formats, while the color picker lets you match your brand palette.
Shopify automatically optimizes images, but manual testing ensures a consistent appearance.
Remember to preview mobile versions of your Shopify order template. Most customers check emails on their phones, so responsive design matters.
4. Update for taxes, duties, and Liquid changes
To add your business tax number, navigate to Settings > Notifications > Order Confirmation > Edit code. In the HTML area, add your business details using this code structure:
<table class=”row”>
<tr>
<td class=”shop-name_cell”>
<img src=”{{shop.email_logo_url}}” alt=”{{ shop.name }}”>
<p>Your Address, City ZIP TAX# 123456789</p>
</td>
</tr>
</table>
Add this code snippet where you want the duties information to appear:
{% if current_total_duties %}
<tr class=”subtotal-line”>
<td class=”subtotal-line__title”>
<p><span>Duties</span></p>
</td>
<td class=”subtotal-line__value”>
<strong>{{ current_total_duties | money }}</strong>
</td>
</tr>
{% endif %}
Always use the Revert to default option before making major changes. This creates a backup, which comes in handy if your modifications cause display issues.
Learning how to edit Shopify order confirmation emails becomes easier once you understand these core customization areas and their limitations.
Pro tip: You can build more engaging order confirmation emails using Omnisend’s drag-and-drop template editor. It offers unlimited customization and integrates with Shopify to automatically send an email after the order status becomes “paid.”
Key elements of a Shopify order confirmation email
Every effective Shopify order confirmation email must include essential information. These elements serve as both a receipt and a reference guide for future inquiries.
1. Order number and date
A unique order ID helps customers reference their purchase easily when contacting support. Include this prominently in both the subject line and email header for quick identification.
2. Customer information and addresses
Display the customer’s name for personalization and show both shipping and billing addresses. This allows customers to verify that their information was entered correctly, enabling them to catch potential delivery issues before shipping.
3. Complete order summary
List all purchased items with product names, quantities, and individual prices. Include product images if possible for visual confirmation. Add an order status link where customers can track progress directly on your website.
4. Transparent cost breakdown
Show item subtotals, applied discounts, shipping costs, taxes, and the total order amount. This transparency prevents confusion about charges and reduces support inquiries.
5. Payment method confirmation
Indicate the customer’s payment method and confirm that it was processed correctly. When displaying credit card information, only display it partially, like Paid with Visa ending ***1234 to provide reassurance without security risks.
6. Shipping method and timeline
State the chosen delivery option and estimated arrival timeframe. If exact dates aren’t available, explain when customers will receive tracking information or shipping confirmations.
7. Customer support contact information
Provide multiple ways for customers to reach support, including email addresses, phone numbers, or support portal links. A simple phrase like “Questions? Contact us at [email protected]” makes assistance accessible.
Overall, you’ll want to cover the following information in your Shopify order confirmation email template:
- Order confirmation and a thank you note
- Order date
- Product details, including price and quantity
- Total price
- Billing and shipping addresses
- Payment method
- Shipping method
- A view order button that links back to the store
Here’s an example of an order confirmation email template containing these elements:
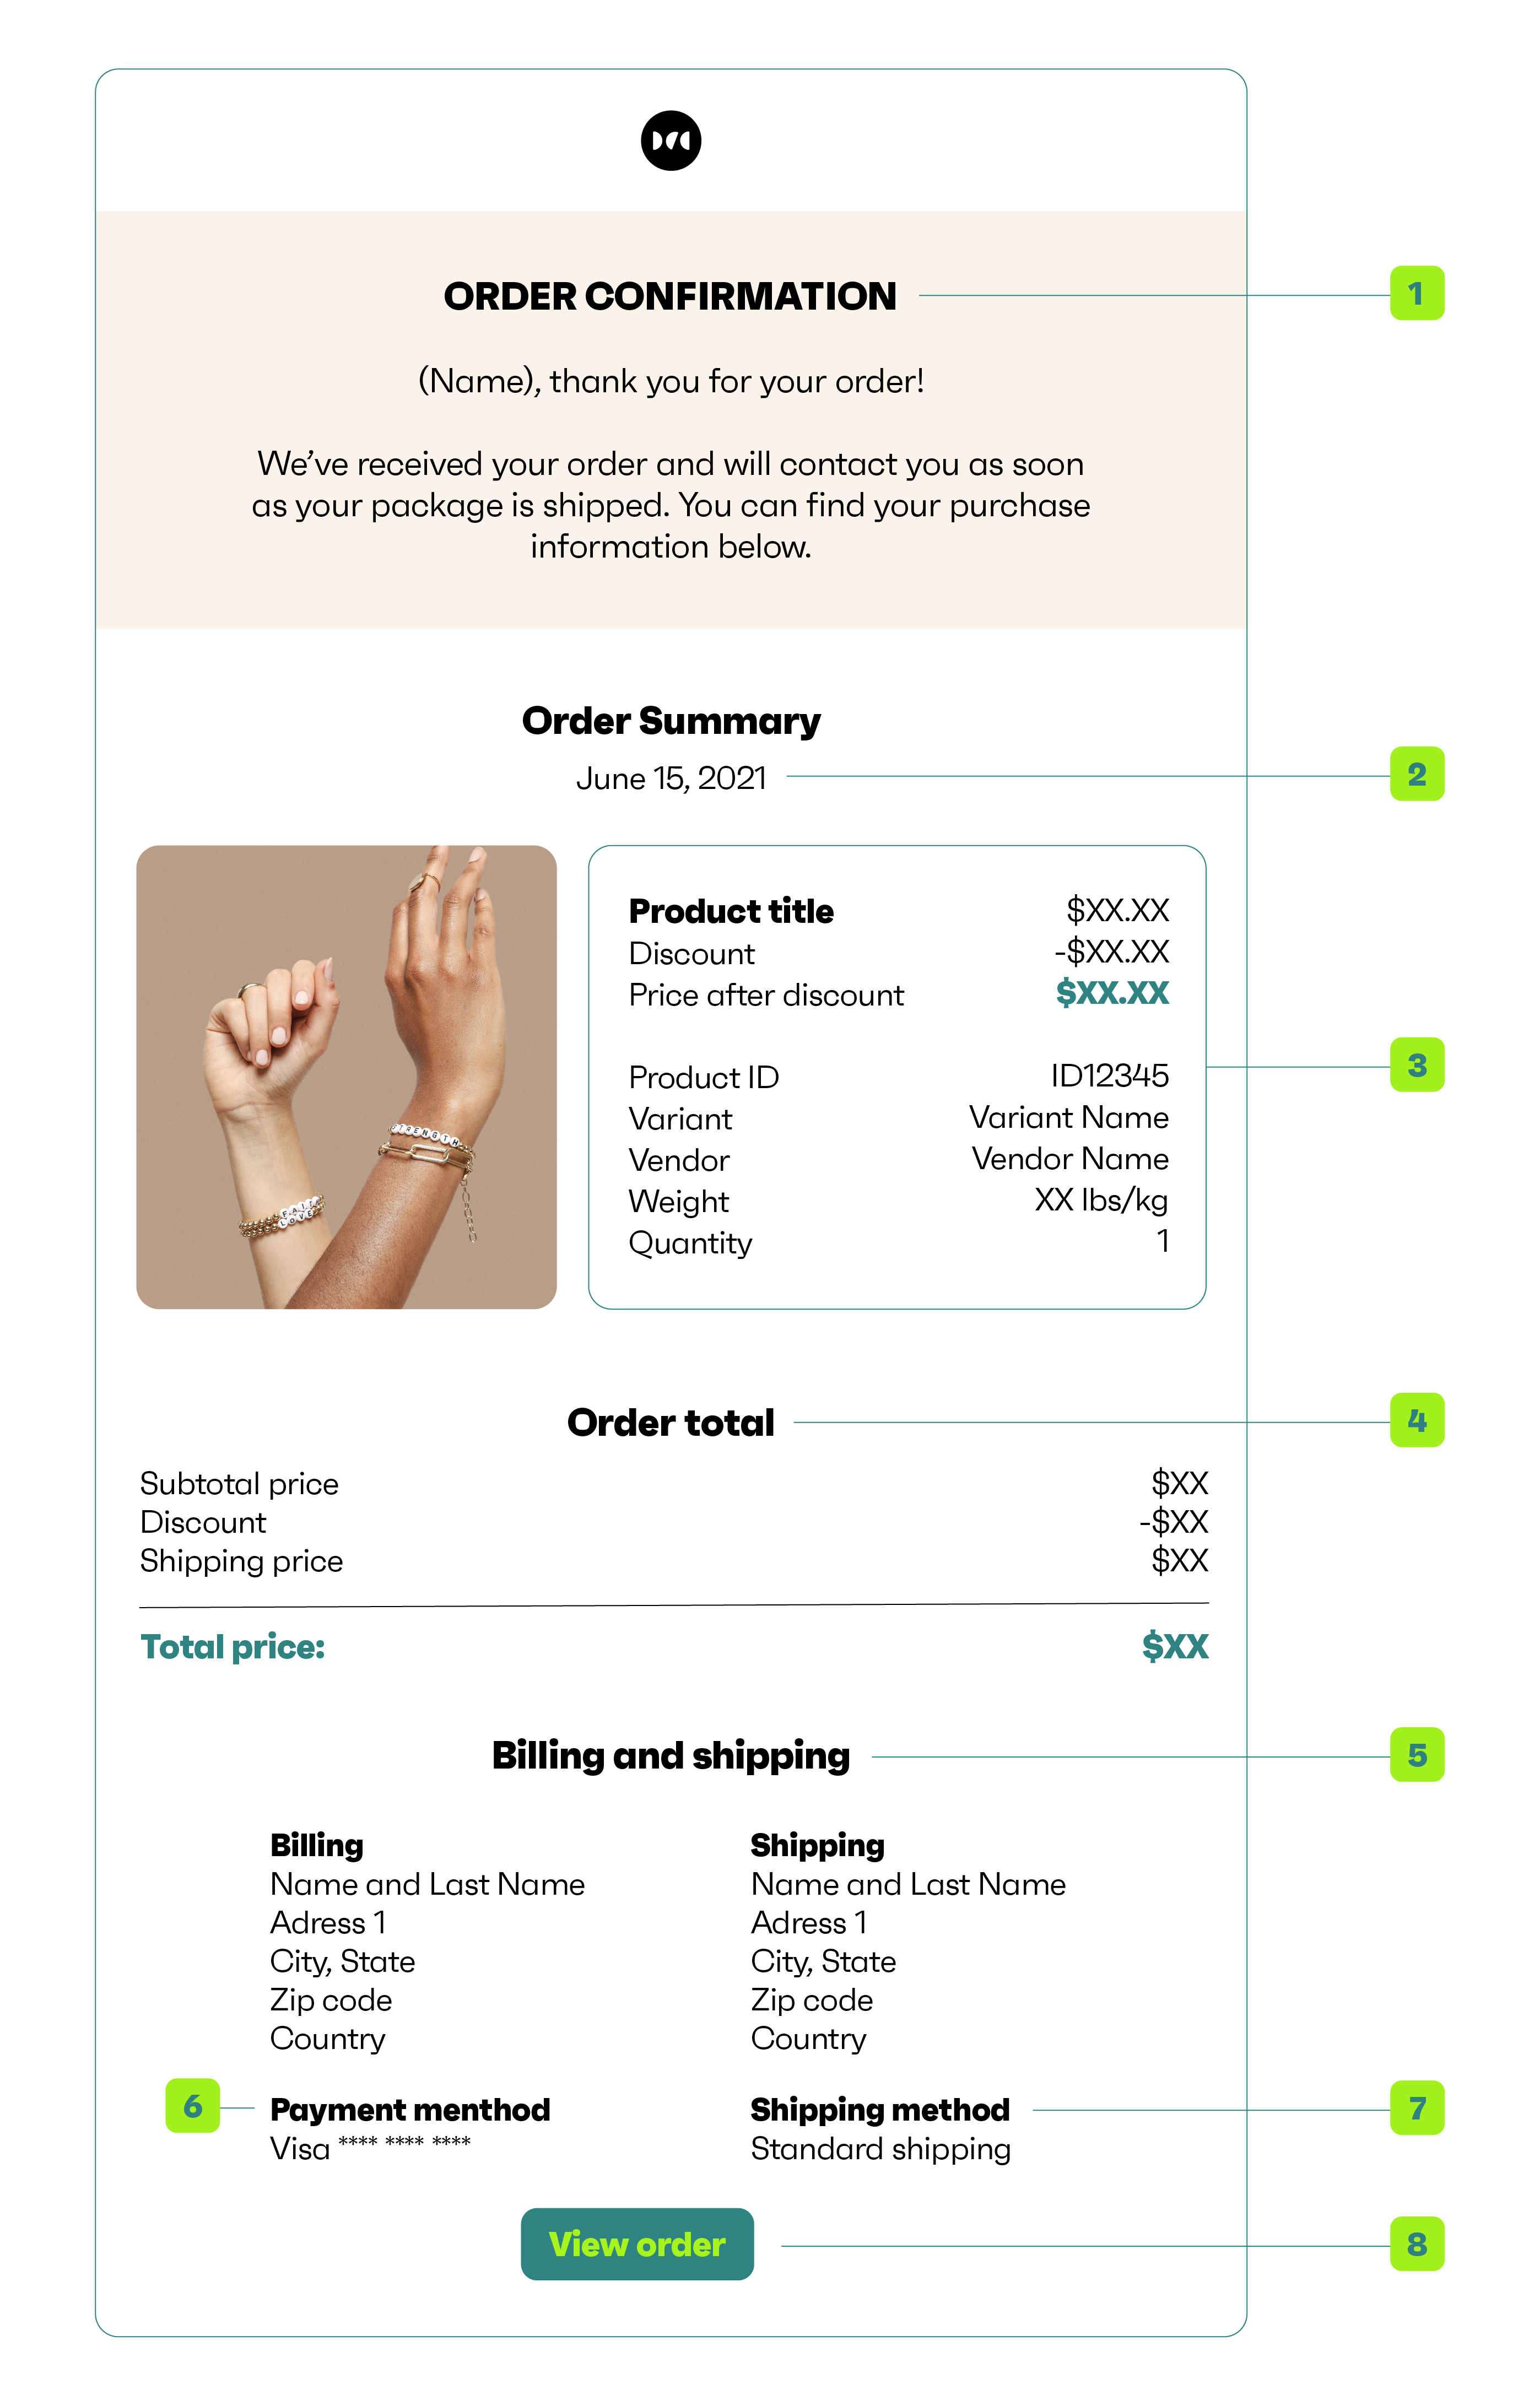
Including all these essential elements ensures your Shopify order confirmation email has everything your customers need to know. When they can find answers to questions within the email, they’re less likely to contact support.
How to customize and automate Shopify order confirmation emails?
Here’s how different approaches compare and what alternatives exist:
| Feature | Shopify default | Omnisend |
|---|---|---|
| Design interface | HTML/Liquid code editing | Visual drag-and-drop builder |
| Template library | Single basic template | 100+ ecommerce templates |
| Personalization | Basic customer variables | Advanced segmentation and product recommendations |
| Testing options | Send test email only | A/B testing, preview across devices |
| Analytics | No performance data | Open rates, clicks, and revenue tracking |
| Automation triggers | Order creation only | Multiple triggers with conditional logic |
| Channel support | Email notifications | Email, SMS marketing, and push notification in unified workflows |
| Brand customization | Logo upload, color picker | Full brand kit integration |
| Delivery optimization | Basic SMTP | Advanced delivery algorithms |
| Mobile optimization | Responsive template | Mobile-first design tools |
Limitations of Shopify’s editor
Shopify’s template system offers basic customization through HTML and Liquid code. While you can modify colors, text, and upload logos, creating sophisticated Shopify order confirmation email layouts requires coding expertise.
The platform also lacks drag-and-drop functionality, making design changes time-consuming and technical. This feature is accessible with Omnisend.
“We have a lot of customizations for order confirmation emails. We use Liquid conditionals to capture the customized HTML, but it’s at a point where the code is getting tedious to maintain. I wonder if there are any apps or any other improvements to the process.” — Reddit user
Best practices summary
To create successful Shopify order confirmation emails, follow several key principles, including:
- Ensuring immediate delivery through automated triggers
- Optimizing for mobile devices
- Writing clear, engaging subject lines
- Maintaining a consistent brand voice and design across all touchpoints
- Including clear calls to action for order tracking
- Showing gratitude without being overly promotional
- Keeping content concise and scannable
- Confirming shipping in separate emails
- Testing all elements before launching
Better alternative — use Omnisend
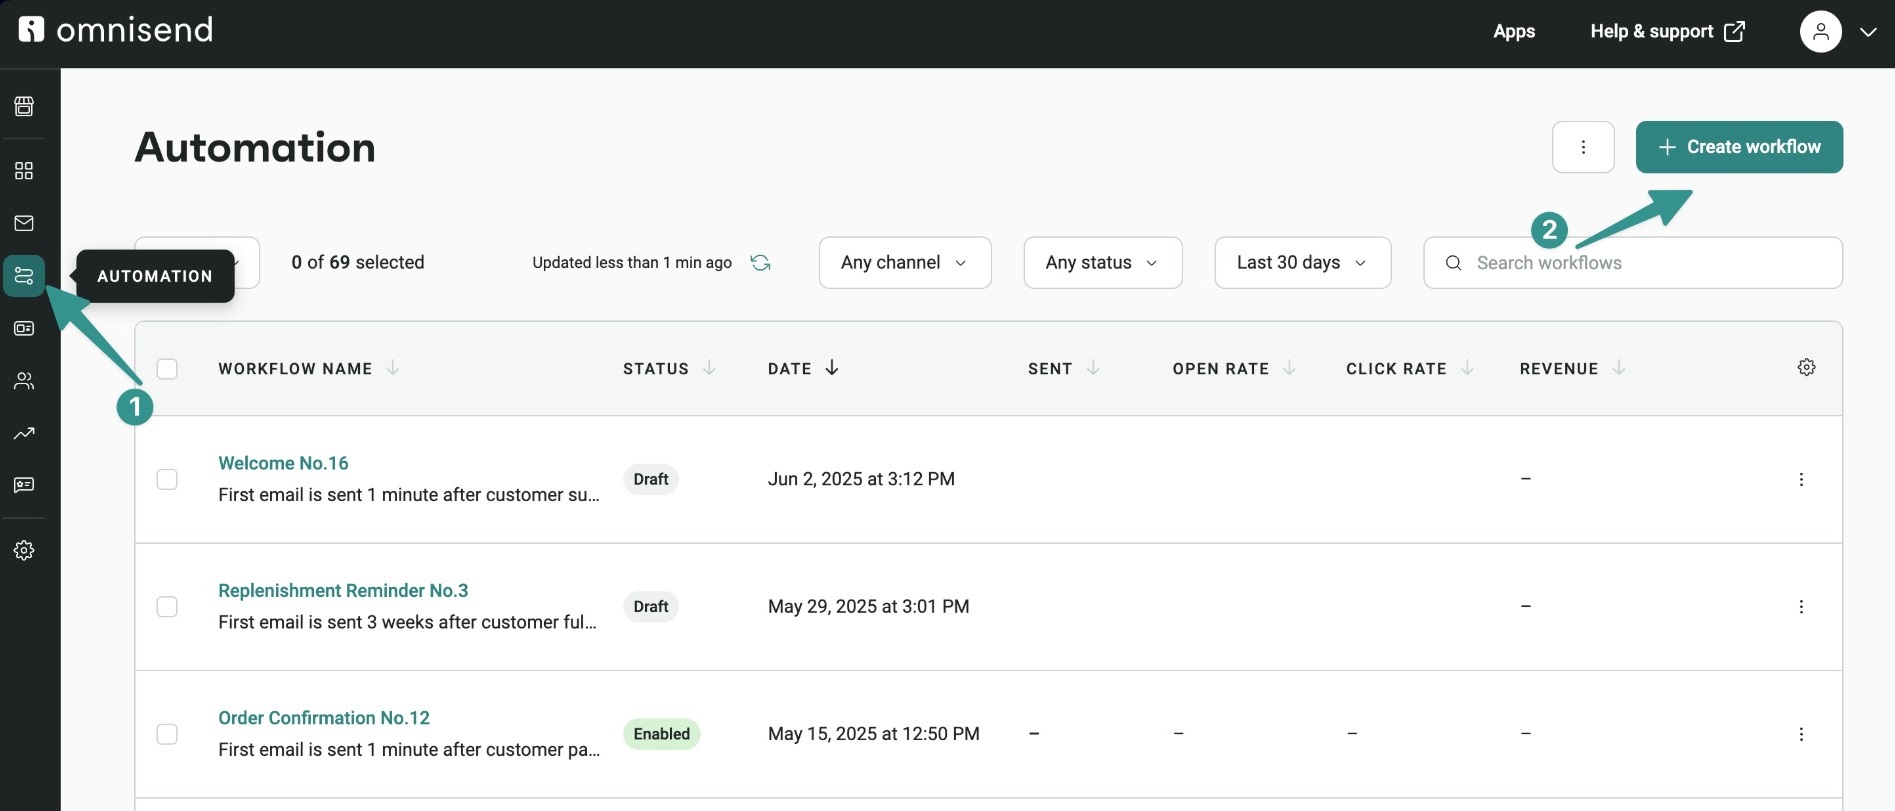
Omnisend provides drag-and-drop email builders specifically designed for ecommerce businesses. The platform integrates seamlessly with Shopify. It automatically sends an order confirmation email when orders reach “paid” status. Here’s a sample of that automation workflow:
Omnisend is powerful without being clunky. You get advanced features without a steep learning curve.
Omnisend customers get $79 back for every one dollar spent — one of the highest ROIs in marketing. With 24/7 customer support that doesn’t have an expiration date, everyone gets help regardless of their plan level.
“For sending thank-you emails after an order is placed. Omnisend is awesome, Shopify Email and Flow are great for email marketing, but not so much for customer appreciation for an order. Omnisend grabbed all my socials and was off to the races. And the workflow chart is way more user-friendly.” — Shopify App Store user
For additional insights into integrating Omnisend with your Shopify store, check out this helpful video tutorial:
How to set up Shopify shipping confirmation emails?
Shopify sends shipping confirmation emails when you mark orders as fulfilled. These notifications inform customers about delivery progress. They require either manual fulfillment or automated service integration to trigger properly.
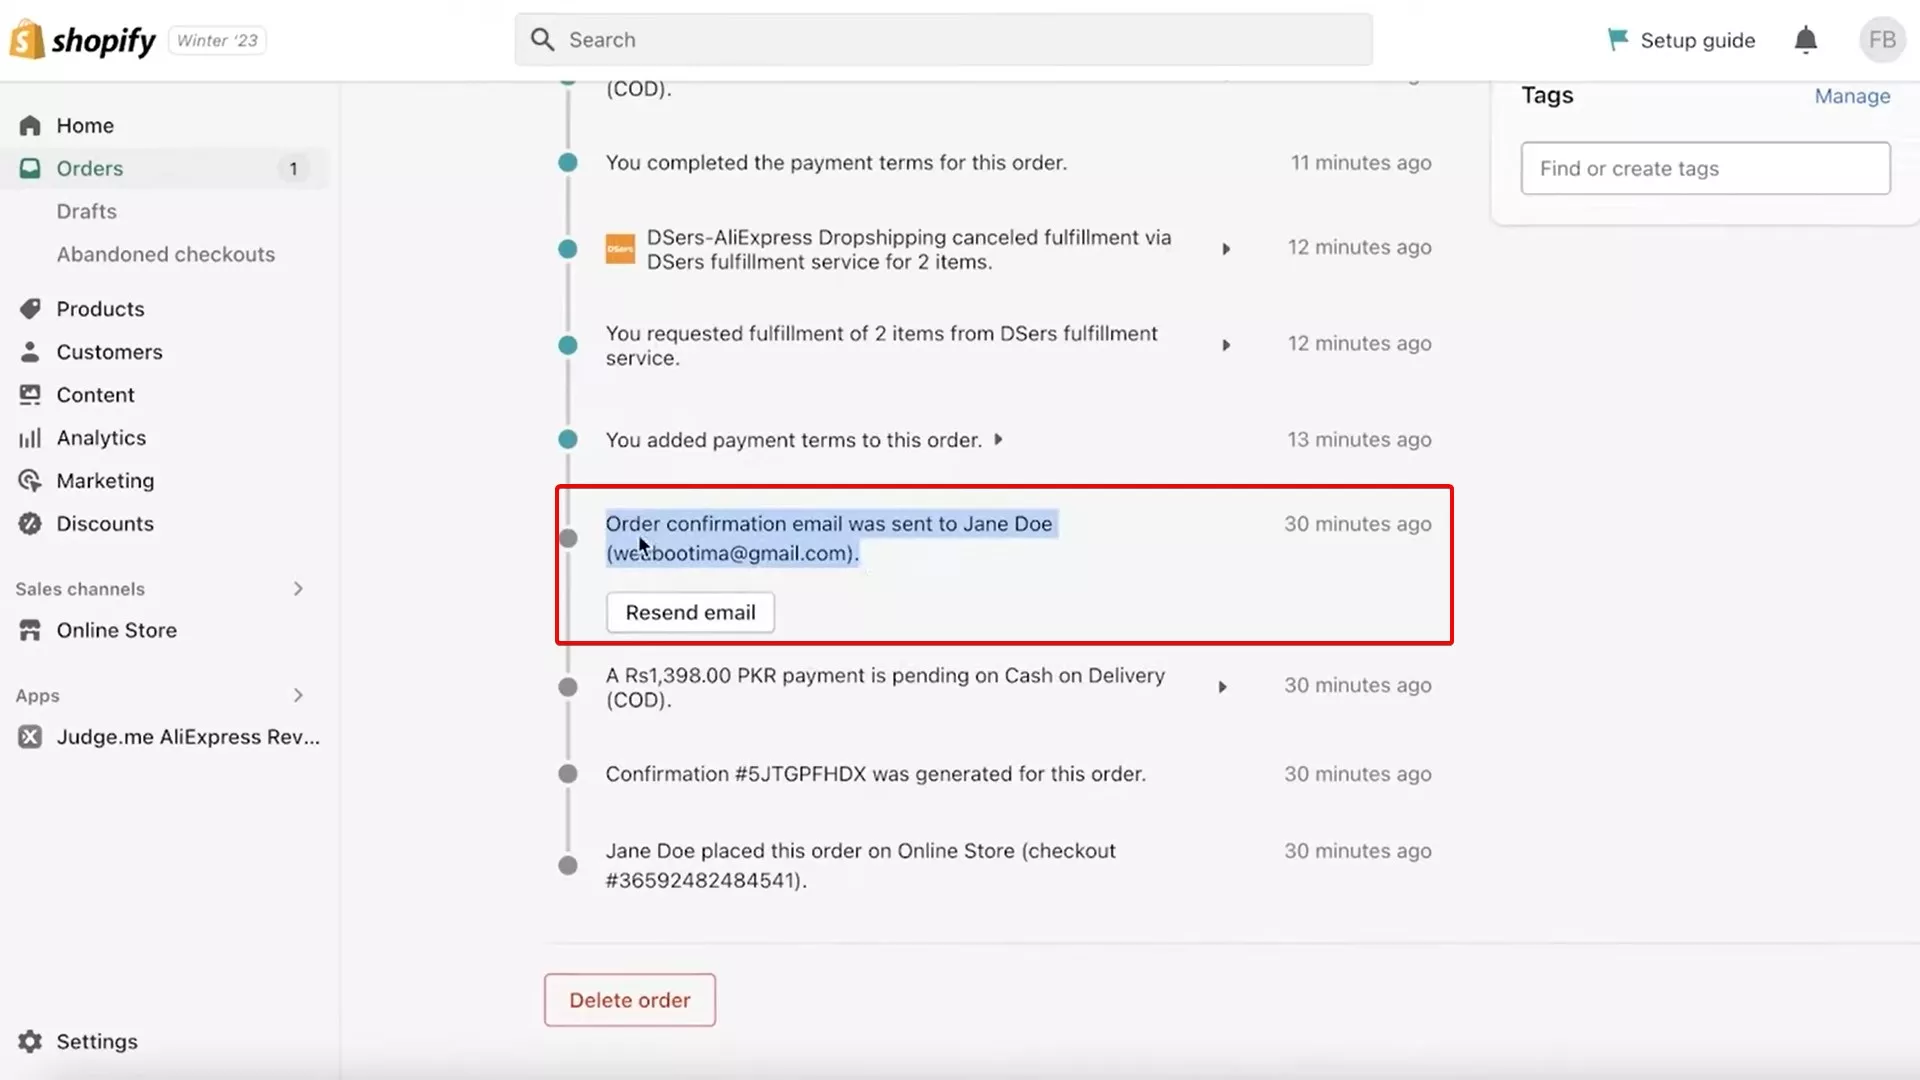
How to resend shipping confirmations manually
Navigate to the order details page and scroll to the Timeline section. Click Resend email under the shipping confirmation event. You can also send test versions to verify formatting and content accuracy.
Common shipping email issues
Several problems can prevent Shopify shipping emails from reaching customers. Check that the Order Fulfilled notification is enabled in Settings > Notifications. Verify your sender email address authentication and ensure customers haven’t marked previous emails as spam.
When customers don’t receive a Shopify shipping confirmation email, it’s typically due to incorrect order status or disabled notification settings. Orders must reach Fulfilled status before shipping emails are triggered.
Omnisend shipping automation
Omnisend automates this process effectively with conditional triggers based on fulfillment status. The platform sends branded shipping confirmations with tracking links, delivery estimates, and relevant product recommendations.
Best practices for Shopify order confirmation emails
To make your Shopify order confirmation emails truly effective, follow these proven strategies:
- Ensure immediate delivery (automation)
- Optimize for mobile devices
- Write clear, engaging subject lines
- Maintain consistent brand voice and design
- Include clear calls to action
- Show genuine gratitude
- Keep content concise and scannable
- Test before sending
Ensure immediate delivery (automation)
Set up automated triggers that send confirmations within seconds of completing a purchase. Delayed confirmations create unnecessary worry and increase support inquiries. Customers expect instant responses, especially after providing payment information.
Optimize for mobile devices
56% of marketers say they plan to use mobile-friendly designs in 2025. Ensure your logo scales properly, text remains readable, and buttons are easy to tap. Test across different screen sizes to guarantee consistent appearance and functionality.
Write clear, engaging subject lines
Use direct, informative subject lines like “Order Confirmed #12345” or “Thank you for your purchase, [Name].” Include order numbers for easy reference. Avoid spam triggers like excessive punctuation, ALL CAPS, or words like “FREE” that can hurt email deliverability.
Maintain consistent brand voice and design
Match email design to your website’s visual identity. Use consistent colors, fonts, and logos to create cohesive brand experiences. If you present your brand professionally, you can build trust and reinforce brand recognition.
Include clear calls to action
Add prominent buttons for order tracking, customer support, and account access. Place them strategically so they’re easy to see and access. Consider including links to shipping policies, return information, or FAQs.
Show genuine gratitude
Express authentic appreciation without being overly promotional. Simple phrases like “Thank you for choosing [Brand]” create positive emotional connections that encourage repeat purchases.
Keep content concise and scannable
Structure information with a clear hierarchy using headings, bullet points, and white space. Customers should be able to quickly locate essential details like order numbers, shipping addresses, and total order amounts.
Test before sending
Send test emails across different devices and email clients. Check all links, ensure that dynamic content is displayed correctly, and verify that images load properly. This step prevents mistakes and errors, helping maintain professionalism.
Shopify order confirmation email templates (examples to copy)
Ready-to-use Shopify order templates can jump-start your email customization efforts. These examples showcase different approaches you can adopt.
Template 1: Basic order confirmation
Subject: Your Order Has Been Confirmed! 🎉
Hi {{ customer.first_name }},
Thank you for your order! We’ve received it and are preparing it now.
**Order number:** {{ order_number }}
**Order date:** {{ created_at | date }}
**Order details:**
{{ order_details }}
**Total paid:** {{ total_price | money }}
[🔍 View your order here]({{ order_status_url }})
If you have any questions, contact us at [[email protected]].
Thanks for shopping with us!
– The [Your Brand Name] Team
Why it works: This basic Shopify order confirmation email structure is clean, focuses on the essentials, and follows the minimum viable confirmation email structure.
Template 2: Personalized with upsell recommendations
Subject: {{ customer.first_name }}, Your Order #{{ order_number }} Is Confirmed!
Hi {{ customer.first_name }},
Thanks for your purchase! Here’s what you bought:
{{ order_details }}
**Total:** {{ total_price | money }}
Estimated delivery: {{ shipping_method }} by {{ delivery_date }}
✨ Based on your order, you may also like:
– [Product Recommendation 1] – [Shop Now]
– [Product Recommendation 2] – [Shop Now]
[Track your order]({{ order_status_url }})
Need help? Reply or contact us at [email protected].
Cheers,
The [Brand] Team
Why it works: This Shopify order confirmation email template combines confirmation with personalized product suggestions, which is ideal for increasing average order value.
Template 3: Confirmation and tracking timeline
Subject: Woohoo! Your Order #{{ order_number }} Is Confirmed
Hey {{ customer.first_name }},
Your order is confirmed! Here’s a look at the timeline:
⏰ **Status:**
– Order confirmed ✔️
– Processing (1–2 business days)
– Shipping soon
You’ll get a shipping email with tracking once it’s on the way.
**Order details:**
{{ order_details }}
[Track My Order]({{ order_status_url }})
While you wait, check out these helpful links:
– Edit or cancel order
– Return policy
– FAQs and support
Best,
The [Your Brand] Support Team
Why it works: This Shopify order confirmation email template builds confidence among consumers with its clear timeline while reducing support questions by setting proper expectations.
Template 4: Gift order confirmation with gift message
Subject: Your Gift Order #{{ order_number }} Is on Its Way! 🎁
Hi {{ customer.first_name }},
Your gift order is confirmed! Here’s the gift info:
**Gift recipient:** {{ shipping_address.name }}
**Gift message:** “{{ gift_message }}”
Order #{{ order_number }}
[Download gift receipt]
We’ll keep you updated when it ships.
Thanks for gifting with us!
– [Your Brand] Team
Why it works: It’s tailored specifically for gift purchases to keep the purchaser informed and ensure that the gift will be sent to the right person.
These Shopify order confirmation email template examples provide starting points for creating branded emails that convert.
Troubleshooting Shopify order confirmation emails
Several issues can prevent your Shopify order confirmation emails from reaching customers. Here are the most frequent problems and their solutions.
Customer didn’t receive the Shopify order confirmation email
Start by verifying the email address in your order records. Typos during checkout create delivery failures that could confuse customers.
Next, ask customers to search their spam folders thoroughly, including promotional and social tabs in Gmail. Shopify order confirmation emails often trigger spam filters due to transactional content.
Order confirmation email on Shopify not sending at all
Access your notification settings through Settings > Notifications and confirm the Order Confirmation toggle remains active. Many store owners accidentally disable this feature when modifying the setup.
Also, verify sender domain authentication through your DNS provider. Missing SPF or DKIM records cause major email providers to reject messages entirely.
Manual Shopify order confirmation email resend requirements
Locate the problematic order in your admin dashboard and examine the Timeline section carefully. Look for the Order confirmation email sent entry. If missing, click More actions and select Resend order confirmation.
This manual trigger often resolves isolated delivery failures.
Duplicate Shopify order confirmation email problems
Third-party email platforms sometimes create conflicts with Shopify’s native notifications. Check if you’ve installed apps like Mailchimp or Omnisend that might cause confirmation emails to be sent twice.
Configure one system to handle confirmations while disabling others to prevent customer confusion.
Shopify shipping confirmation email not sending
Server issues or high traffic periods occasionally slow Shopify’s email queue processing. Monitor your store’s notification logs for patterns that indicate systemic issues rather than isolated incidents.
For stores experiencing frequent delivery issues, specialized email platforms like Omnisend can help. It offers superior reliability, detailed delivery reporting, and advanced troubleshooting capabilities.
Conclusion
Your Shopify order confirmation email creates the first post-purchase impression that shapes customer relationships. These messages go beyond basic receipts and can build trust, reinforce your brand, and create opportunities for repurchases.
Focus on essential elements like clear order details and delivery information, then add personalization features and strategic branding. Test across devices and optimize for mobile viewing to maintain a professional presentation.
Consider platforms like Omnisend for advanced customization, comprehensive analytics, and automation capabilities that turn simple order confirmations into powerful marketing tools.
Quick sign up | No credit card required
FAQs
Yes, Shopify automatically sends order confirmation emails immediately after customers complete purchases. This happens by default for all paid orders.
To customize your confirmation email, go to Settings > Notifications > Order Confirmation in your Shopify admin. You can modify the subject line, email body text, logo, and accent colors.
Open the specific order in your admin dashboard and scroll to the Timeline section. Click Resend email under the order confirmation event.
Standard Shopify plans don’t allow complete disabling of order confirmations. If you’re considering how to turn off the Shopify order confirmation email setting, you must upgrade to Shopify Plus.
Shopify allows template customization through HTML and Liquid code editing. However, you’re limited to their template structure.
Order confirmations are sent immediately after a customer completes a purchase. On the other hand, shipping confirmations trigger when the shop fulfills orders and adds tracking information.
TABLE OF CONTENTS
TABLE OF CONTENTS

No fluff, no spam, no corporate filler. Just a friendly letter, twice a month.