
 OFFER
OFFER


WooCommerce SMS marketing guide for 2026
With over 130+ pre-built integrations and flexible APIs, you can easily centralize data from across your tech stack
Make the most out of your data and unlock powerful growth marketing possibilities with these other top marketing tools.
Build any custom integration with our open, flexible APIs that are simple to use and implement.
Check out apps that have been stealing all the spotlight.
Email and SMS marketing insights, ecommerce resources, and the latest Omnisend news
Expert-led sessions covering email, SMS, and ecommerce marketing strategies.
Educational video and live training to help you make the most out of Omnisend.
Drive sales on autopilot with ecommerce-focused features
See FeaturesCustomizing WooCommerce emails is crucial for engaging customers at their most receptive moments, as these transactional emails have open rates exceeding 62%.
Many store owners miss out on significant revenue opportunities by using generic email templates, which fail to reinforce brand identity and personalization.
Implementing simple customizations, such as using dynamic content and personalized placeholders, can significantly enhance customer engagement and drive repeat purchases.
Utilizing platforms like Omnisend allows for comprehensive email customization and marketing automation, combining design tools with automated workflows for optimal results.
Learning how to customize WooCommerce emails gives you direct access to your most engaged customers.
However, here’s the challenge most store owners face: they don’t know how to create visually appealing emails or write the code needed to customize them. Without design skills or technical knowledge, their emails remain generic and unprofessional, failing to capture attention or drive sales.
Every order confirmation, shipping notification, and completed purchase email reaches people who just bought from you. These transactional emails enjoy far higher open rates than standard marketing emails.
But since most stores send the same generic, default templates, they miss prime opportunities to engage with their customers and reinforce their brand.
This guide shows you six practical methods to edit WooCommerce emails and turn them into a consistent revenue driver. You can start with simple changes using built-in settings or take full control with WooCommerce email plugins and custom code.
Each customization method for WooCommerce emails works for different skill levels, so you’ll find an approach that fits your technical comfort and business needs.
Quick sign up | No credit card required
Your transactional emails reach customers at the exact moment they’re most engaged with your store. Someone who just placed an order will open that confirmation email within minutes. Unsurprisingly, these emails boast an impressive open rate of over 62%, according to Omnisend’s report.

Many WooCommerce stores send these high-performing messages with zero customization, which means they’re ignoring one of their best chances to edit WooCommerce email templates for better results. Here’s what Omnisend’s 2025 Ecommerce Report reveals about email performance:
These numbers translate into six concrete benefits for your WooCommerce store:
Build brand recognition and trust
Your customers see dozens of brands every day, but they remember the ones that look consistent. When you customize WooCommerce email templates to match your website’s colors and logo, it creates familiarity.
Professional, branded emails also reduce support tickets from customers wondering whether your messages are legitimate. Taking time to customize emails ensures every touchpoint reinforces your brand identity.
Increase engagement and conversions
People respond to messages that feel personal. Litmus’ 2024 email report shows that for 80% of marketers, customers respond better to email with some personalization elements.
You can customize WooCommerce email templates to be more personalized through subject line personalization and using dynamic content.
Drive more revenue with automated emails
According to the Omnisend report, automated emails account for just two percent of total email volume but generate 37% of all email-driven sales. Transactional messages hit inboxes when customers are most engaged, achieving that 62% open rate.
When you edit WooCommerce email templates to include product recommendations or loyalty incentives, you turn routine notifications into revenue generators.
Stand out from competitors
Customers can receive hundreds of emails daily. What differentiates you is how you address them — and customization gives you that edge. When you send custom WooCommerce emails with your unique branding and personalized messages, you create recognition in crowded inboxes.
While competitors send plain text on white backgrounds, you deliver a polished experience by customizing emails.
Encourage repeat purchases
When you customize WooCommerce email templates, you get the chance to include cross-sell recommendations and exclusive offers for returning customers. This turns one-time buyers into repeat customers.
For instance, Creality generated €560k in revenue through customized automated emails that guided customers back to its store.
These numbers matter because stores that use WooCommerce custom emails see better results. You just need to stop sending generic emails and start using the methods in this guide.
You have multiple options to style WooCommerce emails, each suited to different technical abilities and business needs.
Your choice should depend on how much control you want and how comfortable you’re with technical tools. Most store owners find success by combining methods — starting simple and adding complexity as needed.
Whether you want to edit WooCommerce emails through visual builders or edit WooCommerce email templates with code, you’ll find an approach that works.
Here are six proven methods to customize WooCommerce email templates:
Each method offers different trade-offs between ease of use, time investment, and customization depth. The comparison table below shows what to expect from each approach when you edit WooCommerce emails:
| Method | Technical skills needed | Customization range | Ideal user |
|---|---|---|---|
| Use email customizer plugins | None | Wide design options | Store owners wanting professional designs |
| Use the built-in editor | Basic WordPress knowledge | Limited to text/colors | Anyone needing quick branding |
| Add custom placeholders | Basic understanding of variables | Moderate personalization | Stores wanting personalized messages |
| Add product purchase notes | Basic product management | Product-specific only | Stores with special product instructions |
| Edit code and hooks | PHP and WordPress development | Complete control | Technical teams needing unique functionality |
| Use WooCommerce hooks | WordPress development | Let insert own code into template | For developers who want deeper customization without editing templates directly |
The sections below walk you through each method with specific steps and examples you can use to customize emails.
This section covers the different methods to customize WooCommerce emails. Each method includes detailed steps you can implement right away.
These tools remove technical barriers that stop most store owners from customizing WooCommerce emails. Where you’d typically need to understand HTML structure and CSS styling, plugins give you buttons, dropdowns, and sliders instead.
You focus on what your emails should say and how they should look, while the plugin handles the code behind the scenes.
Before choosing a plugin, verify that it creates emails that work for all your customers. Some plugins generate clean code that screen readers can interpret correctly, while others create visual designs that look fine but confuse assistive devices.
Check whether the plugin includes fields for image descriptions and shows you how emails appear when someone uses dark mode on their phone or computer.
Here’s a quick comparison of popular WooCommerce plugins to customize emails:
| Tool name | Visual builder | Template count | Marketing features | Ideal customer |
|---|---|---|---|---|
| Omnisend | ✅ | 250+ templates | ✅ | Stores combining email, SMS, and automation |
| Email Customizer for WooCommerce | ✅ | Basic selection | ❌ | Quick setup with straightforward branding |
| Kadence Email Designer | ✅ | Unspecified | ❌ | Stores looking for advanced design on a tight budget |
| FunnelKit Automations | ✅ | 23+ templates | ✅ | Stores running complex customer journeys |
| YITH Email Templates | ✅ | 4 templates | ❌ | Users who value design quality and reliable help |
| WebToffee (formerly Decorator Email Customizer) | ✅ | Undisclosed but limited | ❌ | Basic customization without added cost |
Getting started with email customizer plugins
Download and activate the WooCommerce email plugin through your WordPress admin panel.
Most plugins either create their own menu item in your sidebar or add options to your existing WooCommerce email settings. Once installed, open the plugin’s main screen and pick which email you want to work on first.
You’ll then see a WooCommerce email template customizer displaying your current email template, along with a toolbar of design elements you can add or adjust.
You can also preview how your email will look on desktop, tablet, and mobile devices using the built-in toggle.
Caution: If you’ve customized WooCommerce email templates via PHP in your theme, installing or updating an email customizer plugin may overwrite those changes. Always back up your custom templates before making changes.
Best practices for plugin-based customization
Quick accessibility checklist
✓ Write specific descriptions for all images, especially your logo
✓ Verify text colors create enough contrast against backgrounds
✓ Confirm emails still communicate when images don’t load
✓ Check your plugin uses proper HTML structure
✓ Test that dynamic content populates correctly with real customer data
You can customize WooCommerce emails directly from your dashboard. To access the built-in editor:
This lets you quickly adjust sender details, subject lines, and basic content—no plugin required.
To access this, log into WordPress and navigate to WooCommerce > Settings, then click the Emails tab.

You’ll see all 11 email types — click Manage next to any email you want to customize.

The editing screen shows fields for Subject, Email heading, and Additional content. Type directly into these fields to change what customers see:
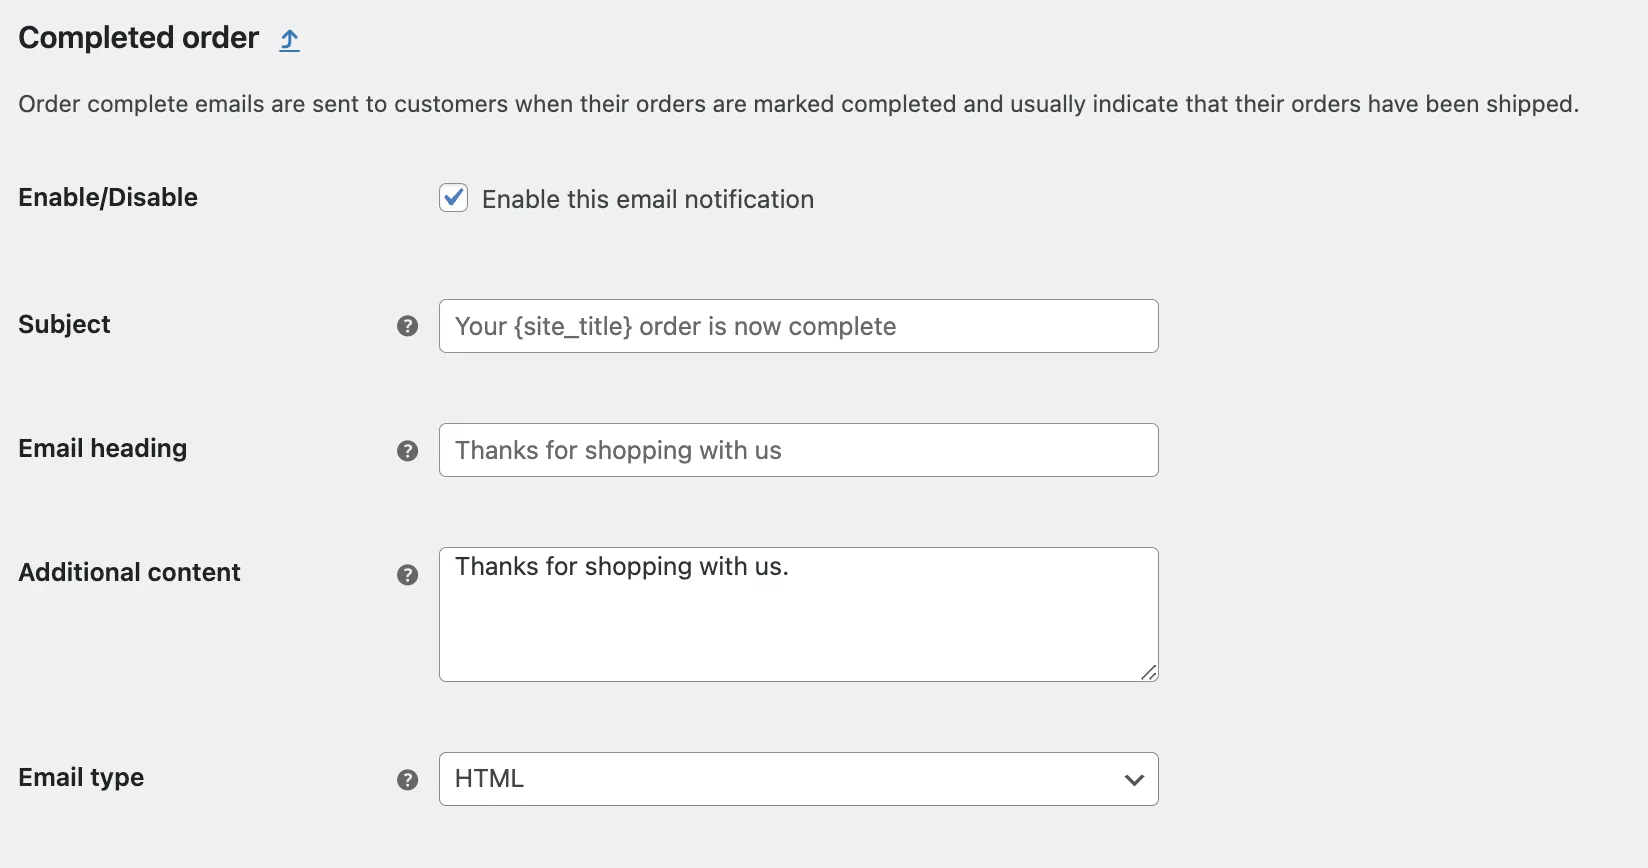
WooCommerce supports placeholders like {customer_first_name} and {order_number} that automatically fill with the right information for each customer.
The preview pane on the right updates as you type, showing how your email will look. This helps you catch formatting issues before saving.

To adjust color and branding, return to the main Emails tab and scroll to the Email template section:

Upload your logo as a header image and change the base color, background color, body text color, and footer text color using the color pickers. These settings apply to all your transactional emails immediately.
What this method offers
You can change any text that appears in emails, including subject lines, headings, and body content, when you customize WooCommerce emails through this method. All edits happen through simple form fields, so you don’t need to touch any code.
Here are some limitations, too:
WooCommerce’s default colors don’t always work when email clients switch to dark mode. Light-colored logos can vanish against inverted backgrounds. Be sure to test your emails in Gmail and Apple Mail with dark mode turned on.
Best practices for built-in customization:
Adding custom placeholders when customizing WooCommerce emails allows you to insert dynamic information that updates for each customer. Instead of sending generic “Dear Customer” emails, greet buyers by name, include their order details, or mention products they’ve purchased.
WooCommerce includes built-in placeholders, but you can create custom ones for even more personalization when you customize emails. Here’s an example of these placeholders:

WooCommerce provides dozens of merge tags that pull data from orders and customer accounts.
For instance, type {customer_first_name} in any email field, and it becomes “Sarah” or “Michael” when sent. Use {order_number} to show the specific order ID, like #12345.
Other useful placeholders include:
You can combine these in sentences like “Hi {customer_first_name}, your order {order_number} totaling {order_total} will ship to {shipping_address}.”
To add placeholder content, navigate to WooCommerce > Settings > Emails and click Manage on any email type. The Subject, Email heading, and Additional content fields all accept placeholders. Type the placeholder exactly as shown, including the curly braces.
For example, in your order confirmation subject line, change “Your order has been received” to “Thanks, {customer_first_name}! Order {order_number} confirmed.”
Creating advanced custom content
Go beyond names and order numbers by adding conditional content based on what a customer purchased. While the basic editor doesn’t support this level of personalization when you customize WooCommerce emails, you can achieve it by adding custom code to your theme’s functions.php file.
For instance, you could create a {product_care_instructions} placeholder that displays unique text depending on whether someone ordered clothing, electronics, or furniture. This requires some PHP knowledge but gives you powerful personalization options.
Best practices for personalization:
Testing your placeholders
Place a test order in your store to see how placeholders populate in real emails. Check that customer names, order numbers, and dynamic content appear as intended and make sense within the message.
If something looks off, double-check that each placeholder is spelled correctly and includes the proper braces.
Purchase notes let you attach custom messages to individual products that appear automatically in the order confirmation emails WooCommerce sends to your customers.
This feature works perfectly for sharing setup instructions, care tips, warranty information, or special thank-you messages tailored specifically to what someone bought.
To add purchase notes, navigate to Products > All products in your WordPress dashboard. Find the product you want to add a note to and click Edit. Scroll down to the Product data section and click the Advanced tab on the left side.
Look for the Purchase Note field near the bottom of this section. Type your message directly into this box. Keep it concise and focused on the information the customer needs right after buying.
Click Update to save your changes. Now every time someone orders this product, your note appears in their order confirmation email below the product details.
Best practices for using product-specific purchase notes
Editing WooCommerce email templates with code gives you complete control over email design and functionality. This method requires PHP and HTML knowledge, but it lets you edit emails in a way that plugins can’t match.
Developers who know how to edit WooCommerce email templates can build unique experiences tailored to their brand.
WooCommerce stores its email templates in the plugin directory at wp-content/plugins/woocommerce/templates/emails/. Never edit these files directly in this location because updates will overwrite your changes.
Instead, copy the templates you want to modify into your theme’s directory. Create a woocommerce/emails/ folder inside your active theme folder. Then copy template files from the plugin directory into this theme folder.
Understanding template structure
Each email uses multiple template files working together:
Let’s say you want to change link colors throughout all emails. Copy email-styles.php from wp-content/plugins/woocommerce/templates/emails/ to wp-content/themes/your-theme/woocommerce/emails/
Open it in a code editor and find the line defining link colors, like $link = ‘#96588a’. Then change the hex code to match your brand and save.
Using a child theme
Always use a child theme when editing template files directly. As mentioned, updates to your main theme’s files will delete your work. Child themes inherit everything from the parent theme but keep your customizations safe.
Create a child theme folder in wp-content/themes/, add a style.css file declaring the parent theme, and then create your woocommerce/emails/ structure inside.
Advanced customization options
Add custom HTML sections by editing specific template files. Say you want a promotional banner in order confirmations. You can edit customer-processing-order.php and insert your HTML.
Or let’s say you need to change the order details table. Modify email-order-details.php to restructure how product information displays.
Accessibility when coding custom templates
When editing templates directly, you control the HTML structure — use this power responsibly:
Here is a good semantic structure,
<h1>Order Confirmation</h1>
<p>Thank you for your order.</p>
A bad one where there are divs as headings looks something like,
<div style=”font-size:24px;font-weight:bold;”>Order Confirmation</div>
Screen readers rely on proper HTML tags to navigate emails. Use <h1>, <h2>, <p>, <ul> tags rather than styled <div> elements.
Testing your modifications
Test template changes on a staging site before going live. Create test orders and check how emails render in Gmail, Outlook, Apple Mail, and mobile apps. Send tests to yourself and view them on different devices to catch mobile-specific issues.
Check contrast ratios: Use WebAIM’s Contrast Checker (webaim.org/resources/contrastchecker) to verify your text and background colors meet accessibility standards.
WooCommerce hooks let you add custom functionality to emails without editing core template files directly.
Hooks provide insertion points where you can inject your own code to customize emails as needed. This approach keeps customizations separate from WooCommerce files, making your changes update-proof and easier to maintain.
WooCommerce offers two hook types for emails:
Common email action hooks:
Why this matters: According to the WHO, 2.2 billion people have vision impairment. So, writing accessible emails is a good practice as customers who use screen readers.
Adding content with action hooks
Open your theme’s functions.php file (use a child theme to protect your changes). Add this code to insert a message after the order table:
add_action( ‘woocommerce_email_after_order_table’, ‘add_custom_order_message’, 10, 4 );
function add_custom_order_message( $order, $sent_to_admin, $plain_text, $email ) {
if ( ! $sent_to_admin ) {
echo ‘<p>Thanks for your order! We appreciate your business.</p>’;
}
}
The conditional check ensures the message only appears in customer emails, not admin notifications.
Using filter hooks to modify content
Filter hooks let you change existing email elements. For example, the woocommerce_email_subject_{email_id} filter modifies subject lines.
Here’s how to add the customer’s name to completed order subjects:
add_filter( ‘woocommerce_email_subject_customer_completed_order’, ‘custom_completed_order_subject’, 10, 2 );
function custom_completed_order_subject( $subject, $order ) {
$subject = sprintf( ‘Your order is complete, %s!’, $order->get_billing_first_name() );
return $subject;
}
Here’s how to change email footers using filters:
add_filter( ‘woocommerce_email_footer_text’, ‘custom_email_footer’ );
function custom_email_footer( $footer ) {
$footer = ‘Thanks for shopping with us! Questions? Contact [email protected]’;
return $footer;
}
Add alt text to the email header logo
Many themes don’t include alt text for the email header logo. Add it with this hook:
add_filter( ‘woocommerce_email_header_image_alt’, ‘custom_email_logo_alt_text’ );
function custom_email_logo_alt_text( $alt_text ) {
return ‘YourStoreName logo’; // Descriptive alt text for accessibility
}
Screen readers will now announce “YourStoreName logo” instead of generic “logo” or nothing at all.
Maintain proper heading hierarchy
When adding content through hooks, use proper HTML structure. If you insert text after an h2 heading, use h3 for your subheading:
add_action( ‘woocommerce_email_after_order_table’, ‘add_tips’ );
function add_tips() {
echo ‘<h3>Product care tips</h3>’;
echo ‘<p>Your items need special handling.</p>’;
}
The alt attribute ensures screen readers can describe the image to visually impaired customers.
Testing hooks
Add your hook code to functions.php and place a test order. Check that your content appears in the right location and displays correctly. Remove the code if something breaks and troubleshoot before trying again.
Use conditional logic to control when hooks fire. You might want certain content only for orders over a specific amount or only for particular product categories.
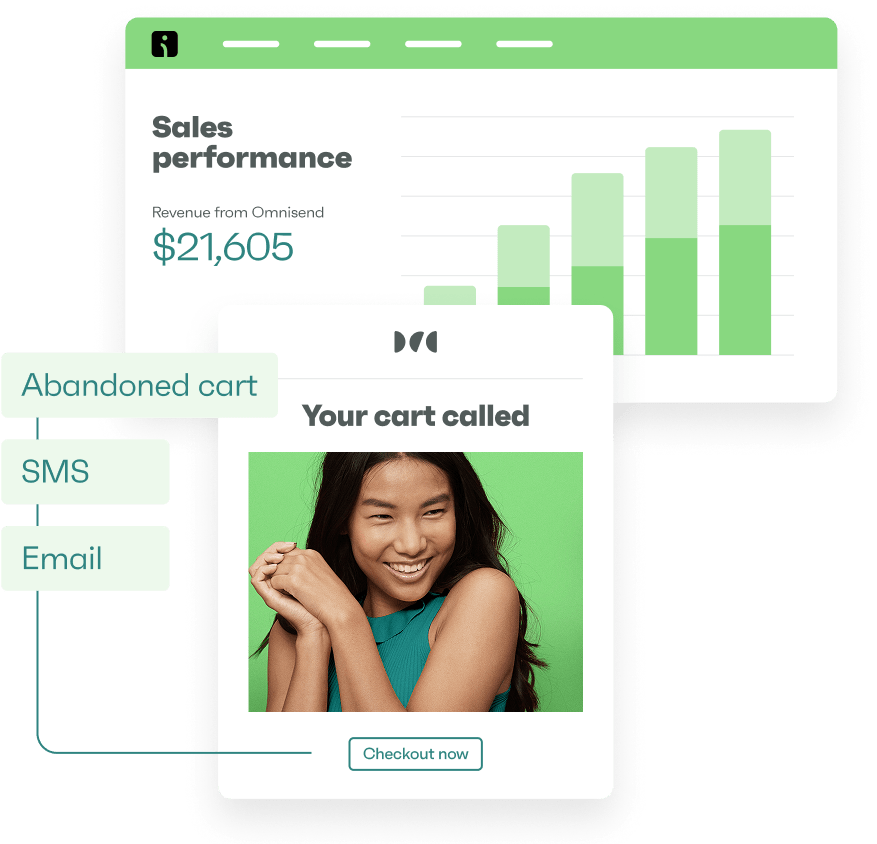
Omnisend combines email customization and marketing automation in a single platform designed specifically for ecommerce stores.
Expert-approved and loved by growing businesses, it combines email customization with marketing automation — handling design, workflows, SMS, and web push in one place. Omnisend does the heavy lifting so you can focus on your business, not the tech.
Installing the Omnisend plugin
Log in to your WordPress dashboard and go to Plugins > Add New Plugin. Search for “Omnisend” in the plugin directory. Look for “Email Marketing for WooCommerce by Omnisend” and click Install Now, then Activate:

After activation, click Connect your store to Omnisend:

If you don’t have an Omnisend account yet, create one during this process as the free plan requires no credit card. The plugin automatically syncs your WooCommerce data.
Creating your first customized email
Open your Omnisend dashboard and go to Campaigns > Create Campaign:

Select Email as your campaign type. Fill in the subject line, sender name, and preheader text. Omnisend includes an AI subject line generator that suggests optimized options. Click the AI icon next to the subject field to try it. Here’s a demonstration:

You can style WooCommerce emails quickly by choosing a template from the library or starting with a blank canvas. Omnisend provides over 250 pre-designed templates organized by goal.
Customizing your email design
The drag-and-drop editor displays your email on the left with design controls on the right. Click any element to modify it.
Change text by clicking and typing. Adjust colors using the color picker. Upload your logo by clicking the image placeholder. Here’s what the editor looks like:

Add new elements by dragging them from the left sidebar — buttons, images, product recommendations, discount codes, social media icons, and dividers. Rearrange elements by dragging them up or down.
Omnisend automatically pulls product images and prices from your WooCommerce store. Add a product block and select which items to feature. Price changes on your site update in email templates automatically.
Setting up automation workflows
Navigate to Automation and click Create Workflow. Omnisend offers pre-built templates for abandoned cart recovery, welcome series, order follow-ups, browse abandonment, and customer win-back campaigns.
Select the abandoned cart workflow as your first automation. The template includes three emails sent at strategic intervals after someone leaves items in their cart. Customize the timing, content, and discount offers within each message.
The workflow builder uses a visual interface where you connect trigger points, conditions, and actions. Your automation can branch based on customer behavior — for instance, sending a different follow-up to those who opened but didn’t click, versus those who didn’t open at all.
Audience segmentation
Omnisend is great for creating segments for high-value customers, repeat buyers, at-risk customers, or people who bought specific product categories.
When sending a campaign, select your target segment instead of your entire list. This is a solid approach considering segmented campaigns consistently outperform broadcast messages.
| Success story: Creality Creality, a 3D printing company, noticed customers frequently abandoned carts on its WooCommerce store. It implemented Omnisend’s automated abandoned cart emails with personalized recommendations and strategic discounts. In under one year, that single automation generated over €560,000 in recovered sales. Its emails achieved 54% open rates and 8.25% click rates. Creality also grew overall European sales by 18% and increased repurchase rates by 54%. Read the full case study here |
Platform benefits
For more guidance on designing standout WooCommerce custom emails, here’s Omnisend’s step-by-step video tutorial:
Your choice on how to customize WooCommerce emails depends on your technical skills, budget, how much design control you need, how much time you can invest, and whether you want marketing automation.
Think about scalability and things you’ll need in the future as well:
Combining multiple methods
You don’t have to pick just one approach to customize emails. Many successful stores layer methods together.
For instance, you can use a plugin for visual design and layout, then add custom hooks to handle features the plugin doesn’t support. Or start with built-in WooCommerce settings to quickly brand your emails, then upgrade to a plugin as your store grows.
You might use Omnisend for marketing automation while keeping WooCommerce’s native settings for basic order notifications. This combination focuses automation on revenue-driving campaigns while keeping transactional emails simple.
Choosing the customization option for your store
If you’re just starting or running on a tight budget, begin with free options — either WooCommerce’s built-in editor or a free plugin to create WooCommerce custom emails. Stores ready to invest in customer relationships will benefit most from platforms that combine automation and customization, such as Omnisend.
Technical ability matters too. If you’re comfortable with code, you have more options. If not, stick with visual builders that don’t require programming knowledge when you customize emails.
Think about maintenance as well. Code customizations need updates when WooCommerce releases new versions. Plugins handle updates automatically but require ongoing subscriptions.
Now let’s look at the specific plugins and tools available in each category to customize WooCommerce emails.
WooCommerce automatically sends 11 different transactional email types based on order status and customer actions. Each email serves a specific purpose in your customer communication flow.
You can style transactional emails in WooCommerce using the methods covered in this guide. Here are the email types:
Here’s what it looks like on WooCommerce:

Start your customization efforts with the highest-impact emails first. Order confirmation emails, completed orders, and shipping notifications reach every customer who buys from you.
These three email types generate the most opens and clicks, which makes them your best opportunity to build brand recognition and encourage repeat purchases.
Tools like Omnisend handle both transactional and marketing emails in one platform, so you can edit WooCommerce email templates and set up automated marketing campaigns in one place.
Here are six popular WooCommerce plugins to customize emails and how they compare:
| Tool name | Price | Drag-drop builder | Automation | Support quality |
|---|---|---|---|---|
| Omnisend | Free, $16+/month | Yes | Full suite | 24/7 for all plans |
| Email Customizer for WooCommerce | Free, $39+/year | Yes | No | Email support |
| Kadence Email Designer | Free, $69+/year | Via customizer | No | Community forums |
| FunnelKit Automations | $99.50+/year | Yes | Advanced | Priority support |
| YITH Email Templates | $89/year | No | No | Ticket system |
| WebToffee (formerly Decorator Email Customizer) | $39/year | Via customizer | No | Forums |

Omnisend combines email customization with marketing automation in a platform designed for ecommerce growth. Unlike plugins that only handle design, Omnisend gives you visual email builders, automated workflows, SMS campaigns, and web push notifications to customize WooCommerce emails.
Key features
Pricing
Omnisend’s paid plans come with a 30% discount when you pay upfront for three months.
Best for
Stores looking to combine professional email design with revenue-driving automation
Limitations

This plugin offers a drag-and-drop builder designed specifically for WooCommerce transactional emails. You get visual customization without needing any code knowledge. The compatibility with many third-party WooCommerce extensions allow you to customize emails.
Key features
Pricing
Free version available with basic features. The premium version starts from $39/year/site.
Best for
Store owners who want straightforward email branding without learning complex tools.
Limitations

Kadence offers a completely free plugin that allows you to customize WooCommerce emails through WordPress’s native customizer interface. You can edit colors, fonts, layouts, and content with instant live previews.
Key features
Pricing
Best for
Limitations

FunnelKit combines email marketing with CRM functionality and advanced automation workflows. It’s built specifically for WooCommerce, with deep integration into your store’s customer data and purchase history.
Key features
Pricing
Best for
WooCommerce stores and agencies wanting comprehensive marketing automation with native WooCommerce integration
Limitations

YITH lets you customize WooCommerce email templates and assign them to different occasions or time periods. You can switch templates based on calendar dates, making it useful for seasonal promotions.
Key features
Pricing
Best for
Limitations

WebToffee provides ready-made email templates you can customize through WordPress’s customizer interface. It focuses on simplicity and ease of use for basic customization needs.
Key features
Pricing
Best for
Limitations
Previewing and testing your WooCommerce emails before they reach customers helps you catch embarrassing mistakes that may damage your brand reputation.
A misspelled product name, broken link, or formatting error in a live email can quickly hurt sales and trust. Taking a few minutes to test your work after you customize emails ensures everything looks and functions as intended.
But before you start testing, consider setting up a staging environment. That way, test emails don’t interfere with your live store operations.
The WooCommerce Email Test plugin lets you send sample emails without creating real orders or changing order statuses. This makes it the fastest and safest way to preview your work when you customize emails.
Step 1: Install the plugin from your WordPress dashboard by going to Plugins > Add New and searching for “WooCommerce Email Test.” Make a choice, click Install Now, then Activate.

Step 2: Navigate to WooCommerce > Preview Emails.

Step 3: Select the variables for the email you want to test.
Step 4: Enter your email address into the “Mail to” box.

Step 5: Check your inbox and review how the email looks. Also, open it on your phone to verify mobile formatting. Here’s a preview sample:

This method works well for quick checks, but the test data uses generic placeholders rather than actual store information.
Creating actual test orders generates emails with real product data, giving you the most accurate preview of what customers will receive when you customize transactional emails.
Step 1: Enable test mode in your payment gateway settings. For Stripe, go to WooCommerce > Settings > Payments > Stripe and check “Enable Test Mode.” Just like this:

Step 2: Use Stripe’s test card number: 4242 4242 4242 4242. You can use any future expiration date and any three-digit CVC code, as shown below:

Step 3: Visit your store’s front end as a customer. Add products to your cart and proceed to checkout.
Step 4: Fill out the form with a test email address you can access. Use the Stripe test card for payment.
Step 5: After you complete the purchase, WooCommerce sends real order confirmation, processing, and shipping emails to the test address:

Step 6: Check the inbox and review all emails that were triggered.
You can manually trigger specific emails by creating sample orders and changing their status. It’s a fast, hands-on way to test how each message looks and functions after you customize emails.
Step 1: Go to WooCommerce > Orders and click Add Order.
Step 2: Create a manual order with test customer information and products from your catalog. Save it with the “Pending payment” status.
Step 3: Change the order status to “Processing” using the dropdown in the Order actions box. Click Update, and WooCommerce sends a processing email.
Step 4: Change the status again to “Completed” and update. This triggers the WooCommerce completed order email.
Step 5: Continue changing the status to test different types.
This method lets you test all email types quickly without running multiple test transactions. You control exactly which emails fire and when. That said, here’s a checklist of what to assess in your test emails when you customize emails:
✓ Logo displays correctly without distortion or broken image icons
✓ Colors match your brand
✓ All links work and direct to the correct pages
✓ Emails render properly on mobile devices
✓ Personalization placeholders populate with data instead of showing code snippets
✓ No broken images or missing product photos
✓ Subject line displays completely without getting cut off
✓ Footer includes required business information and unsubscribe links
Importantly, send test emails to your actual phone and tablet to see how they look. Email apps render messages differently from web browsers. What looks perfect on a desktop might have spacing issues on mobile.
Your emails need to work in Gmail, Outlook, Apple Mail, and other clients. Each interprets HTML differently. Thankfully, Omnisend includes dynamic preview tools that show how your emails render in over 40 email clients instantly, saving hours of manual testing.
Regardless, test thoroughly before sending to your full customer list. Finding issues during testing costs nothing, but discovering them after customers receive broken emails can cost you credibility and sales.
Expert insight
Customization is only half the battle. The stores that see the biggest ROI measure performance consistently. Before launching customized emails, record baseline metrics, such as open rates, click-through rates, and revenue per email. Track these weekly for the first month after customization. You can expect 15-25% higher open rates and 20-30% higher click-through rates within 2-3 weeks, and these gains are seen if you use A/B testing to refine subject lines, CTA placement, and personalization strategies. Tools like Omnisend make this easy with analytics dashboards that automatically calculate revenue attribution and campaign performance. Stores that continuously test and refine their emails based on data perform best over time.
Even the most beautifully designed WooCommerce email is useless if it lands in the Spam folder. For ecommerce store owners, technical authentication is no longer optional — it is the digital passport that allows your messages to bypass strict filters from providers like Gmail and Apple Mail.
Think of these protocols as your brand’s ID. Setting them up ensures your customers see the receipts, shipping updates, and offers they requested.
Your authentication checklist:
A note on SMTP & reliability on WooCommerce
Default WooCommerce emails sent via your web host (PHP mail) often fail to reach the inbox. Omnisend replaces this with a professional SMTP delivery infrastructure designed for high-volume email delivery. Additionally, Omnisend’s setup provides a safety net: if your custom domain settings aren’t yet perfect, our system acts as a fallback, ensuring your emails are still delivered securely.
Read the step-by-step guide to setting up SPF, DKIM, and DMARC, or explore our complete guide to email deliverability.
Email compliance, aside from being a legal requirement, also helps you build customer trust. Whether you’re sending order confirmations or marketing campaigns, understanding what’s allowed under regulations like CAN-SPAM, GDPR, and CCPA keeps your store protected and your clients happy.
Each regulation treats promotional content differently, especially when it appears in transactional emails:
The gist of it — keep transactional emails clear, useful, and focused on the customer’s action. When in doubt, save your promotions for your marketing campaigns.
A note on “implied” consent
This needs to be highlighted — just because a customer has bought from you doesn’t always mean they want to receive your marketing emails. Under GDPR and other strict privacy laws, a purchase often only grants permission for transactional updates, not marketing. When in doubt, treat checkout contacts as “non-subscribed” until they explicitly opt in.
So, this was your complete guide on how to customize emails. WooCommerce gives you multiple ways to customize transactional emails, from quick changes using built-in settings to complete design control through custom code.
While basic branding helps your emails look professional, real ecommerce growth comes from combining customization with marketing automation.
Automated workflows can recover abandoned carts, welcome new customers, and re-engage past buyers — turning one-time shoppers into loyal, repeat customers.
Start today to customize WooCommerce emails with Omnisend’s free plan and transform your email engagement into consistent, measurable revenue growth.
WooCommerce sends emails automatically when specific events occur in your store. For example, when a customer places an order, the system triggers an order confirmation email. When you mark an order as completed, it sends a completion notification.
You can preview WooCommerce emails in three ways:
Email delivery issues usually stem from incorrect SMTP settings or spam filters blocking your messages. Check that your WordPress site can send emails by installing the WP Mail SMTP plugin and configuring it with your email provider’s credentials.
Verify your sender email uses your domain name rather than a generic address. Check customer spam folders and test emails to multiple addresses to identify patterns.
WooCommerce supports placeholders like {customer_first_name}, {order_number}, and {order_date} that automatically populate with customer data when you customize WooCommerce emails. Add these to your email subject lines, headings, and body text.
Yes, go to WooCommerce > Settings > Emails and scroll to the Email template section. Click the “Header image” upload button and select your logo file. WooCommerce displays this image at the top of all transactional emails.
Transactional emails are messages triggered by customer actions or order status changes. They include:
TABLE OF CONTENTS
TABLE OF CONTENTS
What’s next


No fluff, no spam, no corporate filler. Just a friendly letter, twice a month.