
 OFFER
OFFER


7 best WordPress email subscription plugins to grow your list in 2025
With over 130+ pre-built integrations and flexible APIs, you can easily centralize data from across your tech stack
Make the most out of your data and unlock powerful growth marketing possibilities with these other top marketing tools.
Build any custom integration with our open, flexible APIs that are simple to use and implement.
Check out apps that have been stealing all the spotlight.
Email and SMS marketing insights, ecommerce resources, and the latest Omnisend news
Expert-led sessions covering email, SMS, and ecommerce marketing strategies.
Educational video and live training to help you make the most out of Omnisend.
Turn first-time visitors into lifelong subscribers. Reach &
engage them. All automatically, without the stress.
Drive sales on autopilot with ecommerce-focused features
See FeaturesRelying on WordPress's default email function can lead to unreliable delivery, often resulting in emails ending up in spam or not being delivered at all due to lack of proper authentication.
Implementing an SMTP plugin or dedicated email service can significantly enhance email deliverability by routing messages through trusted servers and ensuring proper authentication.
To improve email performance, it's crucial to set up SPF, DKIM, and DMARC records, which help verify your domain and prevent emails from being marked as spam.
For effective marketing, consider using platforms like Omnisend that integrate with WordPress, offering features like automation, segmentation, and analytics to drive sales.
WordPress’s send email functionality can be unreliable if you rely on the default setup. Many site owners run into issues with emails landing in spam or not being delivered at all.
This happens because WordPress uses a basic mail function that lacks proper authentication. As a result, inbox providers can’t always verify whether your emails are trustworthy.
The solution is to set up a reliable sending method that ensures your emails reach the right audience. Whether you use SMTP, a plugin, or manual configuration, you can improve deliverability and avoid frustration.
In this guide, you’ll learn how to send emails from WordPress effectively, troubleshoot common issues, and explore better solutions that go beyond basic sending for real marketing results.
Quick sign up | No credit card required
WordPress sends all emails through wp_mail(), a function that tries to deliver messages using your server’s mail system. Under the hood, wp_mail() relies on the PHPMailer library bundled with WordPress. By default, PHPMailer calls PHP mail(), unless an SMTP plugin overrides it.
The issue is that most web hosts aren’t configured for reliable email delivery. PHP mail() sends messages without proper authentication, so inbox providers often treat them as suspicious. WordPress also defaults to plain text emails, so sending HTML messages requires code changes.
Different hosts handle email in different ways. Some limit the number of messages you can send. Others use IP addresses flagged for spam.
Many skip SPF and DKIM setup entirely. On shared servers, your emails compete with other sites, and WordPress doesn’t provide error messages or bounce notifications to help troubleshoot issues.
You can improve WordPress email delivery in several ways:
SMTP plugins don’t replace wp_mail(). Instead, they hook into PHPMailer and reroute messages through trusted mail servers, improving delivery without breaking WordPress functionality. These methods help ensure your emails reach their intended recipients reliably.
The wp_mail() function is the WordPress built-in method for sending emails. It uses PHP’s mail() function, which sends messages from your hosting server.
If you don’t feel confident editing code, an SMTP plugin is worth looking into as editing theme functions directly can break or get overwritten during updates.
Here’s how the process works:
The first step is to prepare the email using the wp_mail() function. This function lets you define the recipient, subject, message content, and optional parameters, such as headers or attachments.
Here’s a basic example:
wp_mail( $to, $subject, $message, $headers, $attachments );
At this stage, the function formats the email for sending, but doesn’t handle any authentication or advanced formatting.
Once the email is prepared, wp_mail() triggers the PHP mail() function. This is a lower-level command that interacts with your web server.
The PHP mail() function then forwards the email details to the server’s mail transfer agent (MTA), such as SendMail or Postfix, and instructs them to send the message.
Two things to keep in mind:
Because this process lacks error handling, issues like server misconfigurations or missing parameters can go unnoticed, leading to failed deliveries without clear warnings.
The final step relies on your hosting provider to deliver the email. Hosting servers route the email to its destination using the information provided by wp_mail().
Unfortunately, many web hosts don’t have proper authentication protocols in place, like SPF (Sender Policy Framework), DKIM (DomainKeys Identified Mail), or DMARC (Domain-based Message Authentication, Reporting and Conformance).
As a result, receiving mail servers often mark these emails as spam or reject them entirely.
This issue is more common in shared hosting environments, where multiple users share the same server and IP address. If one of the websites on the server sends spam, the shared IP address can get flagged or blocklisted, which will affect all users on the server.
The WP mail function has some other limitations. For example, it makes it difficult to create HTML templates, add images or attachments, and include email headers.
Plus, you can send only a select number of triggered emails with this function, including password resets, transactional messages, and form notifications.
If you’re wondering whether this feature is enabled on your WordPress website, there’s an easy way to check. First, install the Check & Log Email plugin on your site. Here’s an image showing where to find the plugin in the directory:

Then, go to Check & Log Email > Test Email and enter an email address for the test, as you can see below:
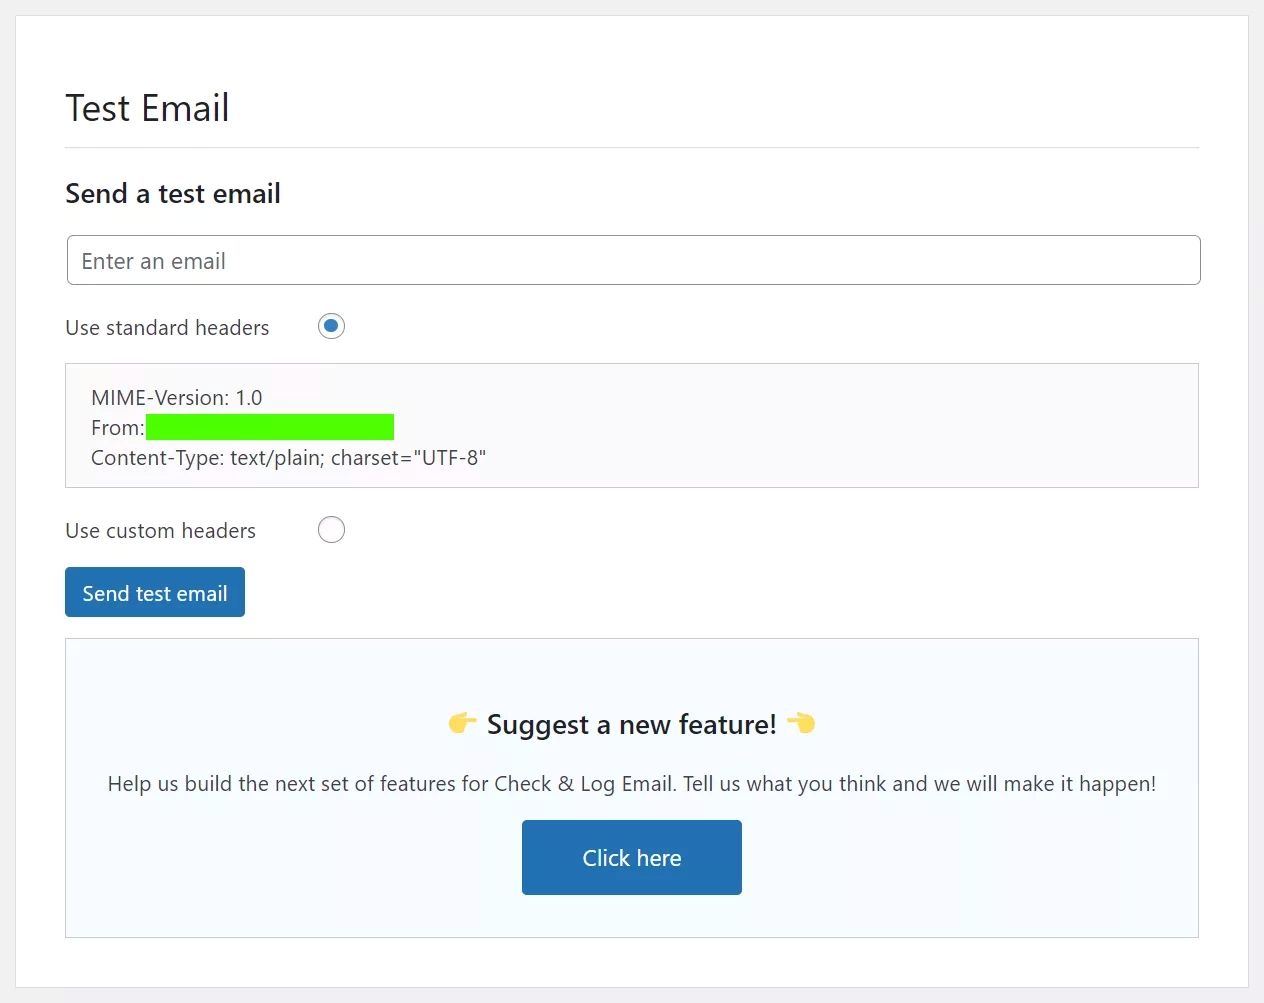
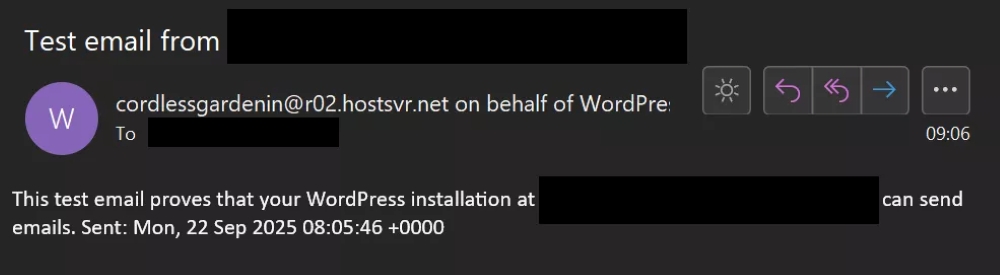
Click on Send test email. You’ll see this message at the top of your dashboard:

Now, one of three things will happen:
If you encounter the second or third scenario, you have other options for sending emails from WordPress to fix these issues. These include using a WordPress plugin or manually setting up an SMTP server using wp-config.php.
We’ll answer the question of how to send emails from WordPress websites in the next sections.
An SMTP plugin is the most reliable way to send emails on WordPress because it bypasses your host’s mail server and connects directly to email providers with proven delivery infrastructure.
As mentioned earlier, the default wp_mail function has limitations that may lead to your WordPress send email — when post-published — and additional messages getting stuck in the spam folder or failing to send at all.
Setting up an SMTP plugin on your WordPress site resolves most configuration issues. The plugin configures wp_mail() to use SMTP instead of PHP and routes the email through an email-sending service. This process improves your site’s reliability and email deliverability.
Let’s look at configuring the WordPress send email functionality over SMTP.
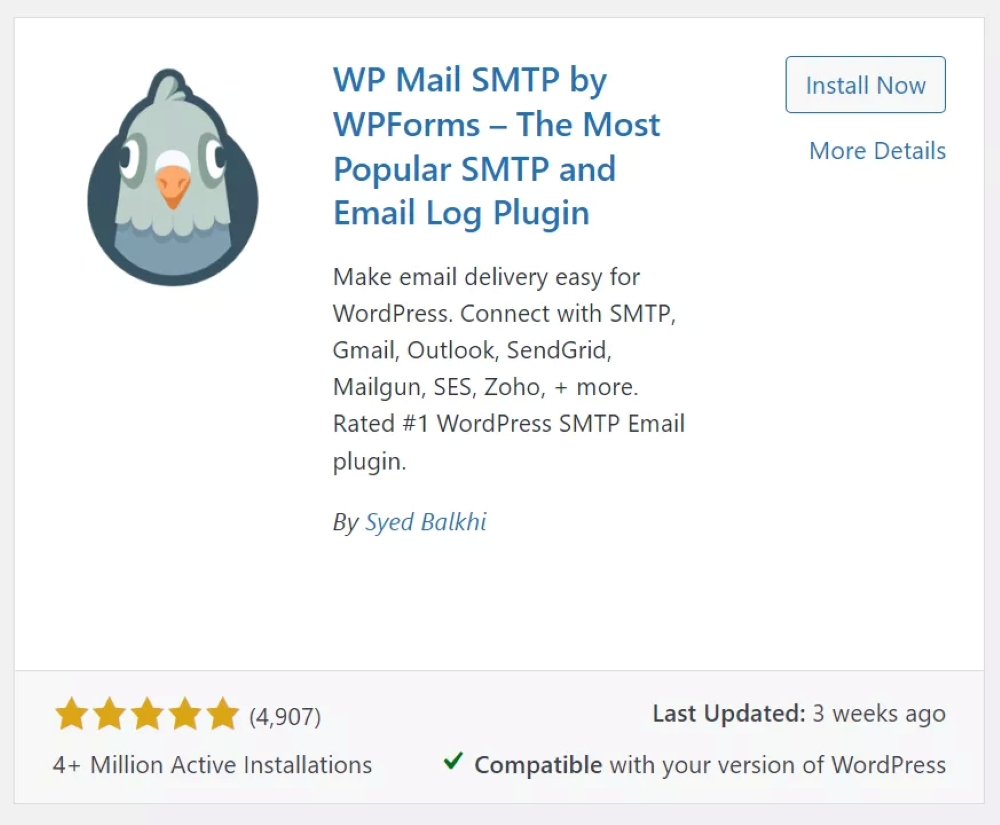
Go to Plugins > Add New Plugin and look for WP Mail SMTP by WPForms in your WordPress dashboard.
Then, click Install Now, followed by Activate. Here’s what the plugin will look like when you search for it:
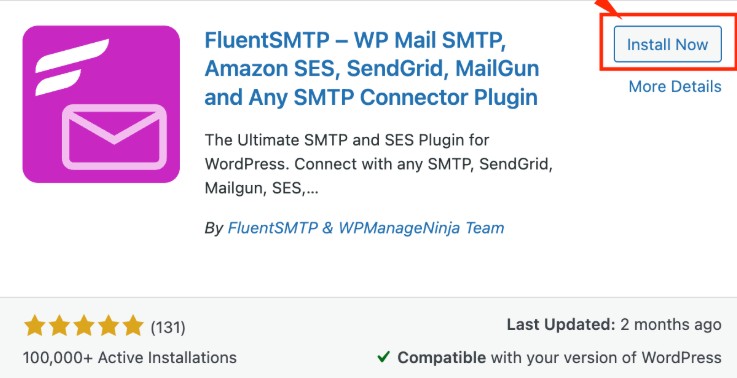
You can also use FluentSMT. Go to Plugins > Add New in your WordPress dashboard and search for FluentSMTP. Click Install Now, then Activate to set it up:
Now, go to WP Mail SMTP > Settings in your dashboard. In the From Email field, highlighted below, enter the email address from which you want to send your emails.
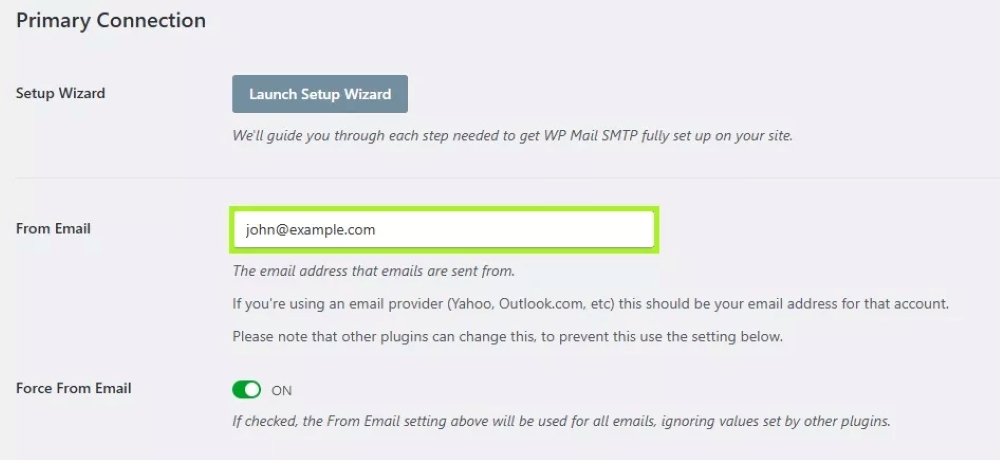
This email address must be created on your domain, as third-party email addresses won’t work.
Also, make sure to enable the toggle switch for Force From Email (as shown in the image above) to ensure that your From Email setting will be used for all your emails.
Next, go to the From Name field. This is set to the name of your website by default, but you can change it to anything you want, as shown:
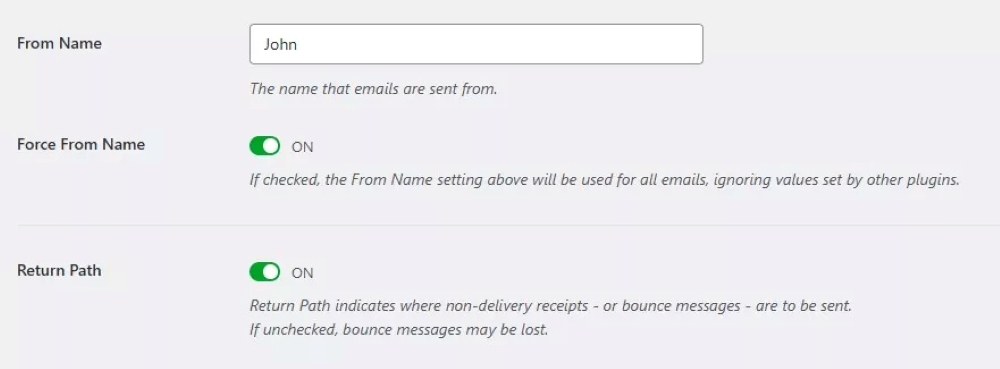
Here, you can also enable the Force From Name setting to apply this name sitewide.
By turning on the Return Path option, you can ensure that your return path matches your From Email. This way, you’ll be notified if any email bounces because of problems on your recipient’s end.
Finally, you’ll need to select a mailer. WP Mail SMTP supports multiple SMTP services, including Gmail, Outlook, SendGrid, and Mailgun.
You’ll need to select the Other SMTP option for this tutorial, as we’ll set it up manually. You can see it selected from the list below:
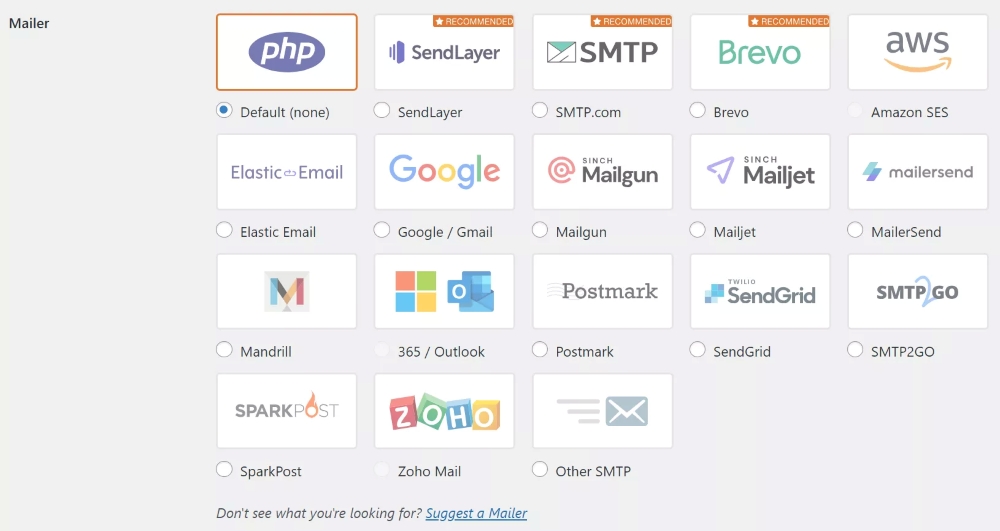
However, feel free to select a pre-configured service of your choice if you prefer it over the manual setup of this guide.
You’ll want to choose a service that’s designed for the type of messages you want to send, mainly transactional and bulk emails.
Transactional emails are one-to-one communications triggered by user actions or events on your site. Examples include order confirmations, password resets, and account verification emails.
On the other hand, bulk emails are typically used for marketing campaigns, newsletters, promotional offers, or announcements. They’re designed to engage a larger audience and may require compliance with email marketing regulations, such as the CAN-SPAM Act.
Gmail SMTP is ideal for smaller-scale transactional needs. It has a straightforward setup and integrates with Google’s ecosystem. Meanwhile, SMTP services like SendGrid, Mailgun, and Postmark are designed to handle large volumes of bulk emails for marketing purposes.
When you select the Other SMTP option, a section will appear with settings for you to configure, as shown below:
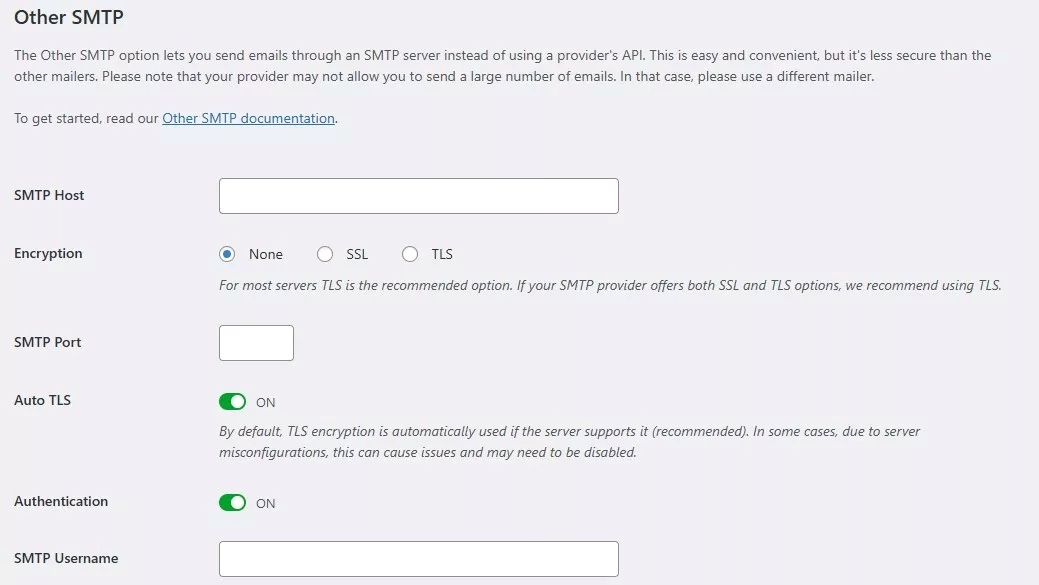
These include:
When you’re done, select Save Settings at the bottom of the page to confirm your configuration.
It’s important that you secure your SMTP credentials to protect your emails from unauthorized access.
Make sure that your SMTP password is complex and not reused across multiple services. Strong passwords include a combination of uppercase and lowercase letters, numbers, and special characters.
Also, access to SMTP credentials should be restricted to trusted users or applications. Avoid sharing credentials publicly or via unsecured methods such as email or chat services.
It’s also a good idea to periodically change your SMTP credentials to minimize risk.
Now, it’s time to send a test email. Go to WP Mail SMTP > Tools in your WordPress dashboard and enter an email address as shown:
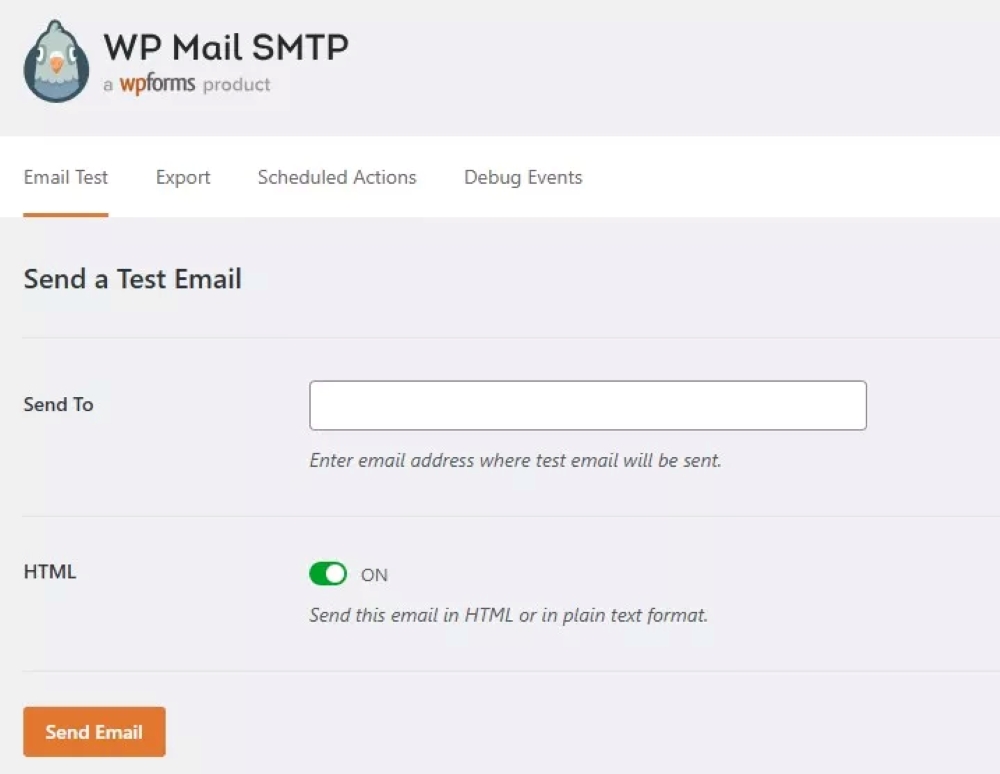
Then, click on the Send Email button and wait for a few seconds. Go to your inbox and see if you’ve received the email.
If the email is in the spam folder, you’ll need to add an SPF record to the DNS settings.
If the test fails, return to the previous step to check that your SMTP credentials are correct. You’ll also need to check your SPF and DKIM records (see the next step).
Email authentication has become a requirement. Your domain needs SPF records to verify your emails are genuine and keep them out of spam folders.
SPF records tell receiving servers which mail servers are allowed to send emails on behalf of your domain. This helps block unauthorized senders and improves delivery for your real emails.
In simple terms, the include part lists approved services, while the ending part tells servers what to do with anything not on that list.
Your DNS settings live in your hosting account, unless you bought your domain elsewhere — then check your registrar instead. Each provider puts these settings in different places, and support can show you where if you get stuck.
Here’s an example of an SPF record:
v=spf1 include:your-mail-provider.com ~all
While you’re here, you might also want to check that you have DKIM and DMARC records set up.
DKIM adds a cryptographic signature to your emails to prove they originated from your domain and haven’t been altered in transit. Make sure that your DNS includes the DKIM TXT record provided by your SMTP service provider.
Meanwhile, DMARC works alongside SPF and DKIM to protect your domain from unauthorized use. It specifies how to handle emails that fail SPF and DKIM checks.
Here’s an example of a DMARC record:
v=DMARC1- p=reject- rua=mailto:[email protected]
Also, ensure that your Mail Exchange (MX) records point to the correct mail server. This way, incoming emails are routed to your domain’s email service provider.
Try sender reputation warming to improve deliverability. This means starting by sending emails to a small group of people and gradually increasing the number of recipients.
Finally, make sure that your IP address isn’t on a blocklist. Tools like MXToolBox or Sender Score can help you check the current status of your IP address on various blocklists.
Want to skip plugins? You can add SMTP settings directly to wp-config.php and write custom PHP functions for your theme.
This method suits developers who are comfortable editing core files, though you’ll be storing credentials in plain text and fixing things yourself when WordPress updates break your code.
Most sites are better off using a plugin, but if you need raw control over email handling, manual configuration delivers that.
Here’s a step-by-step guide:
First, you need an SMTP service, such as Mailtrap, MailerSend, SendGrid, or others. Ensure you’ve verified your domain with your chosen service and retrieved the necessary credentials.
Connect to your website using an FTP client, such as FileZilla, or access it through an SSH terminal. Locate the wp-config.php file in the root directory of your WordPress installation.
Open wp-config.php in a text editor and add the following SMTP configuration:
define( ‘SMTP_USERNAME’, ‘your-smtp-username’ );
define( ‘SMTP_PASSWORD’, ‘your-smtp-password’ );
define( ‘SMTP_SERVER’, ‘smtp.your-smtp-service.com’ );
define( ‘SMTP_FROM’, ‘[email protected]’ );
define( ‘SMTP_NAME’, ‘Your Name’ );
define( ‘SMTP_PORT’, 587 );
define( ‘SMTP_SECURE’, ‘tls’ );
define( ‘SMTP_AUTH’, true );
define( ‘SMTP_DEBUG’, 0 );
Save your changes.
Navigate to your WordPress dashboard and go to Appearance > Theme Editor. Select your theme’s functions.php file and add the following PHP snippet:
add_action( ‘phpmailer_init’, ‘my_phpmailer_smtp’ );
function my_phpmailer_smtp( $phpmailer ) {
$phpmailer->isSMTP();
$phpmailer->Host = SMTP_SERVER;
$phpmailer->SMTPAuth = SMTP_AUTH;
$phpmailer->Port = SMTP_PORT;
$phpmailer->Username = SMTP_USERNAME;
$phpmailer->Password = SMTP_PASSWORD;
$phpmailer->SMTPSecure = SMTP_SECURE;
$phpmailer->From = SMTP_FROM;
$phpmailer->FromName = SMTP_NAME;
}
To send an email with custom headers, HTML content, and attachments, update the my_phpmailer_smtp function as follows:
add_action( ‘phpmailer_init’, ‘my_phpmailer_smtp_with_attachments’ );
function my_phpmailer_smtp_with_attachments( $phpmailer ) {
$phpmailer->isSMTP();
$phpmailer->Host = SMTP_SERVER;
$phpmailer->SMTPAuth = SMTP_AUTH;
$phpmailer->Port = SMTP_PORT;
$phpmailer->Username = SMTP_USERNAME;
$phpmailer->Password = SMTP_PASSWORD;
$phpmailer->SMTPSecure = SMTP_SECURE;
$phpmailer->From = SMTP_FROM;
$phpmailer->FromName = SMTP_NAME;
// Adding custom headers
$phpmailer->addCustomHeader(“X-Mailer: My Custom Mailer”);
$phpmailer->addCustomHeader(“X-Priority: 1”);
// Setting HTML content
$phpmailer->isHTML(true);
$phpmailer->Body = ‘<h1>Hello,</h1><p>This is an email sent from WordPress without a plugin.</p>’;
// Adding attachments
$phpmailer->addAttachment(‘/path/to/file.pdf’, ‘Example.pdf’);
}
Save your changes.
After saving the changes, test your configuration by sending an email using WordPress’ built-in wp_mail() function:
wp_mail(“[email protected]”, “Subject”, “Message content”);
This will send an email through your configured SMTP server using your set credentials.
WordPress defaults to plain text emails, which works fine until you need formatted messages with your brand’s look. Here’s how to send HTML emails without affecting other emails on your site.
Locate the /wp-content/themes/your-child-theme/email/basic-template.php theme folder and add an HTML email template to it.
You can use this code snippet for a head start:
<!DOCTYPE html>
<html>
<head>
<style>
body { font-family: Arial, sans-serif line-height: 1.6 }
.container { max-width: 600px margin: 0 auto padding: 20px }
.header { background: #333 color: white padding: 10px text-align: center }
</style>
</head>
<body>
<div class=”container”>
<div class=”header”>
<h1><?php echo $subject ?></h1>
</div>
<p><?php echo $message ?></p>
</div>
</body>
</html>
<div class=”container”>
<div class=”header”>
<h1><?php echo $subject; ?></h1>
</div>
<p><?php echo $message; ?></p>
</div>
</body>
</html>
Build emails as a single narrow column (600px max) with all styling written within HTML tags, such as <p style=”color: blue-”>. Many email clients delete <style> blocks and external CSS files completely.
If you want to speed things up, you can use tools like Premailer or Mailchimp CSS Inliner to convert your styles into inline CSS automatically.
This PHP function loads your template and passes data to it safely:
function render_email_template($template_name, $variables = array()) {
extract($variables);
ob_start();
include(get_stylesheet_directory() . ‘/email/’ . $template_name);
return ob_get_clean();
}
The function captures whatever your template file outputs and returns it as a string rather than displaying it on screen, so that you can pass that HTML to wp_mail().
Now send the email while temporarily switching WordPress to HTML mode:
// Prepare the email
$to = ‘[email protected]’;
$subject = ‘Your Order Confirmation’;
$html_body = render_email_template(‘basic-template.php’, array(
‘subject’ => $subject,
‘message’ => ‘Thank you for your order!’
));
// Temporarily switch to HTML
add_filter(‘wp_mail_content_type’, function() { return ‘text/html’; });
// Send it
wp_mail($to, $subject, $html_body);
// Immediately restore plain text
remove_filter(‘wp_mail_content_type’, function() { return ‘text/html’; });
Note — we deliberately scope the content-type change to this single send so that other plugins’ emails aren’t forced into HTML. You’ll know HTML is working when email headers display Content-Type: text/html or multipart/alternative instead of plain text.
Two things that could trip you up:
Test everything before going live.
WordPress handles attachments via wp_mail()’s fourth parameter, which accepts file paths:
$to = ‘[email protected]’
$subject = ‘Invoice #1234’
$message = ‘Please find your invoice attached.’
// Must use absolute server paths
$attachments = array(
WP_CONTENT_DIR . ‘/uploads/2024/invoices/invoice-1234.pdf’,
ABSPATH . ‘wp-content/uploads/terms-conditions.pdf’
)
wp_mail($to, $subject, $message, ”, $attachments)
You can also attach multiple files like this:
$attachments = array(
WP_CONTENT_DIR . ‘/uploads/invoice.pdf’,
WP_CONTENT_DIR . ‘/uploads/terms.pdf’
)
Email providers set their own rules for attachments. Some cap the total message size at 10MB, others allow 25MB. Many reject executables and compressed files outright. wp_mail() gives you a success message based on the handoff to your server, not final delivery.
When attachments vanish, the culprit is usually a typo in your file path or the receiving mail server silently dropping them. Your inbox is the best testing ground.
WordPress offers many plugins to improve email deliverability, but if you want to go beyond basics and grow your business, tools like Omnisend are built for that.
SMTP plugins solve the problem of getting emails delivered. Marketing platforms solve the challenge of turning those emails into revenue. You need subscriber capture, automated workflows, and sales tracking, which basic delivery plugins can’t provide.
Here’s how different plugin types stack up:
This table compares SMTP-only plugins vs. Omnisend in more detail:
| Feature | SMTP plugins | Omnisend |
|---|---|---|
| Core function | Routes WordPress emails through external SMTP servers | Complete email/SMS marketing platform with built-in deliverability |
| Email types | System emails only (password resets, form notifications) | Transactional emails + marketing campaigns + automated sequences |
| Setup time | 15–30 minutes (configure SMTP credentials, test delivery) | Five minutes (install plugin, connect account, import brand) |
| Email builder | Plain text or basic HTML | Drag-and-drop editor, pre-built templates, mobile-responsive designs |
| Marketing features | None | Segmentation, A/B testing, personalization, SMS campaigns |
| Automation | None | Welcome series, abandoned cart recovery, customer reactivation, custom workflows |
| Revenue tracking | None | Full attribution, conversion tracking, ROI reports per campaign |
| Subscriber management | None | Built-in audience management, tagging, behavioral triggers, custom properties |
| Compliance tools | Basic unsubscribe link | Forms with opt-in, preference management, automatic suppression |
| Support | Documentation + forums | 24/7 support via chat and email |
Pick based on your goals, either how to fix WordPress not sending email issues, or improving your email service with marketing features.
Here are the best email plugins on the market:
Omnisend connects with WordPress and WooCommerce for transactional and marketing emails, helping you build revenue instead of just fixing delivery.
It handles autoresponders and automations across your customer journey. New customers get a welcome series that guides them toward purchases, abandoned carts trigger reminder sequences for revenue recovery, and past purchases influence product recommendations.
If you need help writing emails, AI tools generate subject lines and build customer segments from simple descriptions such as “customers who bought twice this month.”
Email and SMS work together, so you reach customers where they check messages. Revenue tracking reveals which emails generate revenue, providing insights beyond open and click rates, helping you optimize your ROI and maximize the effectiveness of all channels.
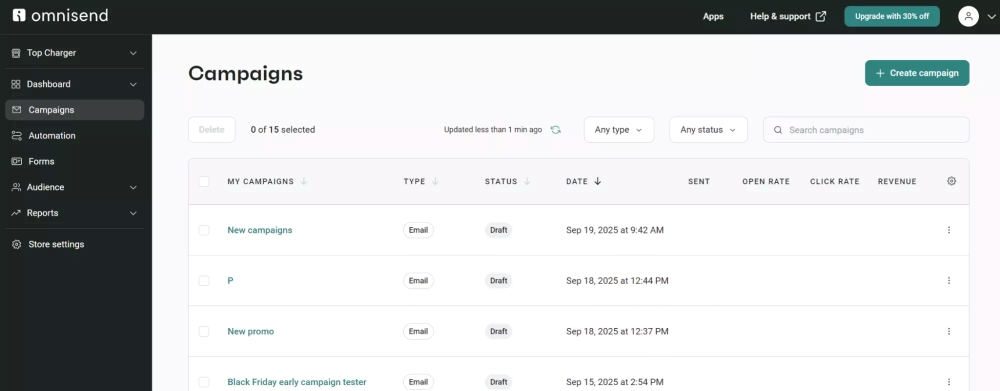
Once you create your Omnisend account, go to Campaigns and click + Create campaign:
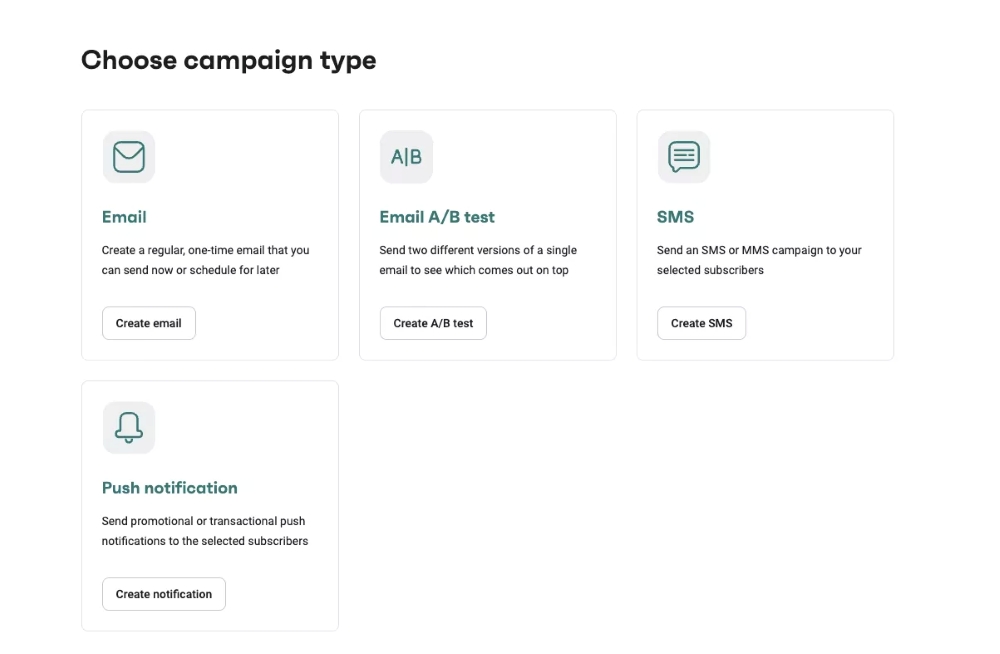
Then, choose a campaign type, such as email:
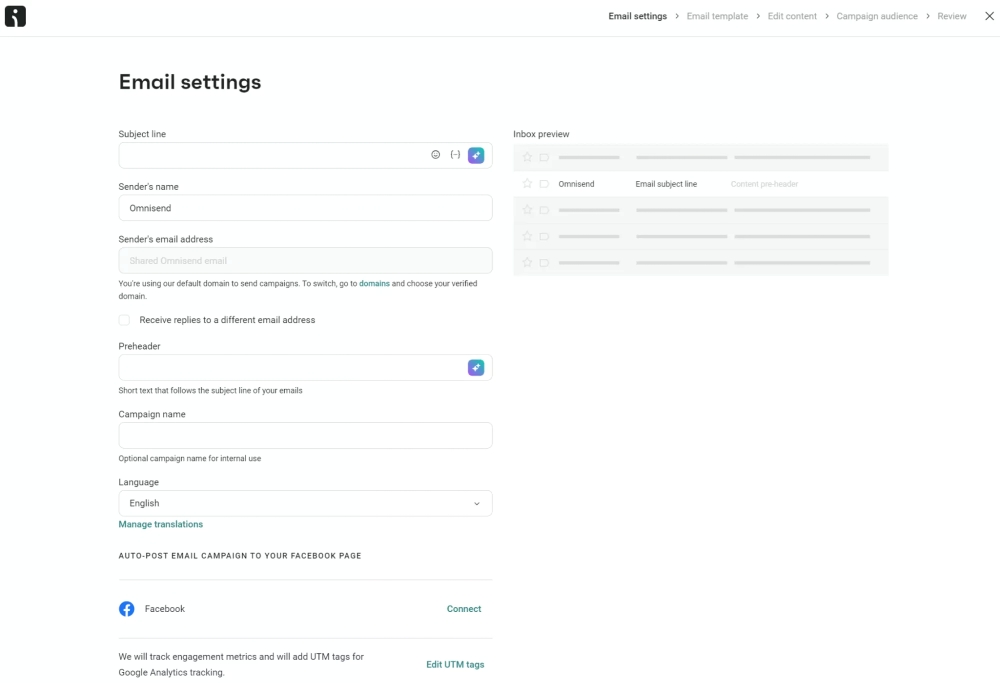
Provide your subject line, sender’s name, and other details:
Then, choose a pre-designed template. You can filter options based on your goals and the theme:
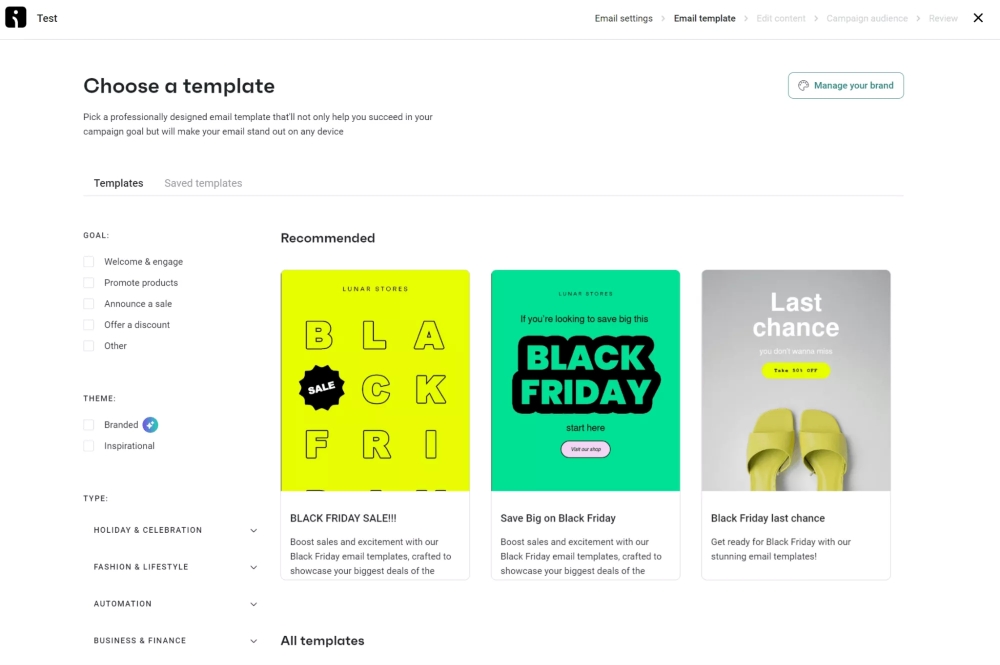
You can then edit the content with your text and images, choose your audience segment, and schedule your email.
Quick sign up | No credit card required
WP Mail SMTP reconfigures your WordPress site to use an SMTP provider when sending emails. It integrates with a variety of SMTP services, including Zoho Mail, Mailgun, Sendgrid, and Gmail.
Once you install the plugin on your site, you can launch the setup wizard to help you get started:
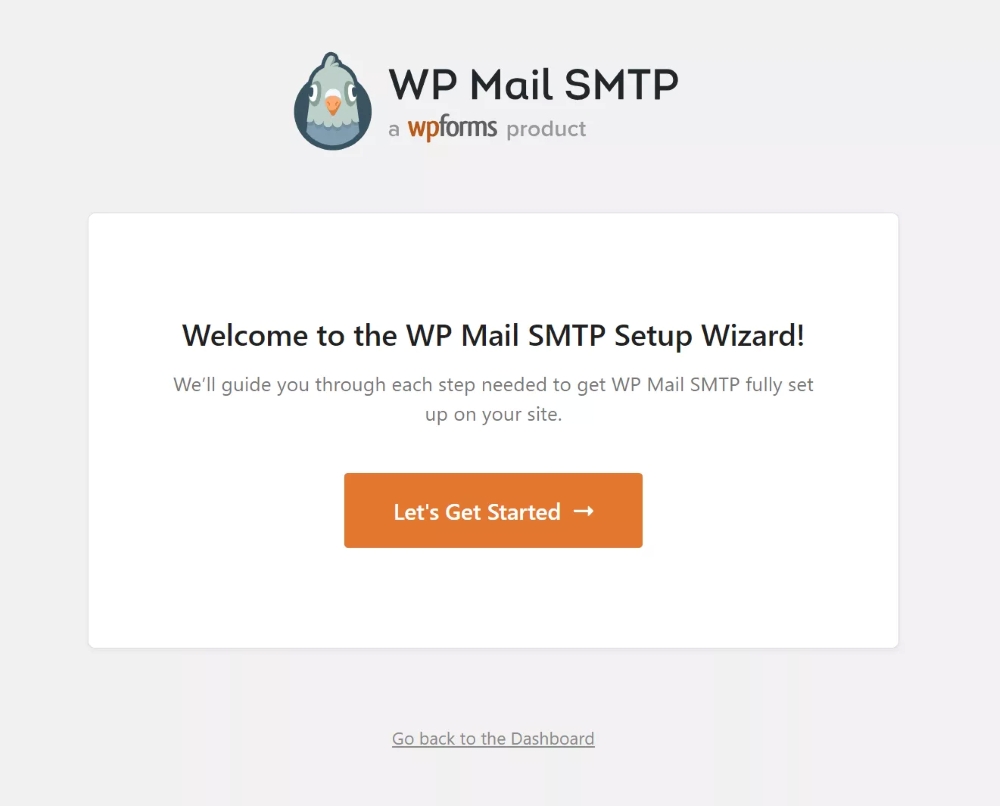
You’ll need to choose a provider and configure its settings, including the From name and email address. It’s a good idea to send a test email once you’re done to make sure everything works as expected.
WP Mail SMTP Pro offers even more features, including email logging, which lets you verify whether your emails were successfully delivered and view details of clicks and opens.
You’ll also get advanced email reports, smart conditional routing, and more.
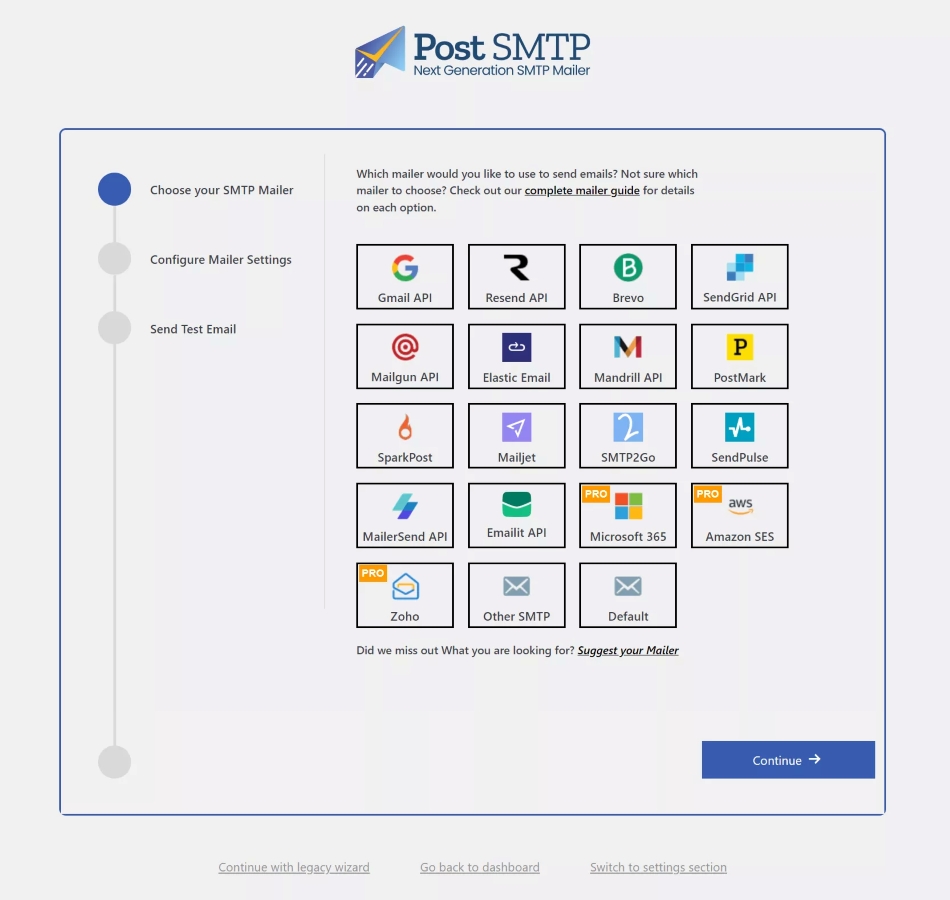
Post SMTP enables you to replace the default PHP mail function (wp_mail) with the SMTP mailer of your choice. It uses OAuth 2.0 (open authentication), allowing you to securely configure any service (such as Gmail, Brevo, Mailgun, etc.) via API Keys.
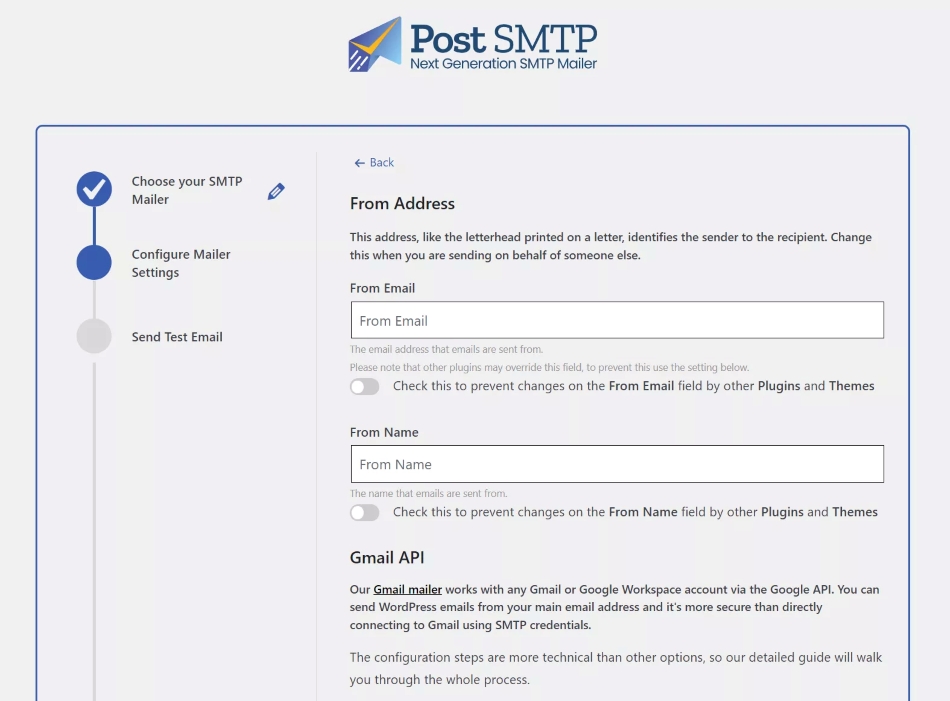
You won’t need to provide your SMTP account credentials, so setup is quick. Simply choose your mailing provider:
Then, enter the From Name and From Email, and the API details of your chosen providers:
Once you’ve connected to the SMTP mailer, you can send a test email to make sure messages are being delivered.
The plugin also includes additional features, including advanced reporting, email logs, and instant email-failure notifications.
By testing email sending in WordPress, you can find out whether your messages are making it into your recipients’ inboxes. Let’s look at some methods you can use:
One of the most effective ways to verify email delivery is by using email logging. Many SMTP plugins, such as WP Mail SMTP, offer built-in email logging features.
After sending a test email, navigate to the Email Log section to track its delivery status:
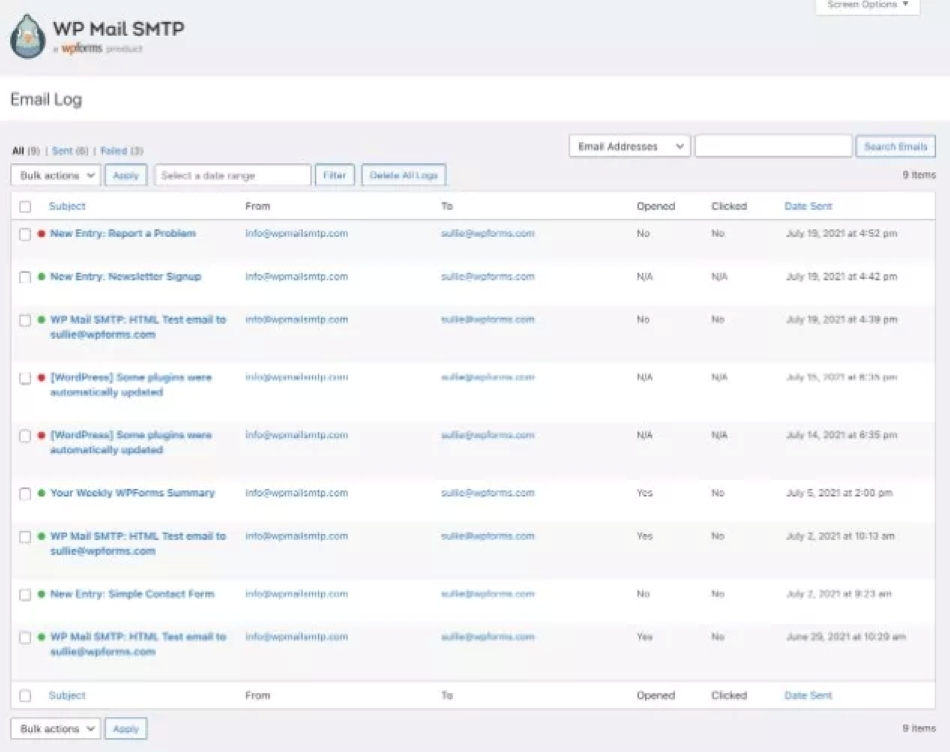
Here, you can navigate to the Sent tab to see which emails were successfully delivered, or the Failed tab to view a list of messages that weren’t sent.
You can also track email clicks and opens, save detailed email headers, and view more delivery information on each individual email.
A quick way to test email functionality is through the password reset feature. Go to your login page (e.g., yourdomain.com/wp-login.php) and click on Lost your password? as shown here:
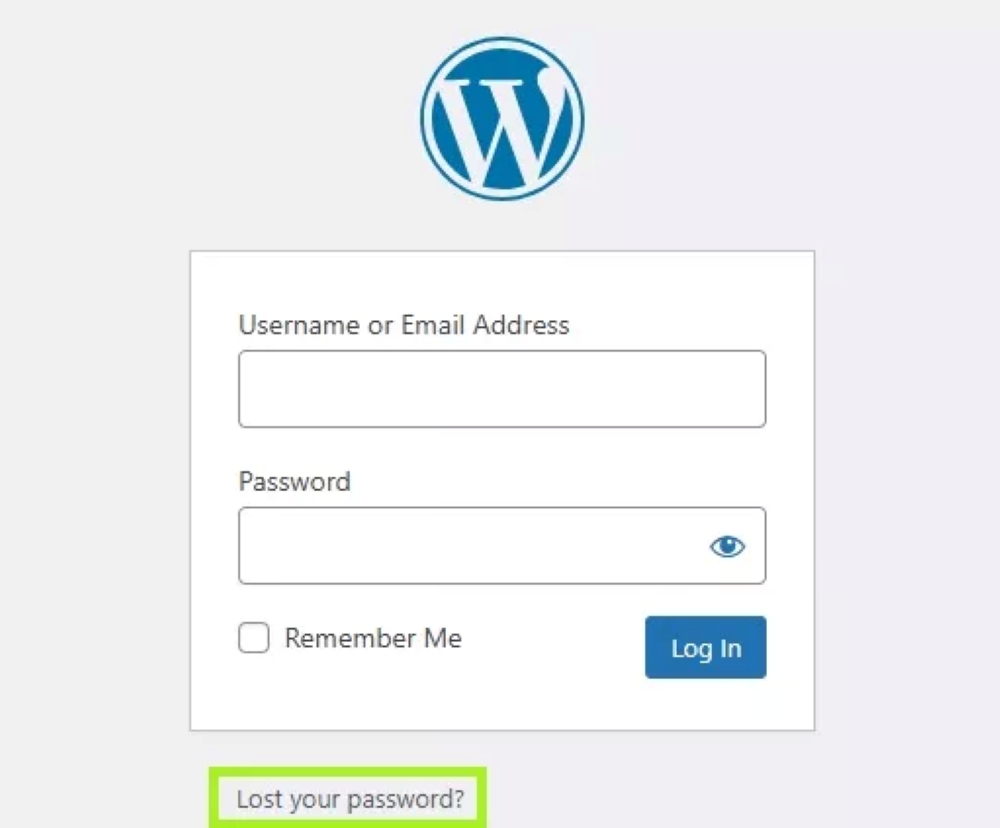
Then, enter your email address and click Get New Password. You should receive an email with a password reset link.
For a more advanced testing method, you can send emails from WordPress directly using a PHP script. This involves creating a simple PHP file and running it locally or via the server.
Save the following script as a test-php-mail.php file:
<?php
ini_set(‘display_errors’, 1)
error_reporting(E_ALL)
$from = “[email protected]”
$to = “[email protected]”
$subject = “PHP Mail Test”
$message = “It works! You can send email using PHP Mail”
$headers = “From:” . $from
mail($to, $subject, $message, $headers)
echo “Test email sent successfully”
?>
Then, run the script by navigating to yourdomain.com/test-php-mail.php in your browser. Check for any errors displayed at the top of the page.
Important: Delete the test file after testing to prevent misuse.
It’s frustrating when you try to send an email in WordPress, but it doesn’t work the way you want it to. There are a few common issues that frequently come up when sending WordPress emails.
Below, we will discuss what those issues are and how to fix them:
WordPress emails land in spam folders for predictable reasons, and fixing each one improves your delivery rates.
Start with your From address. Using “[email protected]” when your site is deliciouscakes.com signals to email providers that you’re hiding something. “[email protected]” looks more legitimate.
WordPress shows “sent” once the mail leaves your server, but providers like Gmail and Outlook still decide if you reach the inbox or spam based on your sender identity and message quality.
Authentication proves you own your domain:
Skip any of these, and email services assume you’re untrustworthy.
Your content matters as much as your technical setup:
Get a hosting plan with custom email addresses if yours doesn’t include them. Free email accounts make your business look amateur and hurt delivery rates. Professional senders use their own domains for everything.
Your WordPress server may not have the proper configuration to send emails, which can prevent your messages from reaching their recipients. Luckily, you can check whether your server has the correct PHP mail() function enabled.
If there’s a server configuration issue, you can resolve it by installing a WordPress SMTP plugin. Omnisend offers a service to help you send emails reliably, ensuring they reach the intended recipients.
Using a third-party SMTP plugin allows emails to move across different networks while keeping them linked to your website. This means your emails are sent through another server, bypassing any restrictions imposed by your hosting provider.
Your emails aren’t going to a spam folder, and you’ve resolved server issues. So why are they still not reaching your customers?
You may be facing problems with your contact form plugin. Since there are several different contact form plugins available for your site, the solution depends on which one you’re using.
Fixing contact form plugin issues can significantly improve customer engagement, so it’s essential to address this problem as soon as possible. Many plugins provide step-by-step troubleshooting guides to help fix email sending issues.
With some plugins, the fix may be as simple as changing your email address. Other forms may include trying to send and receive your emails from the same address. Common examples include Contact Form 7, WPForms, and Gravity Forms.
Since each one has its slight differences, you’ll need to check the help or troubleshooting guides for the specific plugin you use or contact the customer service team to resolve email problems in WordPress.
Sometimes, similar WordPress plugins conflict with each other. For example, if you’re using multiple plugins for email delivery, like an SMTP plugin and a contact form plugin, they may interfere with one another, resulting in failed email sends.
To troubleshoot, deactivate all plugins related to email sending. Then, reactivate them one by one, testing the email functionality after each activation.
Once the conflicting plugin is identified, decide whether to replace it or adjust its configuration.
Always ensure that your plugins are up to date, as outdated versions are more prone to conflicts.
When your WordPress emails fail to send, the problem often lies in the server or email configuration.
Common causes include:
The solution is to switch to SMTP. Using an SMTP server bypasses these limitations and provides a more reliable infrastructure for email delivery.
Configure your site to send emails via an SMTP service, as outlined in earlier sections. This ensures that your emails aren’t reliant on PHP mail functions or hosting server constraints.
WordPress email fails because PHP mail() lacks authentication, and your web host’s server has a bad reputation. Messages vanish into spam folders or never arrive, leaving you with broken password resets and missed form submissions.
SMTP plugins solve this by connecting your site to trusted email providers instead of relying on your hosting server. Install WP Mail SMTP or a similar plugin, add your credentials, and emails start reaching inboxes. The technical fix takes minutes.
If email marketing matters to your business, Omnisend handles both delivery and growth. Capture subscribers with forms, send targeted campaigns based on purchase behavior, and see revenue per email instead of hoping your messages work.
Quick sign up | No credit card required
WordPress may fail to send emails because it uses PHP mail without proper authentication. Many hosts don’t configure mail correctly, so messages get blocked or marked as spam. Server limits, missing SPF or DKIM records, or plugin conflicts can also cause delivery issues.
You don’t always need SMTP, but it’s highly recommended. SMTP routes your emails through trusted servers with proper authentication. This improves delivery rates and reduces the chances of emails going to spam or failing completely.
WordPress can send basic emails, but it’s not built for marketing campaigns. It lacks tools for automation, segmentation, and tracking. For marketing emails, it’s better to use a dedicated platform designed for sending campaigns at scale.
Popular SMTP plugins include WP Mail SMTP, FluentSMTP, and Post SMTP. Each helps route emails through reliable servers. The best option depends on your needs, but all three improve delivery compared to the default WordPress setup.
TABLE OF CONTENTS
TABLE OF CONTENTS
What’s next


No fluff, no spam, no corporate filler. Just a friendly letter, twice a month.