
 OFFER
OFFER


Drive sales on autopilot with ecommerce-focused features
See FeaturesSurveys are a powerful tool for growing your email list and engaging your audience. By creating an interactive survey, you can gather valuable insights for your business and expand your subscriber base.
If your website runs on WordPress, setting up surveys and integrating them with your Omnisend account is simple and straightforward. In this article, we’ll explore why surveys are a must-have for your marketing strategy and walk you through the steps to get started.
Why use surveys for lead generation?
Surveys offer unique benefits when it comes to collecting email addresses:
- Interactivity: They prompt website visitors to take an active role. This builds engagement and investment, making it easier to ask for an email address at the end.
- Offering value: Done right, surveys create something useful for participants, such as helping them find the right product. People are more likely to subscribe to a newsletter if they receive a direct benefit.
- Insights: Questionnaires help you collect information about site visitors. Getting to know and understand them better, and learning their needs and pain points, helps you improve your website and business.
- Discretion: Surveys can feel less obtrusive than some other lead capture methods, like popups or signup forms. This can help people feel more inclined to take part.
- Segmentation: With smart surveys, you can collect data like preferences, location, or purchase intent. This lets you segment your audience and send personalized emails from day one.
Finally, with the right tool, surveys can be highly shareable and displayed almost anywhere on your site.
Useful types of surveys
What kind of surveys can you use to reap the benefits above?
- Quizzes and personality tests: These are designed to be fun and engaging. They often promise personalized outcomes in exchange for an email.
- Customer feedback surveys: These are perfect for improving your products or services while also asking respondents to subscribe for updates. Best when combined with an incentive like a free guide or discount for survey completion.
- Polls and single-question surveys: Quick and simple, these are great for engagement. Users can provide their email to see aggregated results or follow up on the topic.
- Giveaway or contest surveys: Run a survey as part of a contest. Users enter by answering a few questions and providing their email for a chance to win. Example: “Tell us about your favorite (Product/Service) and enter to win a $50 gift card!”
This is just the tip of the iceberg. With a little creativity, there are plenty more ways to use online surveys for lead generation.
How to grow your email list using surveys on a WordPress website
Now that you have a better idea about how surveys can benefit your email marketing, let’s cover how to put them into practice on your WordPress site using Gravity Forms, a premium form plugin with a number of great features. These include:
- Drag-and-drop form builder: You can create surveys and other forms quickly and easily within its user-friendly interface, as well as take advantage of pre-built form templates, including a survey template
- Flexibility: A wide range of customizable form fields and advanced features allow you to collect almost any information you need
- Wide range of extensions: Add functionality and connect your forms with a wide assortment of software solutions, including Omnisend, thanks to the Gravity Forms Add-Ons
In order to follow along with the tutorial, you need a WordPress website with the Gravity Forms plugin installed (instructions here). You can also create a free demo website and try it out.
Be aware that you need the Survey Add-On to create surveys and process their results. This is included with the Gravity Forms Elite and Nonprofit license.
1. Install add-ons and connect to Omnisend
The first step is to install the Survey Add-On, which you can add to your site under Forms > Add-Ons in the WordPress dashboard. Find it in the list and click Install.
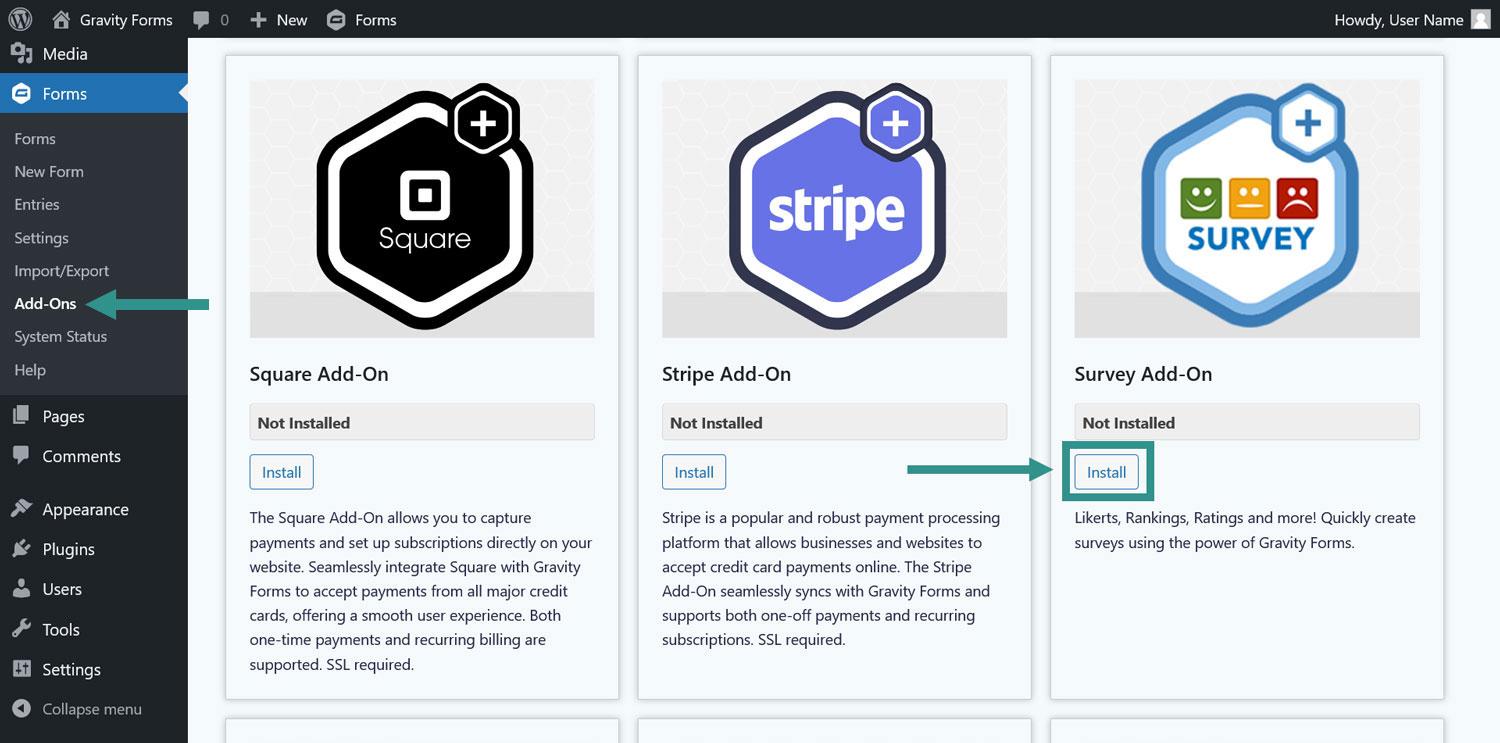
Once on your site, be sure to activate it.
Additional add-ons you’re going to need are the official Omnisend plugin and the Omnisend for Gravity Forms Add-On. You can install both of those via Plugins > Add New Plugin. Simply search and click Install Now.
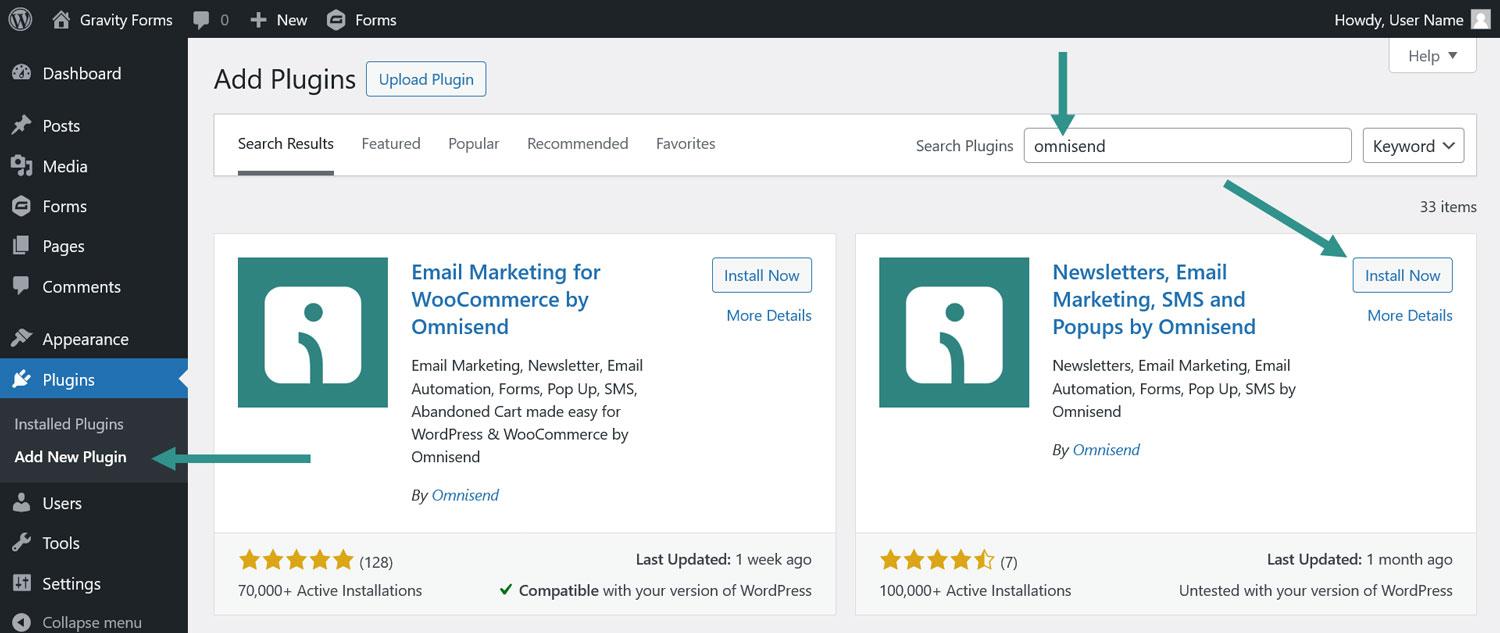
Here, too, you need to remember to activate them afterwards.
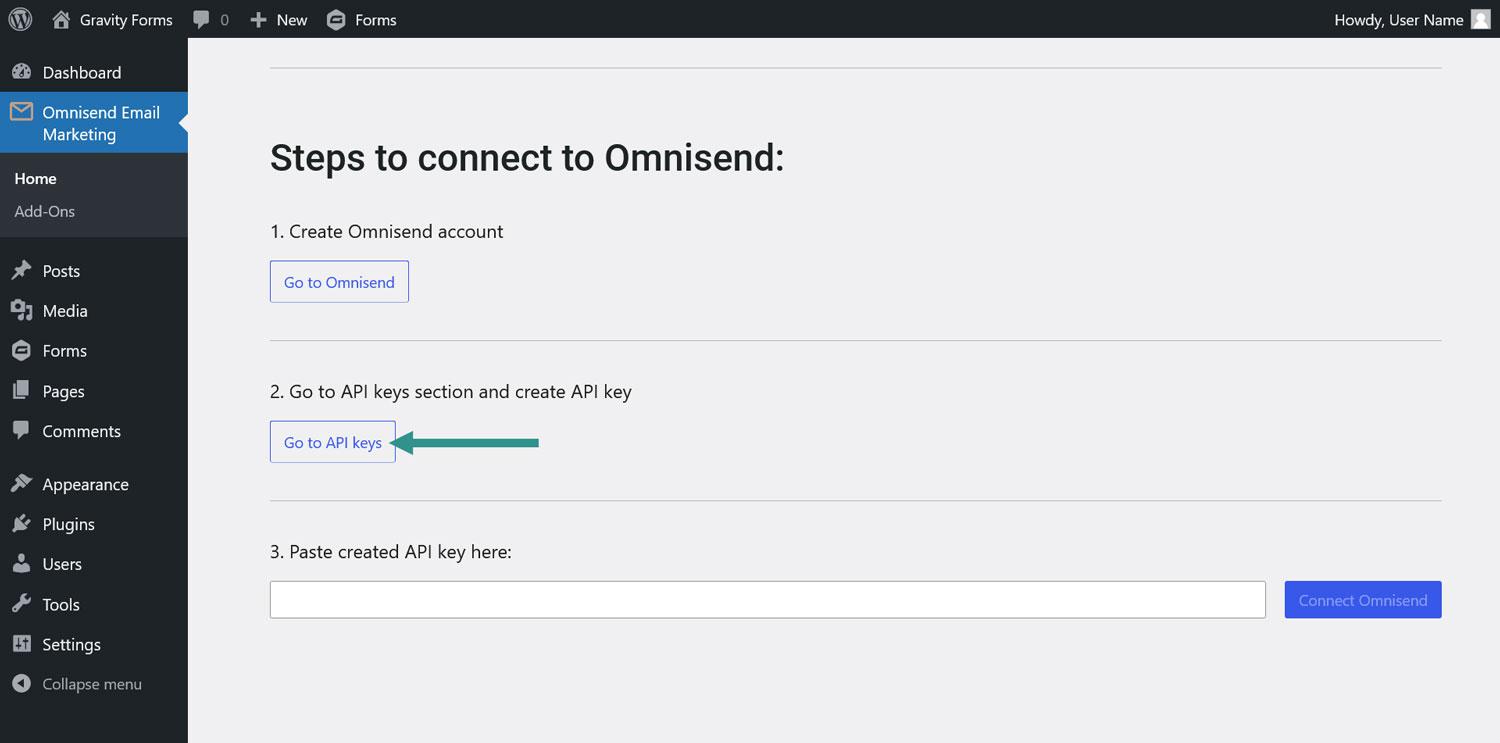
Next, connect your website to your Omnisend account. For that, go to the Omnisend Email Marketing menu (still in WordPress) and click the big green button.

The next screen will ask you for an API key. The easiest way to get one is to simply click the Go to API keys button.
This will take you to the location in your Omnisend account with the API key. Alternatively, learn how to create an API key by hand.
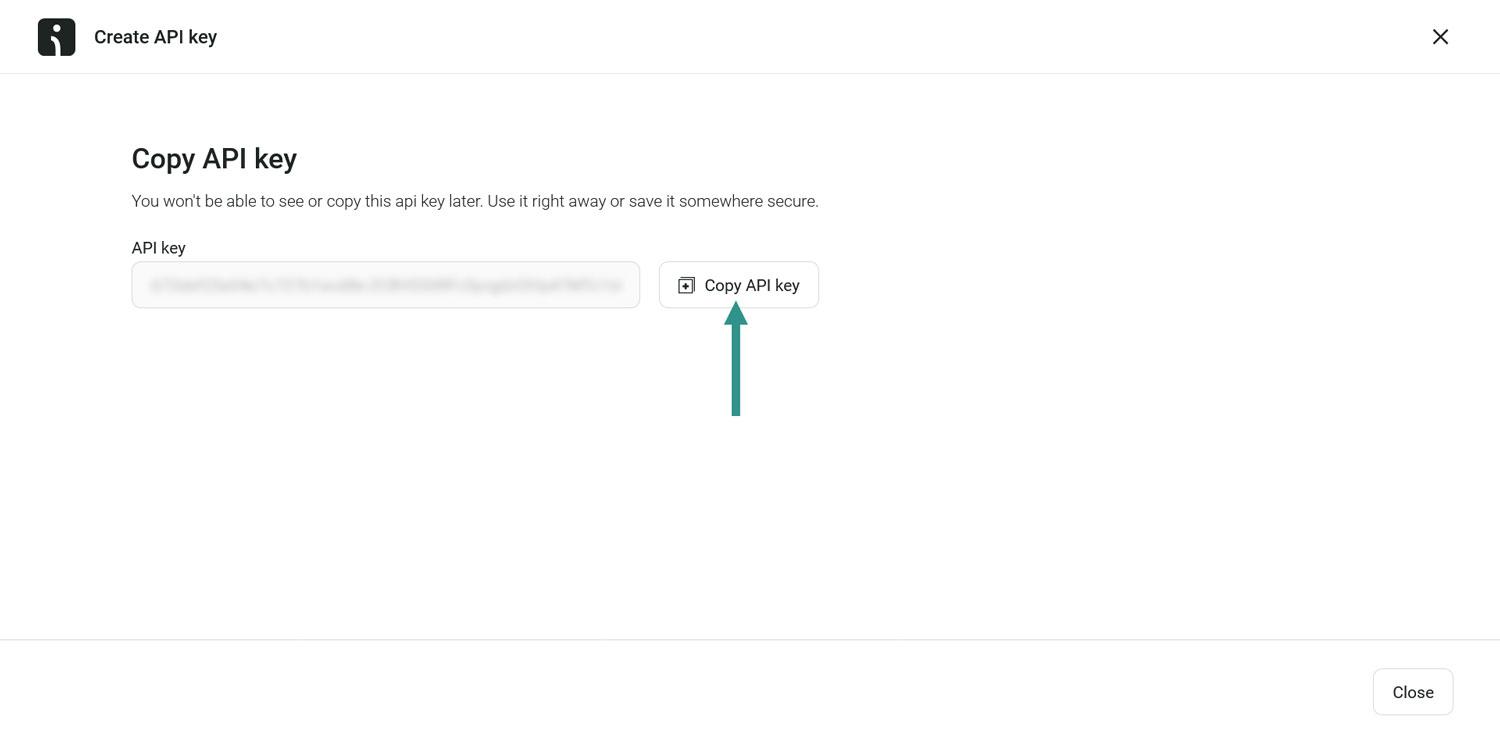
Copy and paste it in the field on your WordPress site, then click Connect Omnisend.
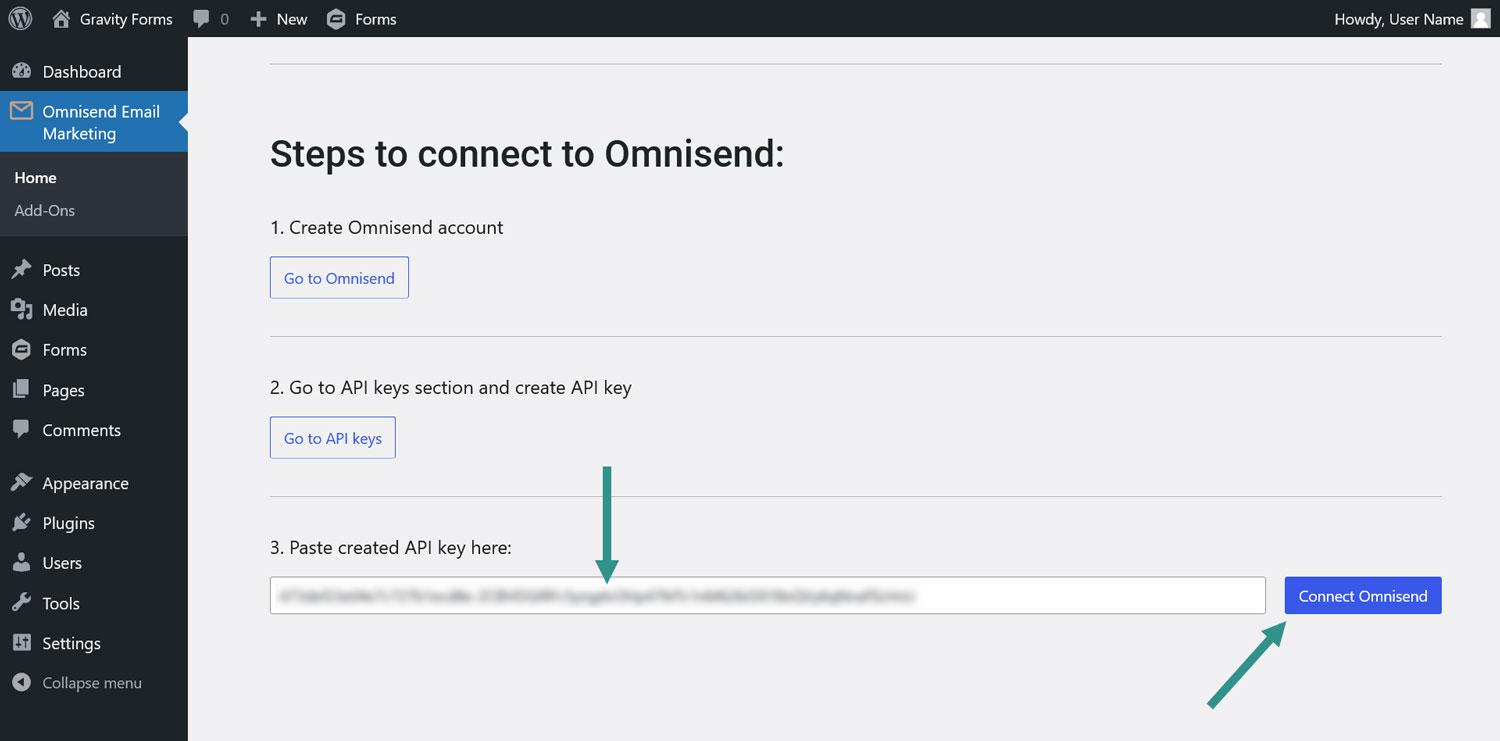
You should receive a success message.

2. Create your survey
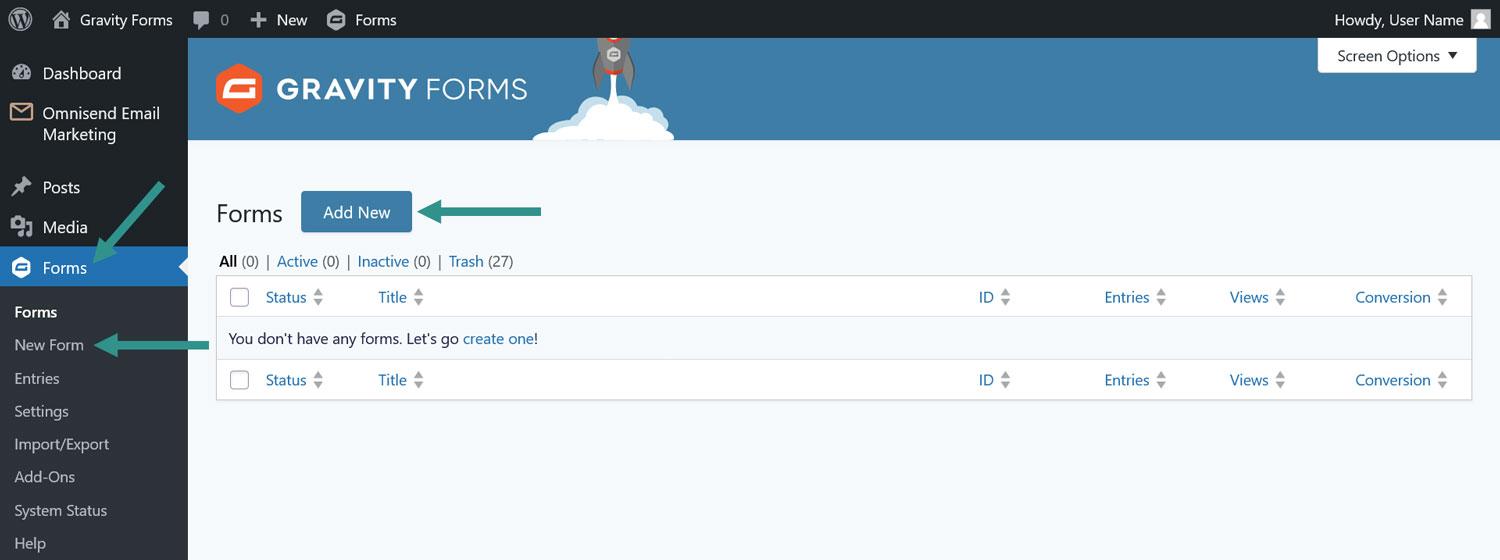
After that, you need to create a form for your survey. You can do that via Forms > New Form > Add New.
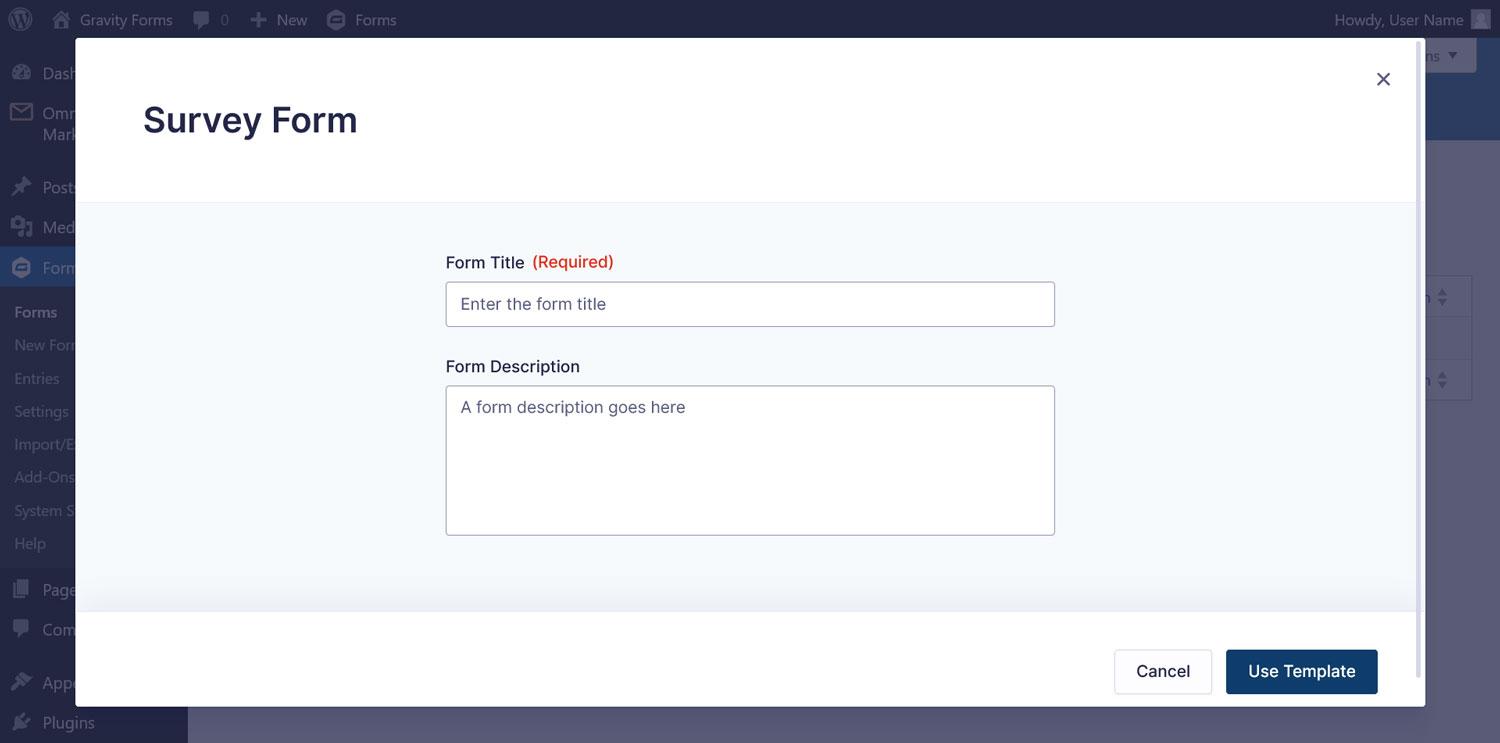
Clicking it gives you access to the form templates, which contain common form fields for their use cases. In this case, it makes sense to go with the Survey Form template. Hover over it and click Use Template.

Name your form, then continue.
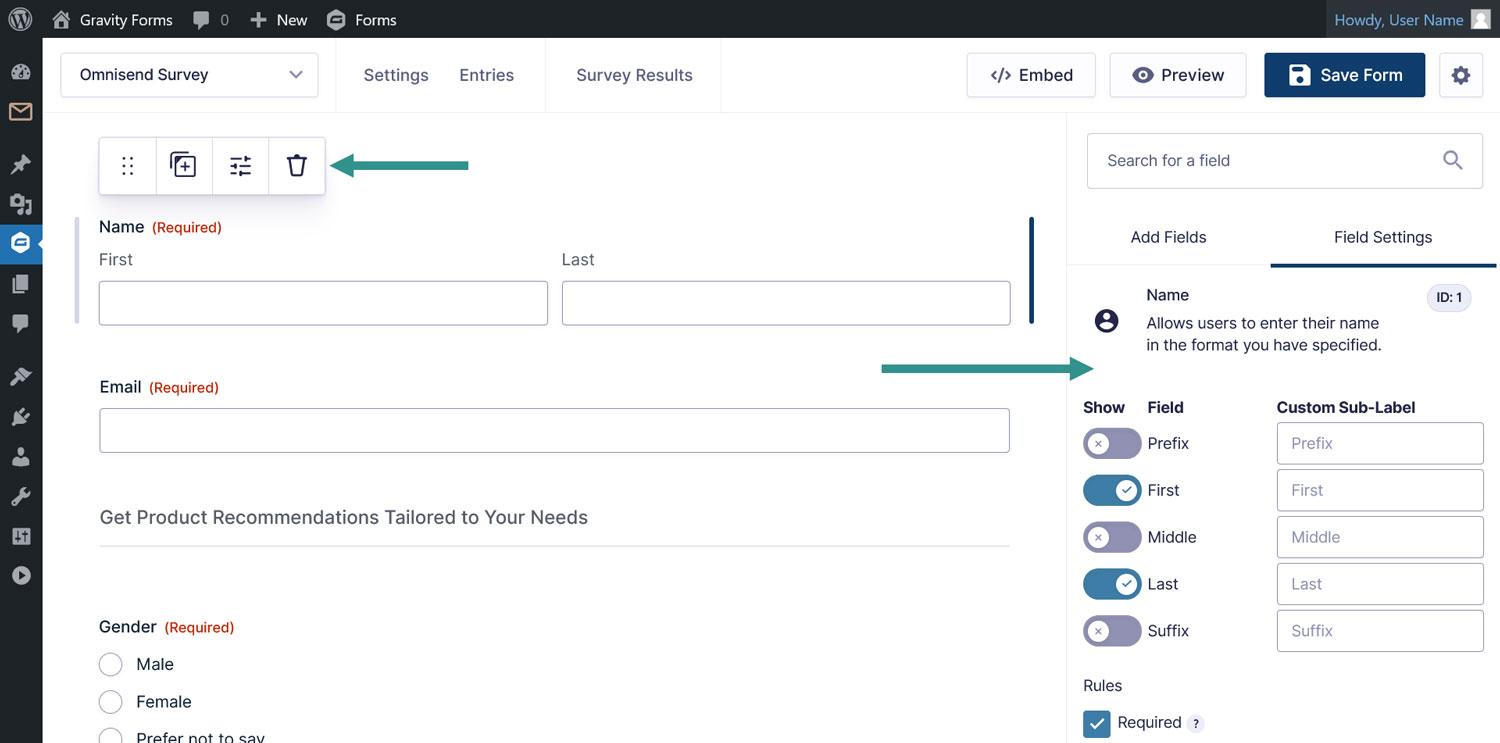
Now you’ll land in the main form editor.
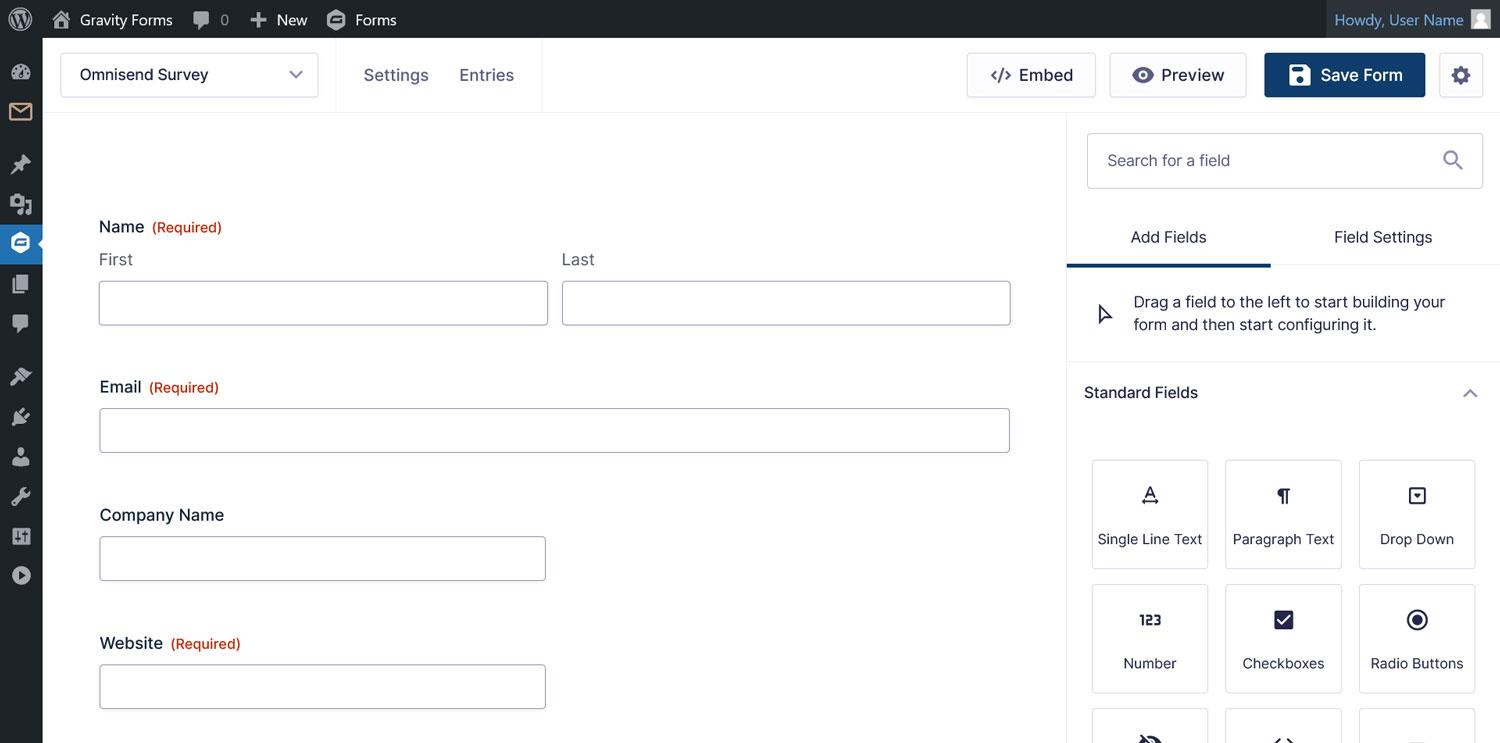
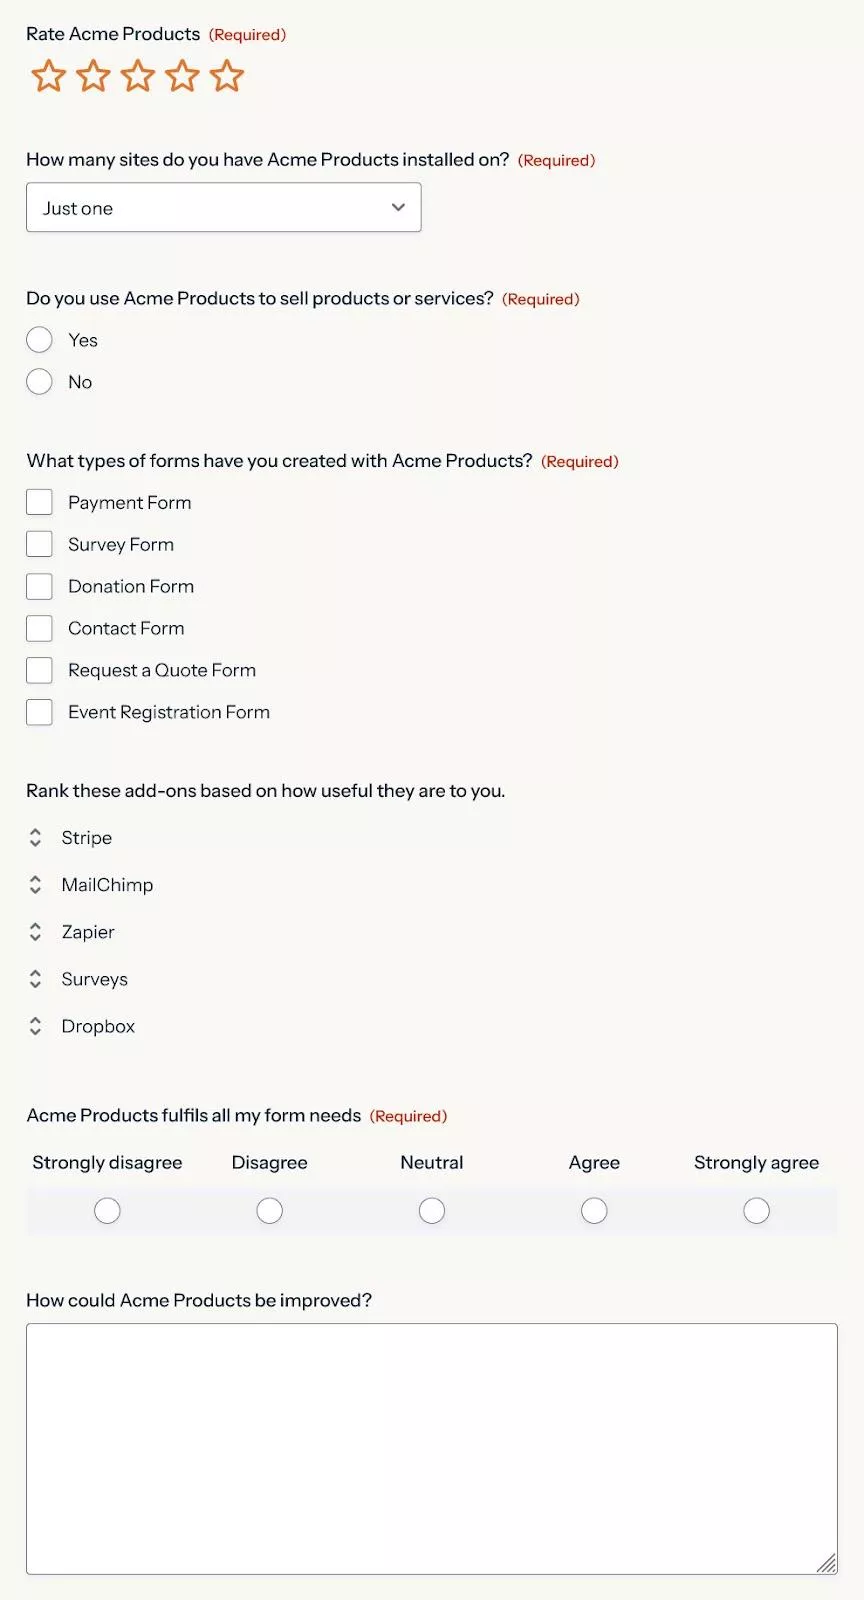
The chosen template comes with a number of fields, mainly to collect the contact information of survey participants. It also has examples for all the available survey field options, which are:
- Star ratings
- Drop-down menus
- Radio buttons
- Checkboxes
- Ranked choice
- Likert scales
- Paragraph fields (single-line text is also available)
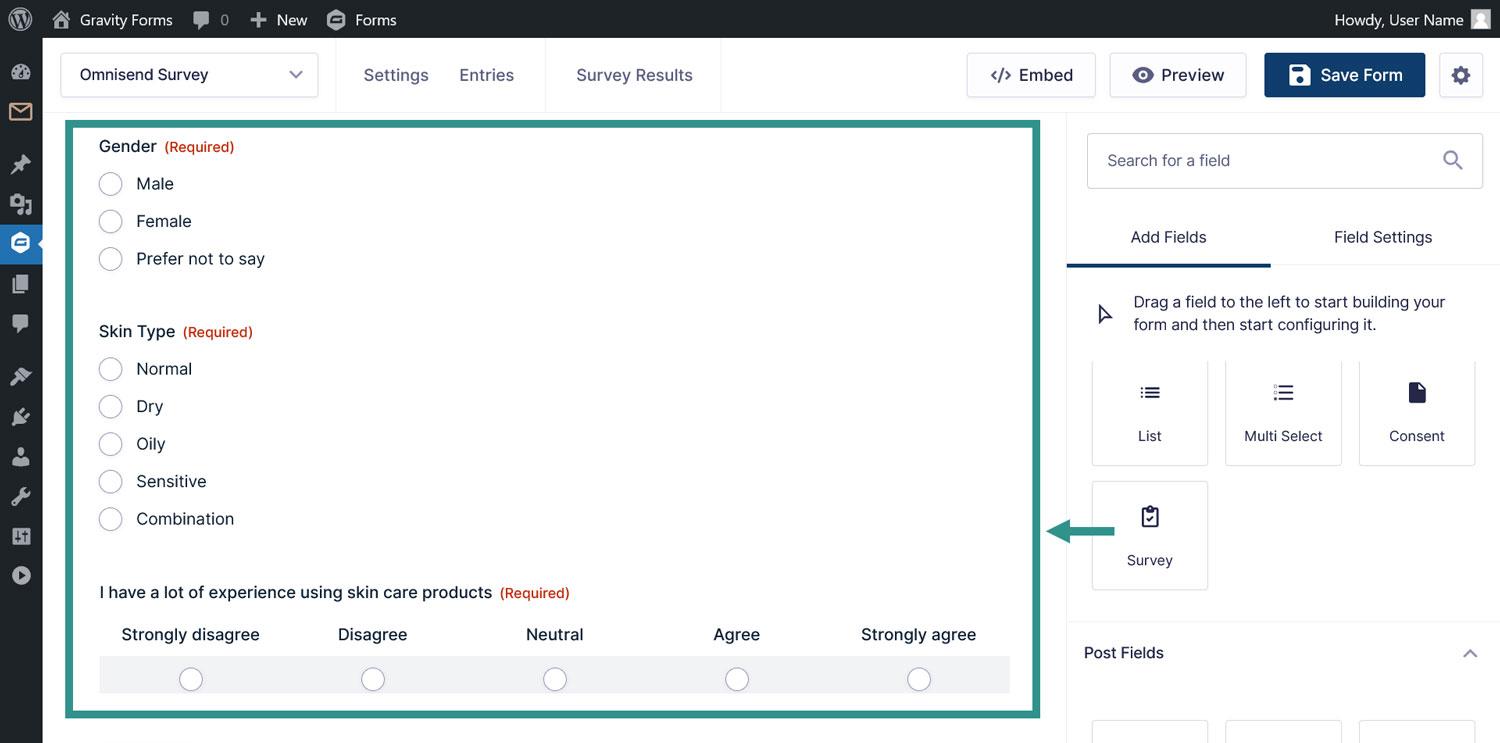
3. Start customizing
Gravity Forms has three main ways to adjust forms to your needs:
- Move, duplicate, and delete existing fields: Hover over any form field and use the icons in the toolbar on top to do this
- Edit field settings: Click on a field to show advanced options in the right sidebar
- Add new fields: The sidebar also lets you drag-and-drop additional fields to the desired position on the form
Use these options to customize the form content, order, layout, etc., according to your needs.
If you want to collect your survey participants’ information, be sure to include a Consent field where users can give you permission to do so.
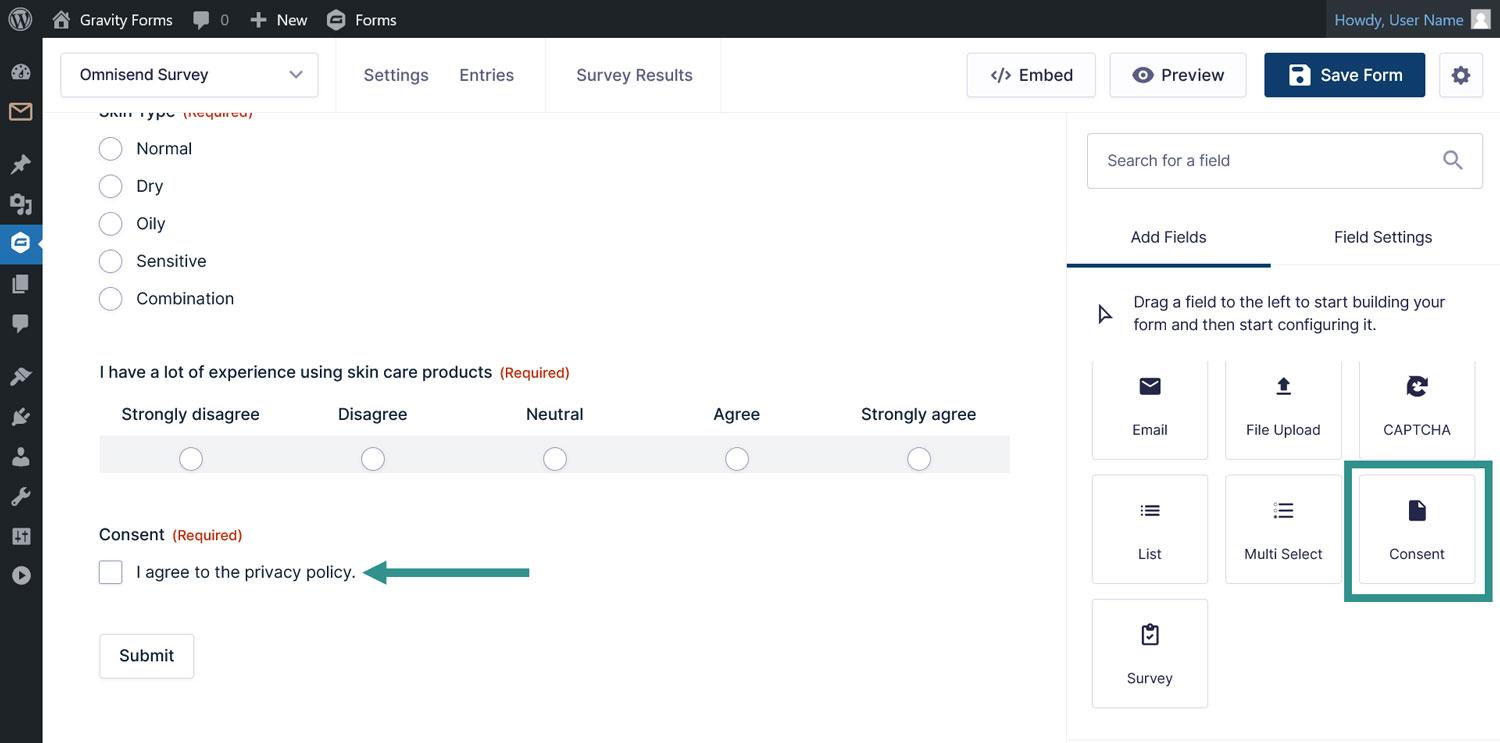
Aside from that, you’ll likely mostly work with the Survey field to create your questions. It’s available under Advanced Fields on the right (besides the examples already in the form).
Customize as needed and save at the top when you’re ready.
4. Map form fields to Omnisend data
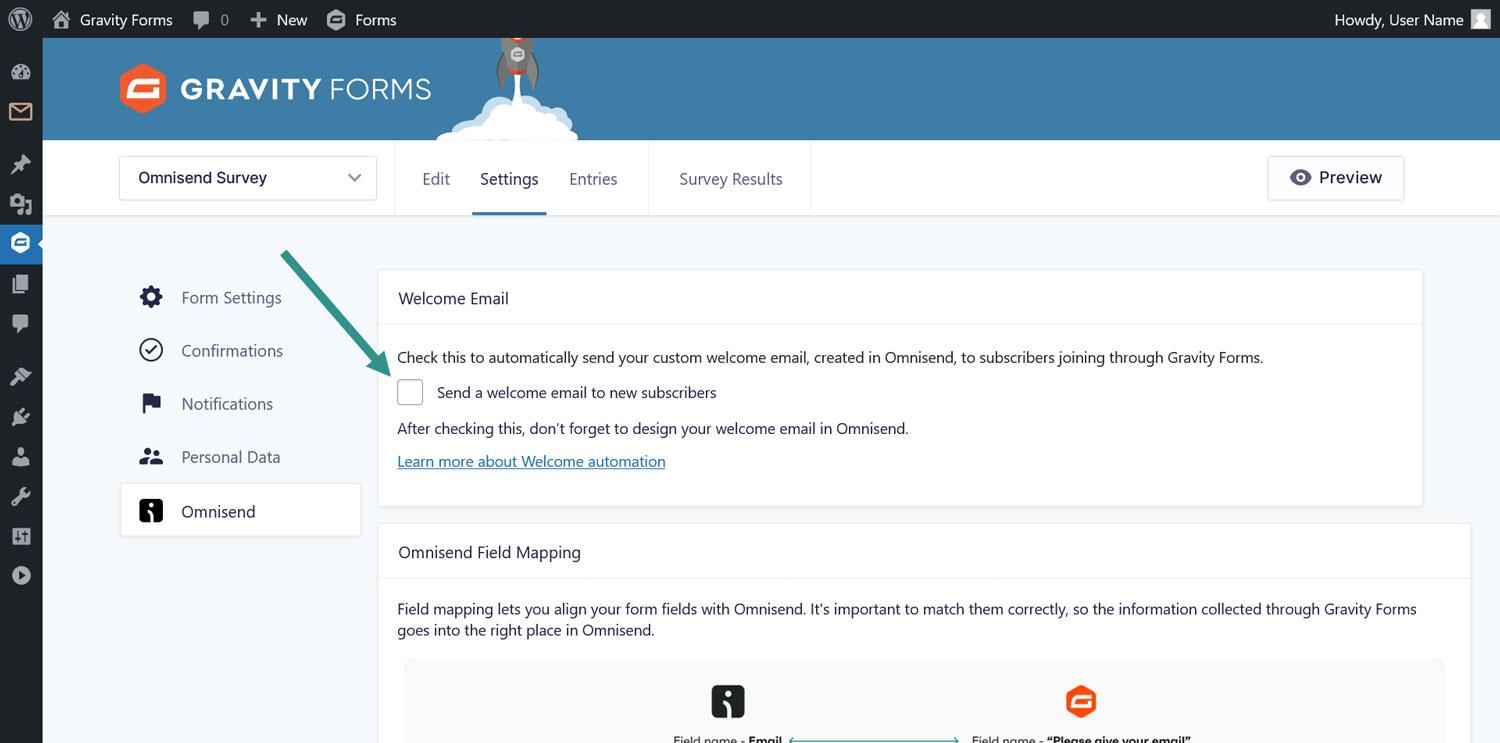
In order to correctly capture form data in Omnisend, you need to map the form fields. For that, go to Settings > Omnisend at the top of the editor.
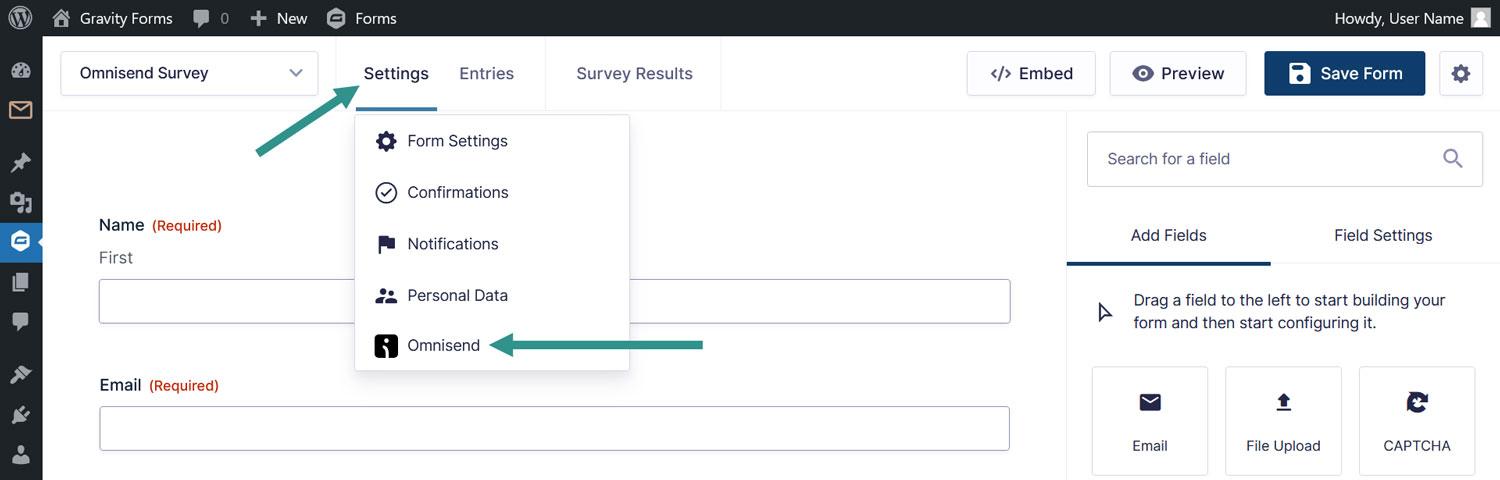
Here, you’ll find drop-down menus where you can assign specific form fields to the information sent to your Omnisend account.
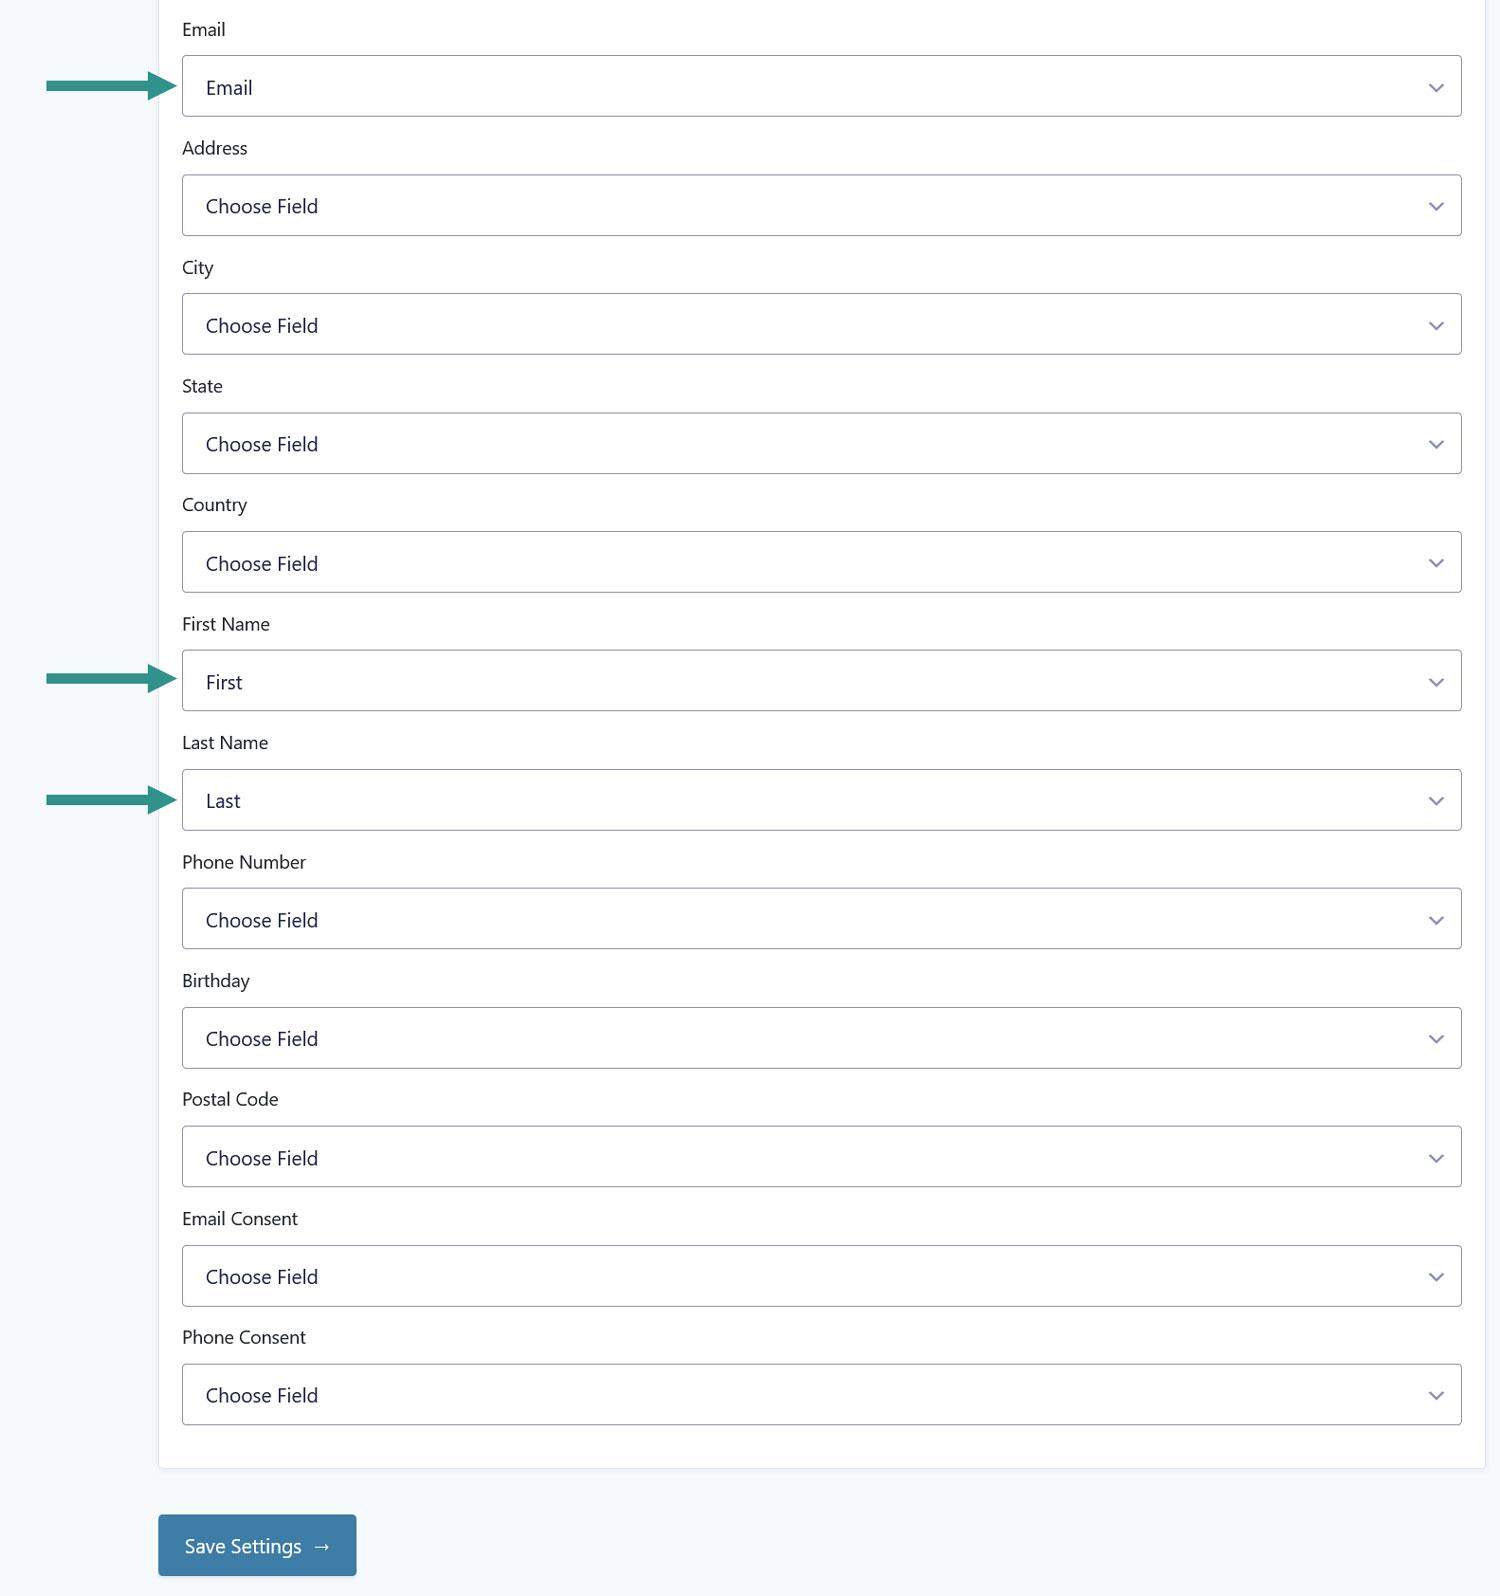
Complete it and save at the bottom. You can also choose to automatically send a welcome email to new subscribers from this menu.
5. Enhance the form
As mentioned, Gravity Forms offers lots of additional extensions. One that’s especially interesting is the Conversational Forms Add-On, which allows you to set up surveys so that participants can complete each question individually step by step.

Plus, in the form settings you can also customize:
- Confirmations: This is the message that appears when someone submits a form, and you can customize this, and even redirect users to a specific page
- Notifications: Here, you can set up and customize the email notifications your site will send to survey participants, yourself, and/or others upon form submission
6. Embed and publish the survey
Now all that’s left to do is embed and publish the survey. For that, open the page where you want it to appear in the WordPress editor, then add the Form block to it (Classic Editor users can use shortcodes). Choose the survey you just created from the list.
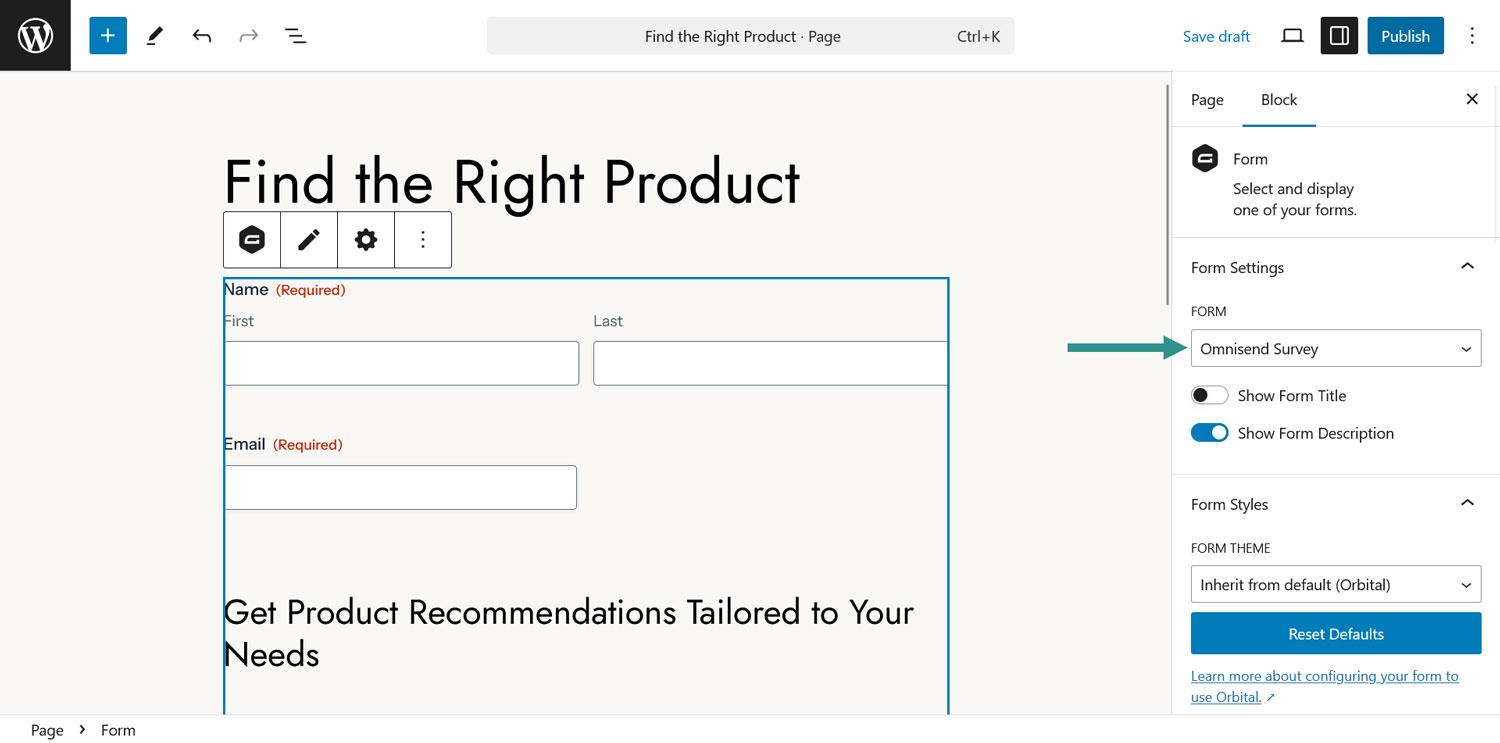
Previewing the page allows you to test your survey before publishing it. Simply fill it in like a real participant.
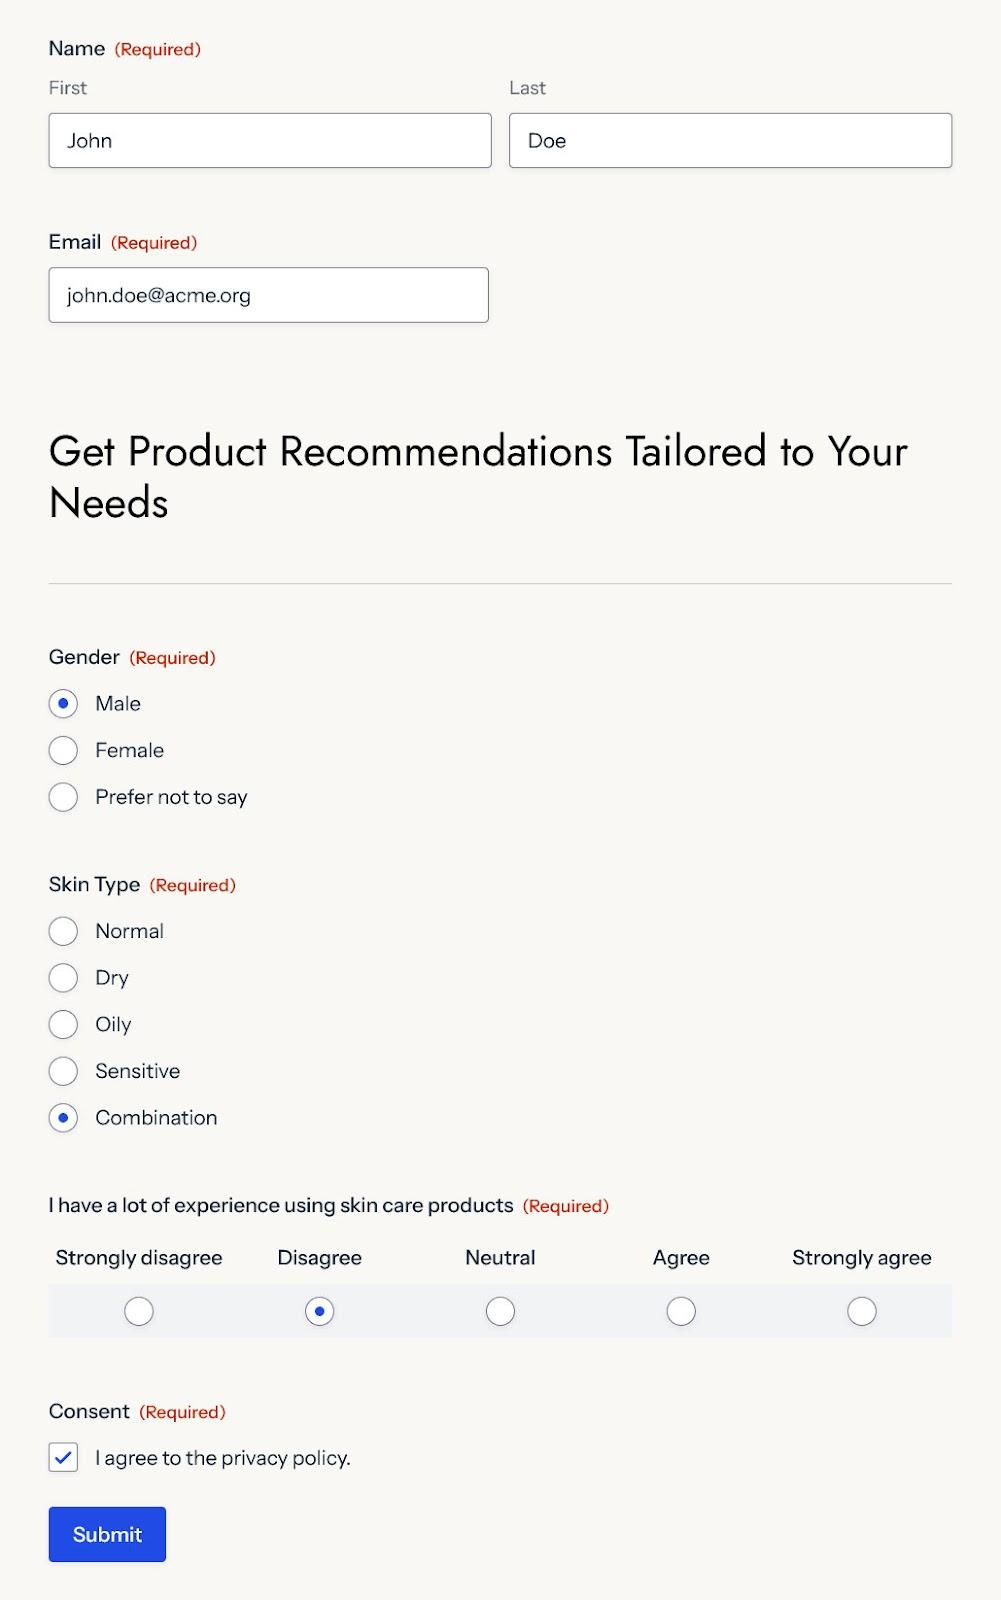
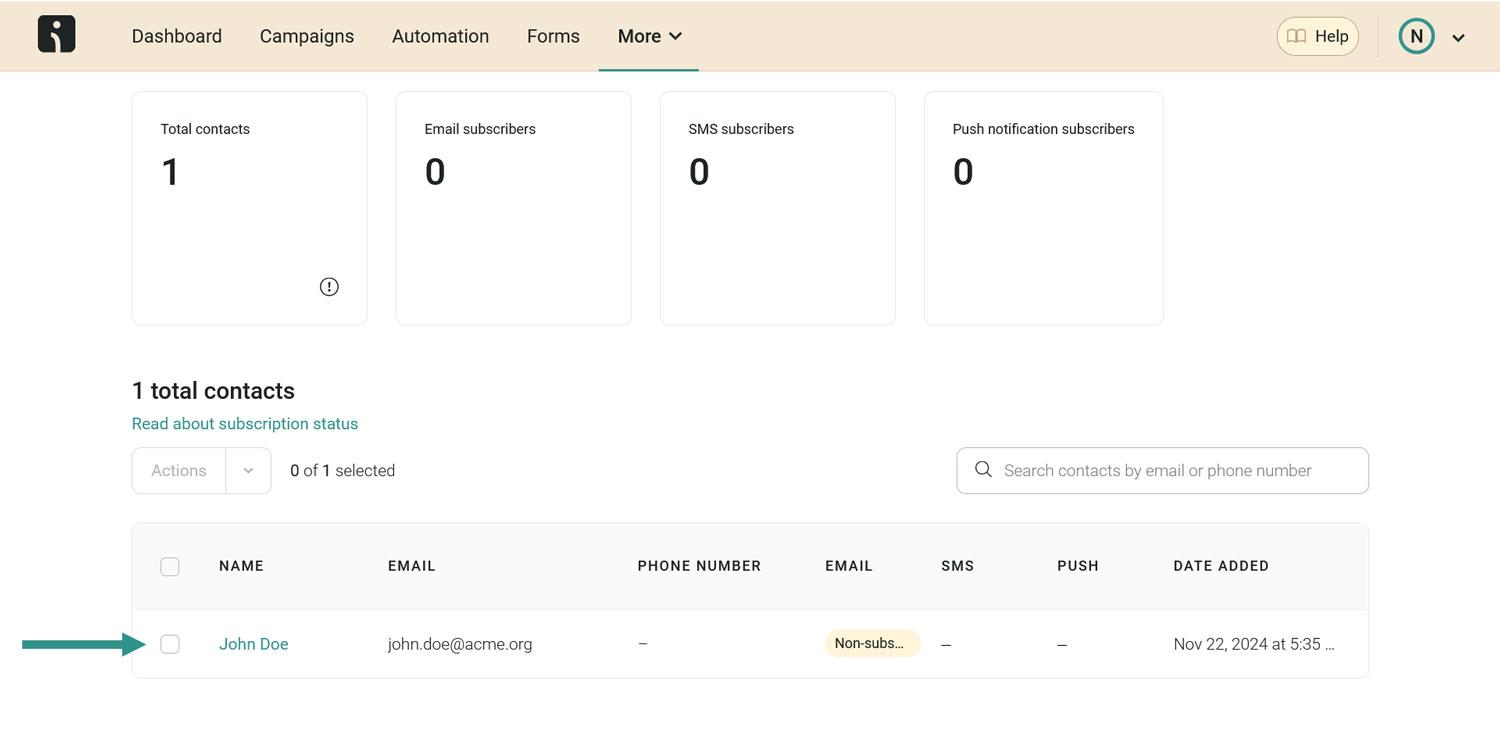
Check that everything is working as intended on the front end, and also be sure that the subscriber data arrives in Omnisend.
When you’re satisfied, hit Publish to make the survey available on your WordPress site.
By the way, you can later see an overview of the outcomes of your survey on the Survey Results page in the form settings.
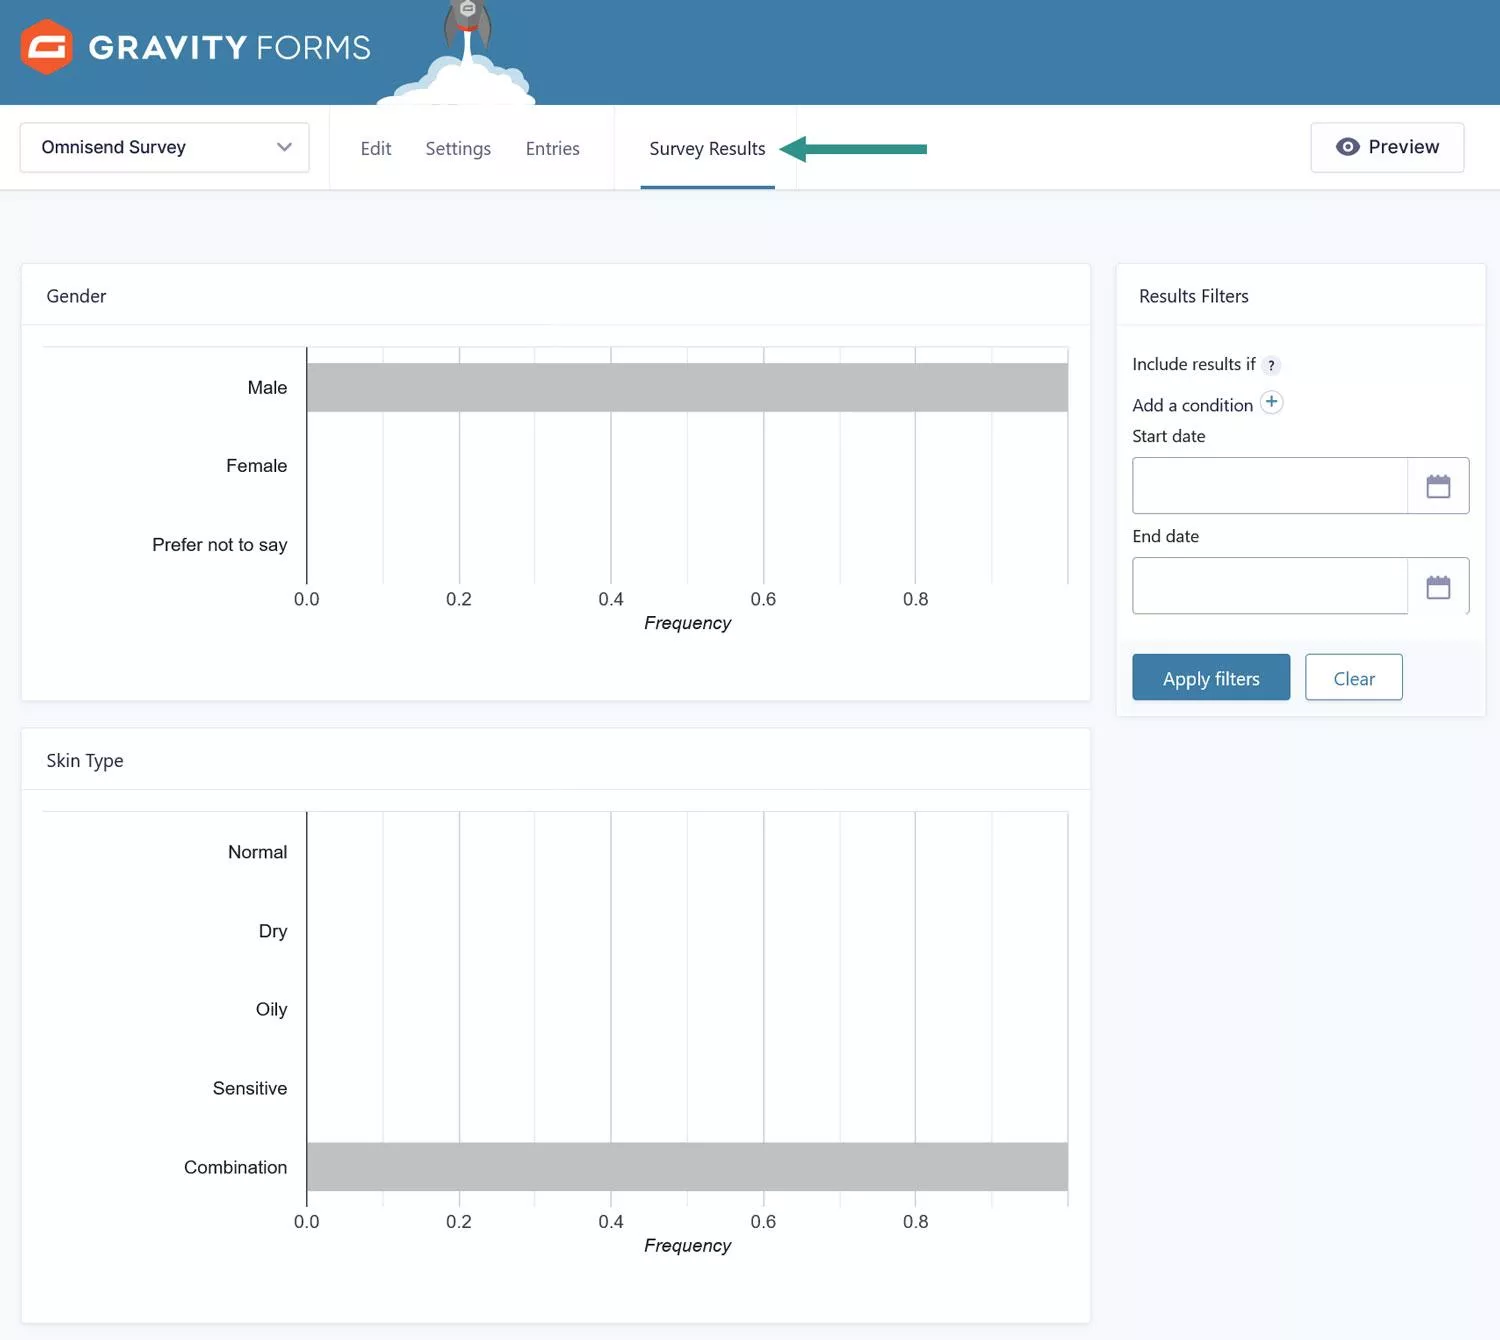
To drill down into individual responses, check the Entries menu.
Turn survey participants into email subscribers
Surveys are a powerful and versatile tool for growing your email list and gathering valuable insights at the same time. Using WordPress and Gravity Forms, you can easily create engaging surveys that directly connect to Omnisend and put your lead generation efforts on autopilot.
Author bio

Nick Schäferhoff — content writer, entrepreneur, and digital marketer. Based in Berlin but home anywhere that has an Internet connection. Bad at writing short bios. You can get in touch with Nick via LinkedIn or his website.
TABLE OF CONTENTS
TABLE OF CONTENTS

No fluff, no spam, no corporate filler. Just a friendly letter, twice a month.