
 OFFER
OFFER


Drive sales on autopilot with ecommerce-focused features
See FeaturesIf you’re wondering how to add collections on Shopify, you’re in the right place. Shopify collections help organize your store by bringing relevant products together in one place. With the help of well-crafted descriptions, they can also optimize your SEO, helping you get seen on search engines.
Collections can be created manually by selecting products. Alternatively, you can automate collections by setting up to 60 conditions. We’ll cover both of these below, explaining how to set up Shopify collections and highlighting their positives and negatives along the way. We’ll also answer some frequently asked questions so you can build your own collections safely in the knowledge that they will benefit your store.
Quick sign up | No credit card required
What are Shopify collections?
Shopify collections are groups of products, categorized to make them easy for customers to find. In terms of Shopify collections vs. categories, collections appear in a dedicated section, while categories appear in your top menu to help with navigation.
Shopify collections don’t work in the same way as product bundles.
Types of Shopify collections
Manual collections
With manual collections, the control is entirely in your hands. You add or remove each product, with nothing in the collection changing unless you decide to switch things up yourself. As a result, the process of creating the collection will be more time-consuming, especially if your inventory is large.
Manual collections are especially effective when creating limited-time flash sales or specific collections for certain customers. They are a good way to show off your personal favorite products or to bundle products that aren’t selling as well as you’d like.
Here are the advantages and disadvantages of manual collections:
| Advantages | Disadvantages |
| Gives you full control over the items in your collection | Time-consuming to create |
| Straightforward to set up | They lack dynamism as you have to add and remove everything yourself |
| Good for curating small or personalized collections |
Automated collections
Using automation to create your collections is a way to save time. They are ideal for permanent collection pages, especially if you have a lot of products for sale on your site. The process is relatively simple — you have to set the criteria for the collection, and Shopify will group the relevant products together for you.
However, this diminishes some of your control over your collection. Some products may appear as part of the collection if they match any of your criteria, whether you want them there or not.
Here are the advantages and disadvantages of automated collections:
| Advantages | Disadvantages |
| Saves time | Lack of control over items in your collections |
| Shopify will update your collection as you add more products to your inventory | Need to be specific in your criteria to avoid adding irrelevant products |
| Keeps your store organized for you |
How to manually add collections on Shopify
Step 1: Access collections from the Shopify dashboard
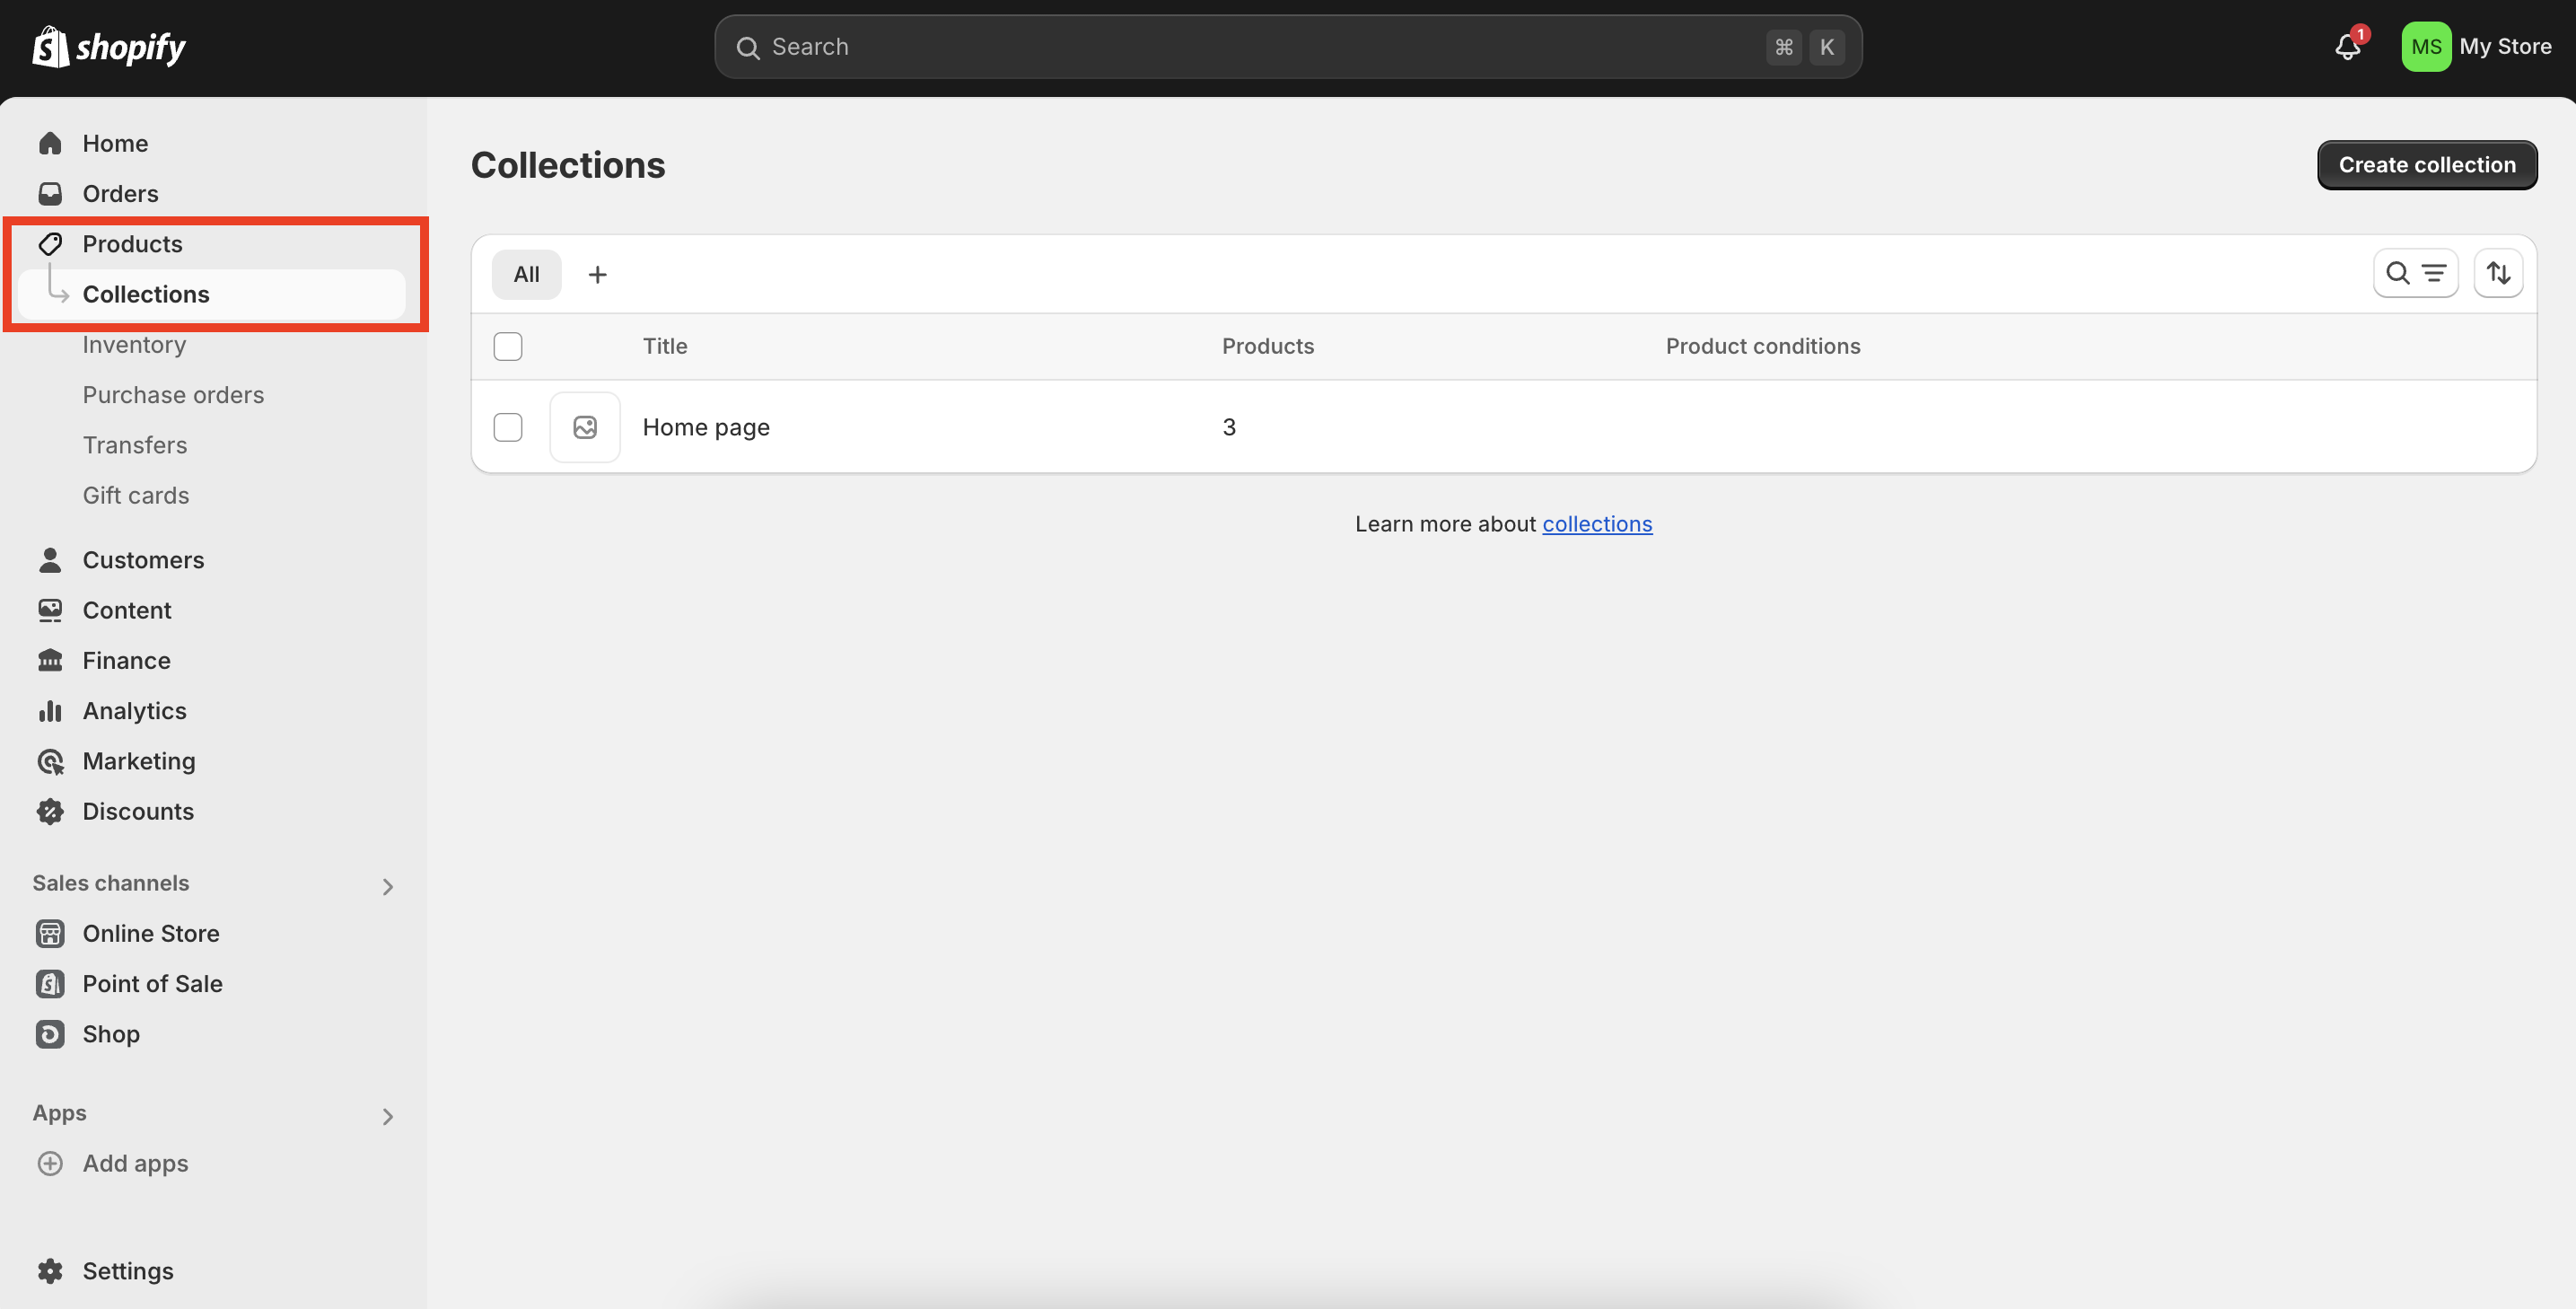
The first step when creating manual collections on Shopify is to access the collections area from your dashboard. It’s located on the left-hand sidebar once you click on Products. Once you’ve clicked on the Collections button, you’ll be redirected to the Collections page, where you can begin compiling your products.
Before going any further, it’s important to note that if you’re on the Starter plan, you won’t be able to create a Shopify collection. The feature is only available to those who are subscribed to the Basic Shopify, Shopify, Advanced Shopify, or Shopify Plus plans.
Step 2: Create a new manual collection
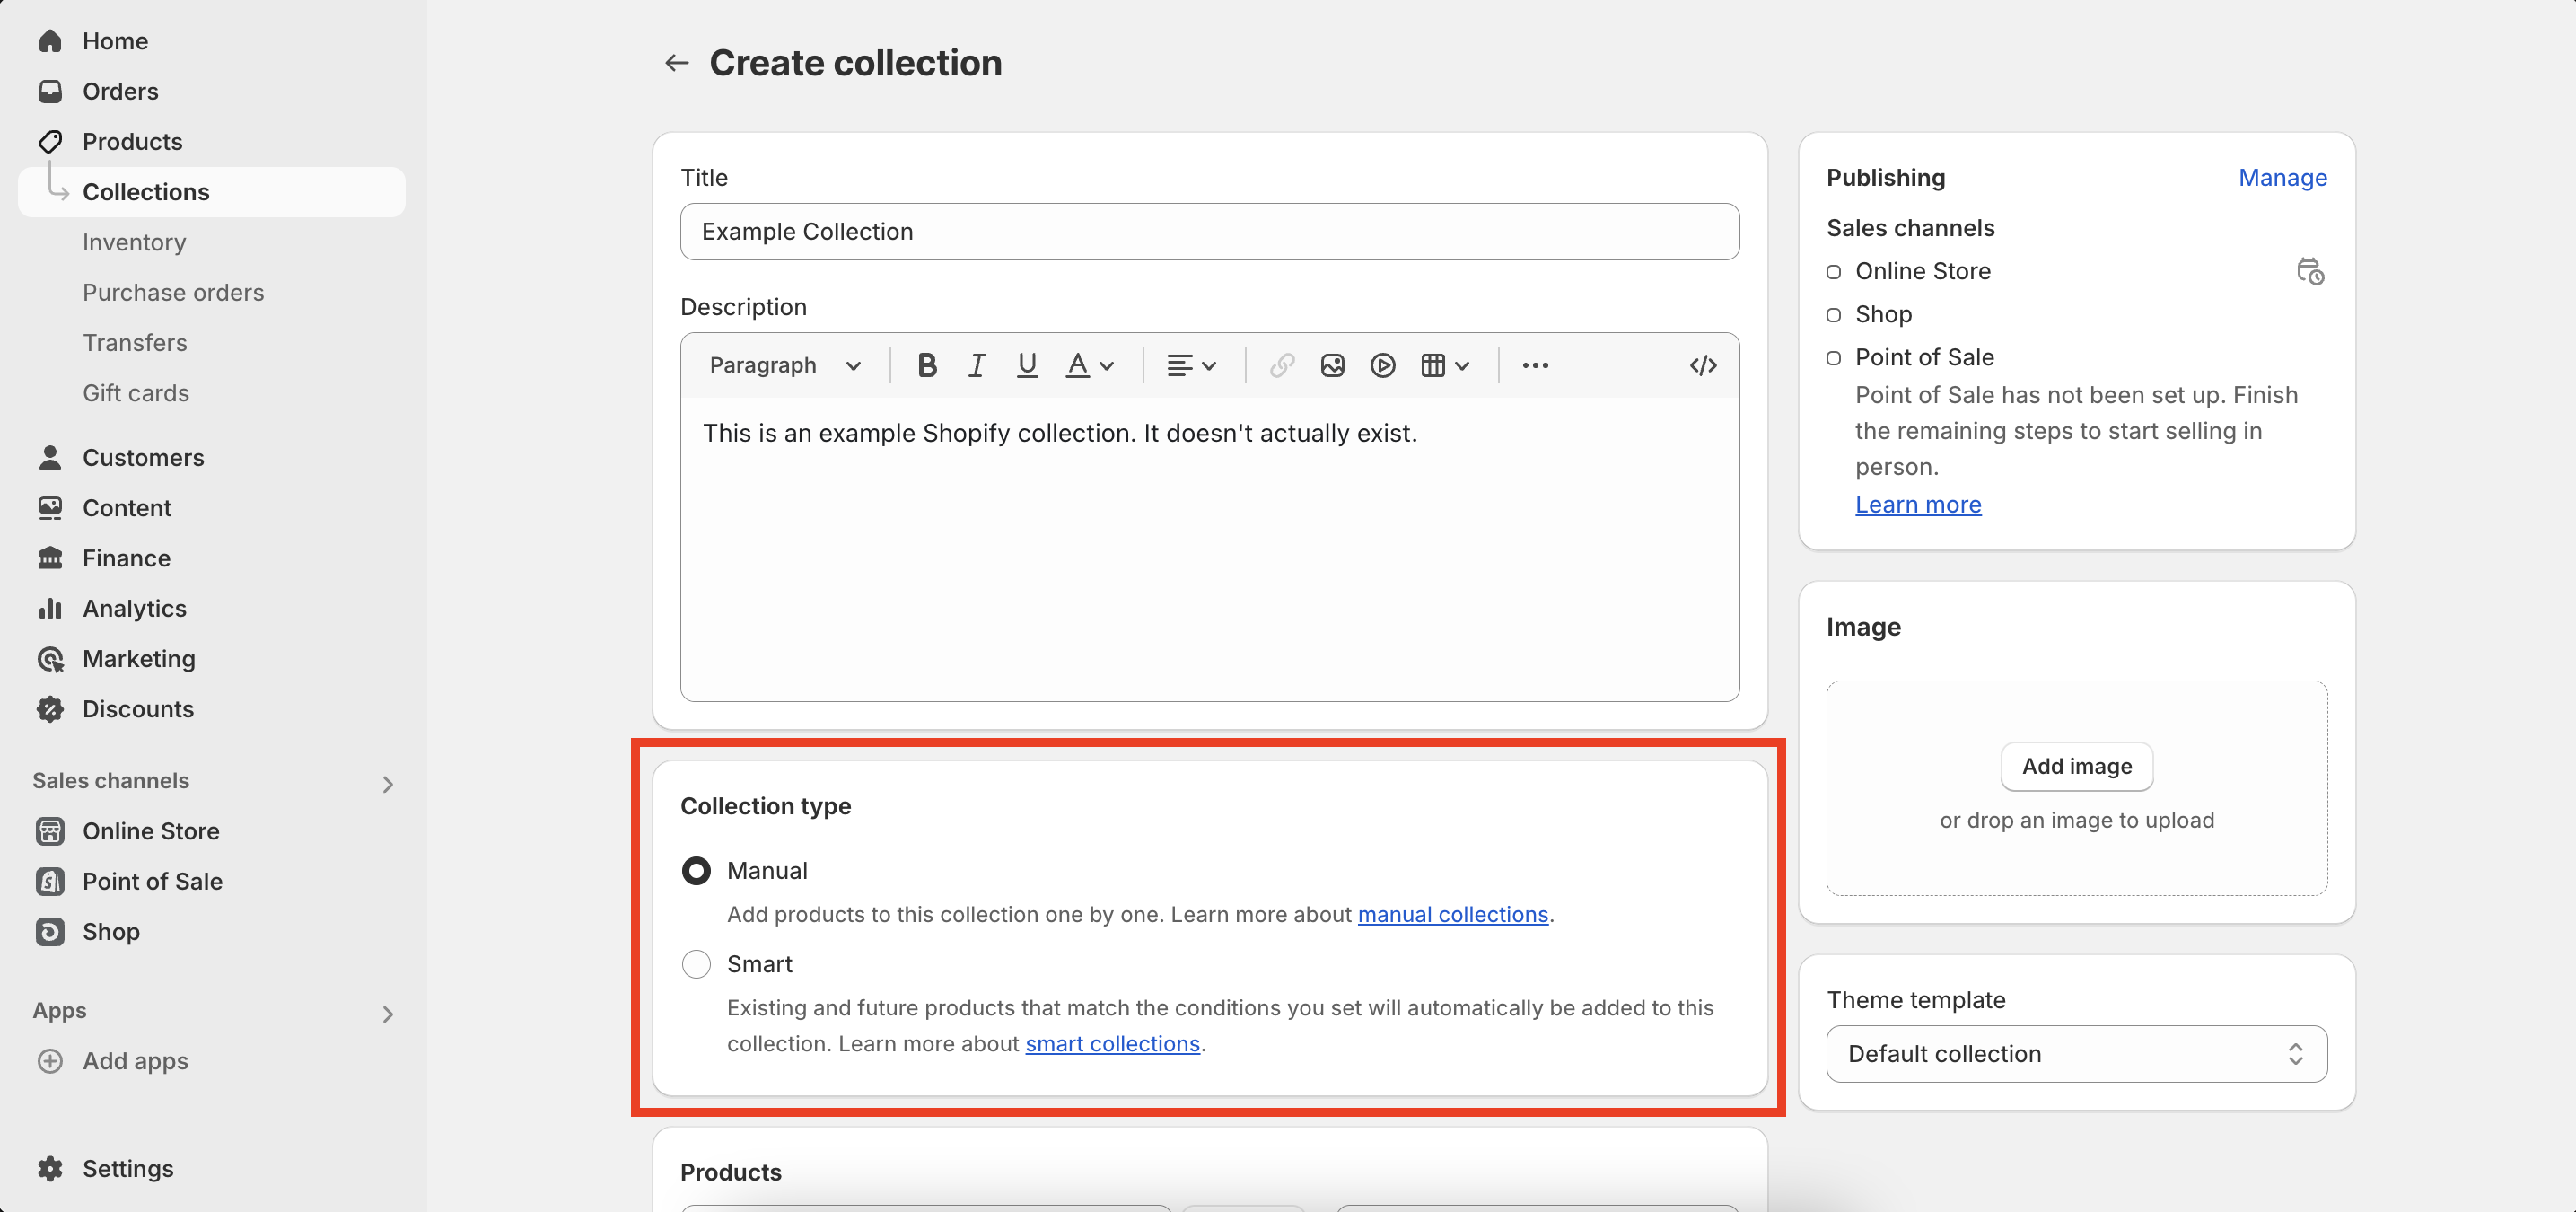
To begin creating your manual collection, click the Create collection button in the top right corner of the main collections screen. Once you have done so, you’re taken to the Create collection page, where you’re given the option of which collection type you want to create.
The default selection is Manual, which is the option we’ll be going for here.
Once you’ve selected this option, you can begin curating your collection by choosing the individual products you want to include. As you’ve likely noticed, creating manual collections is made as simple as possible by Shopify and doesn’t even require a Shopify app.
Step 3: Add products to your manual collection
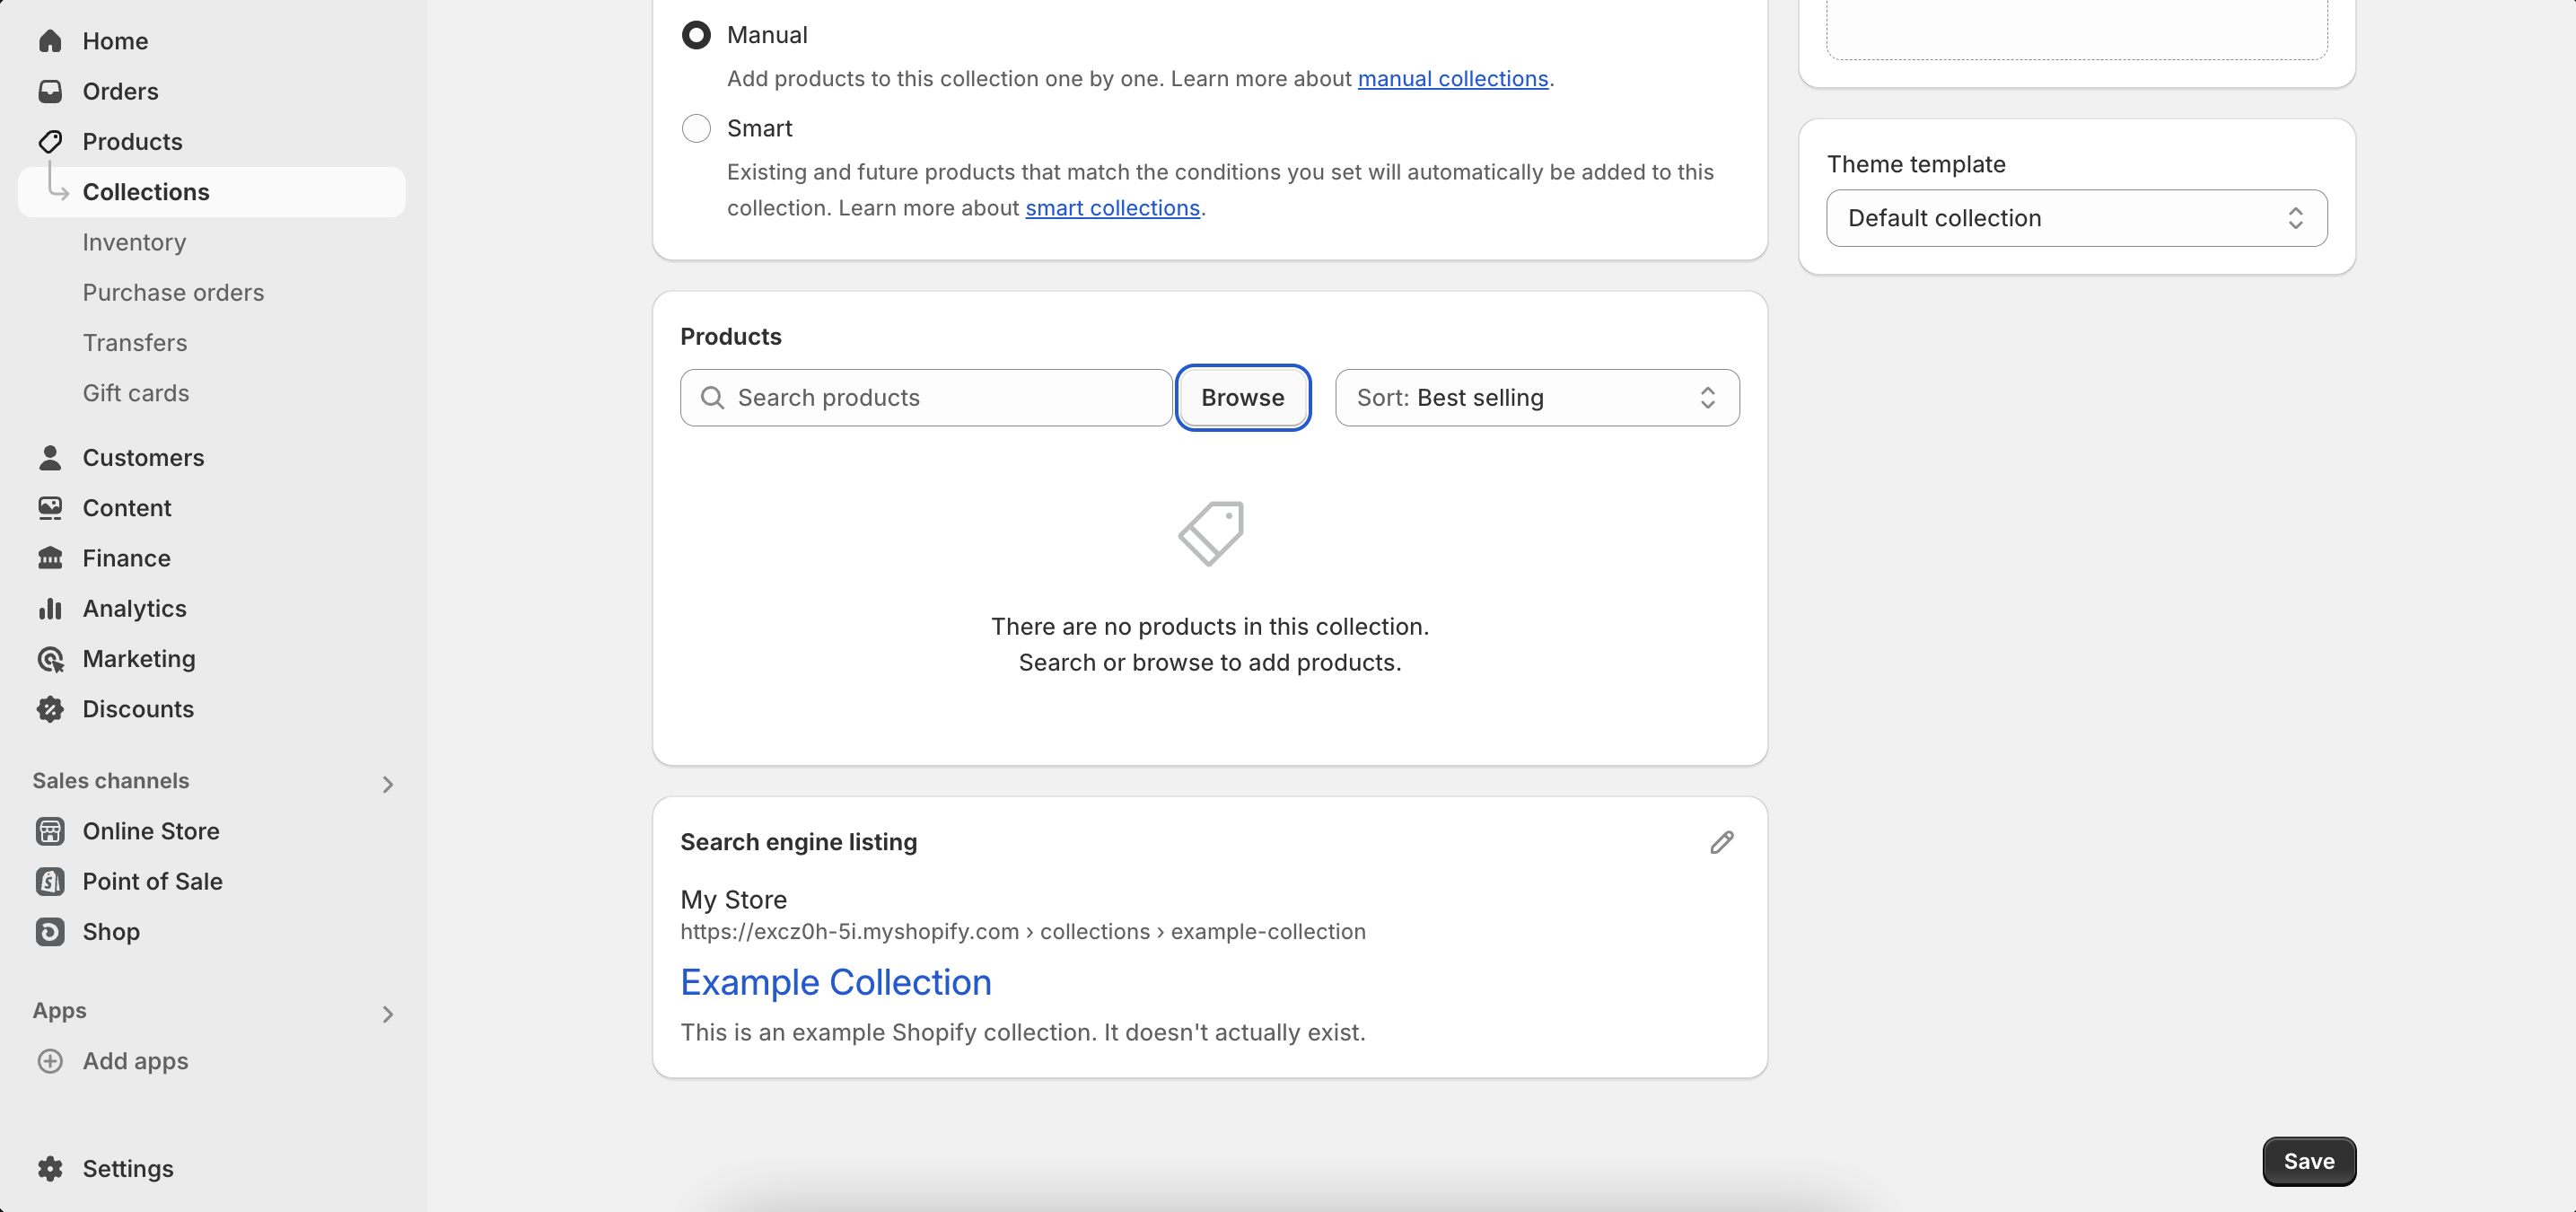
The next step involves scrolling down to the Products section of the screen. Here, you’ll find the option to search for products in your inventory or to browse through them manually. To get started, we’re going for the Browse option, which is located next to the search bar.
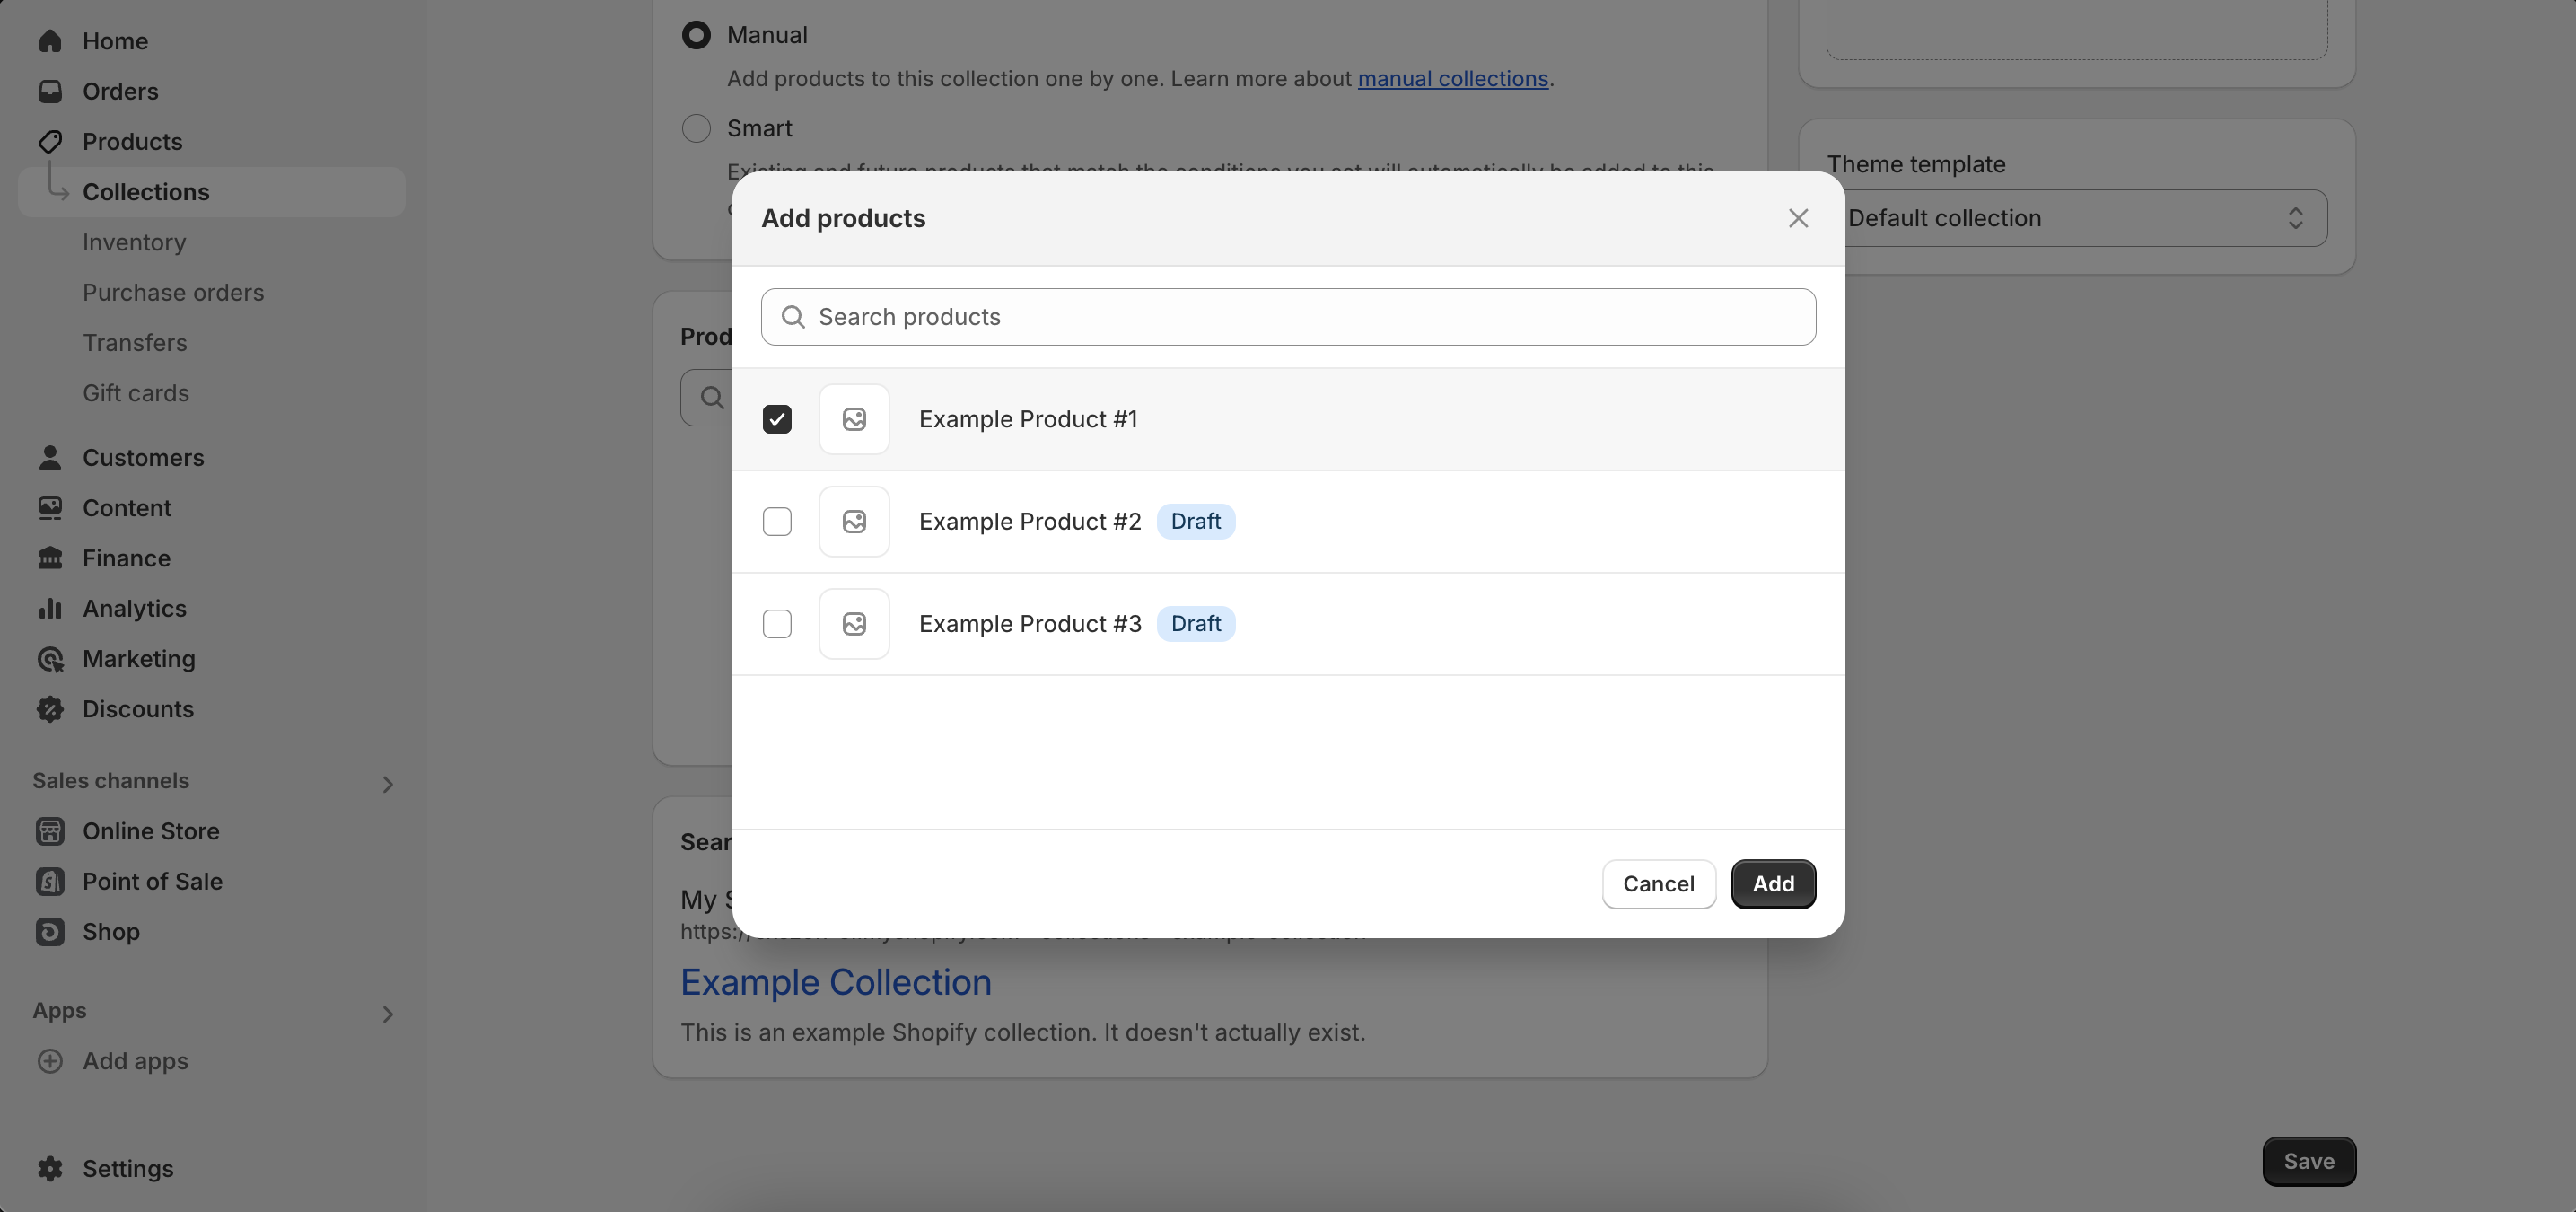
Once you click the Browse button, you’ll be shown a list of all the products in your inventory. Now, if your inventory is relatively small, this selection process will be more straightforward. However, if you have a large inventory of products, you might want to utilize the search bar at the top.
Thankfully, Shopify offers a tick-box system, so you can add multiple products at once rather than having to do it one by one. Simply tick the products you want to add, click Add in the bottom right corner, and your products will be added to your collection.
Once you’ve done this, you’ll need to customize the details of your collection.
Step 4: Customize your collection’s details
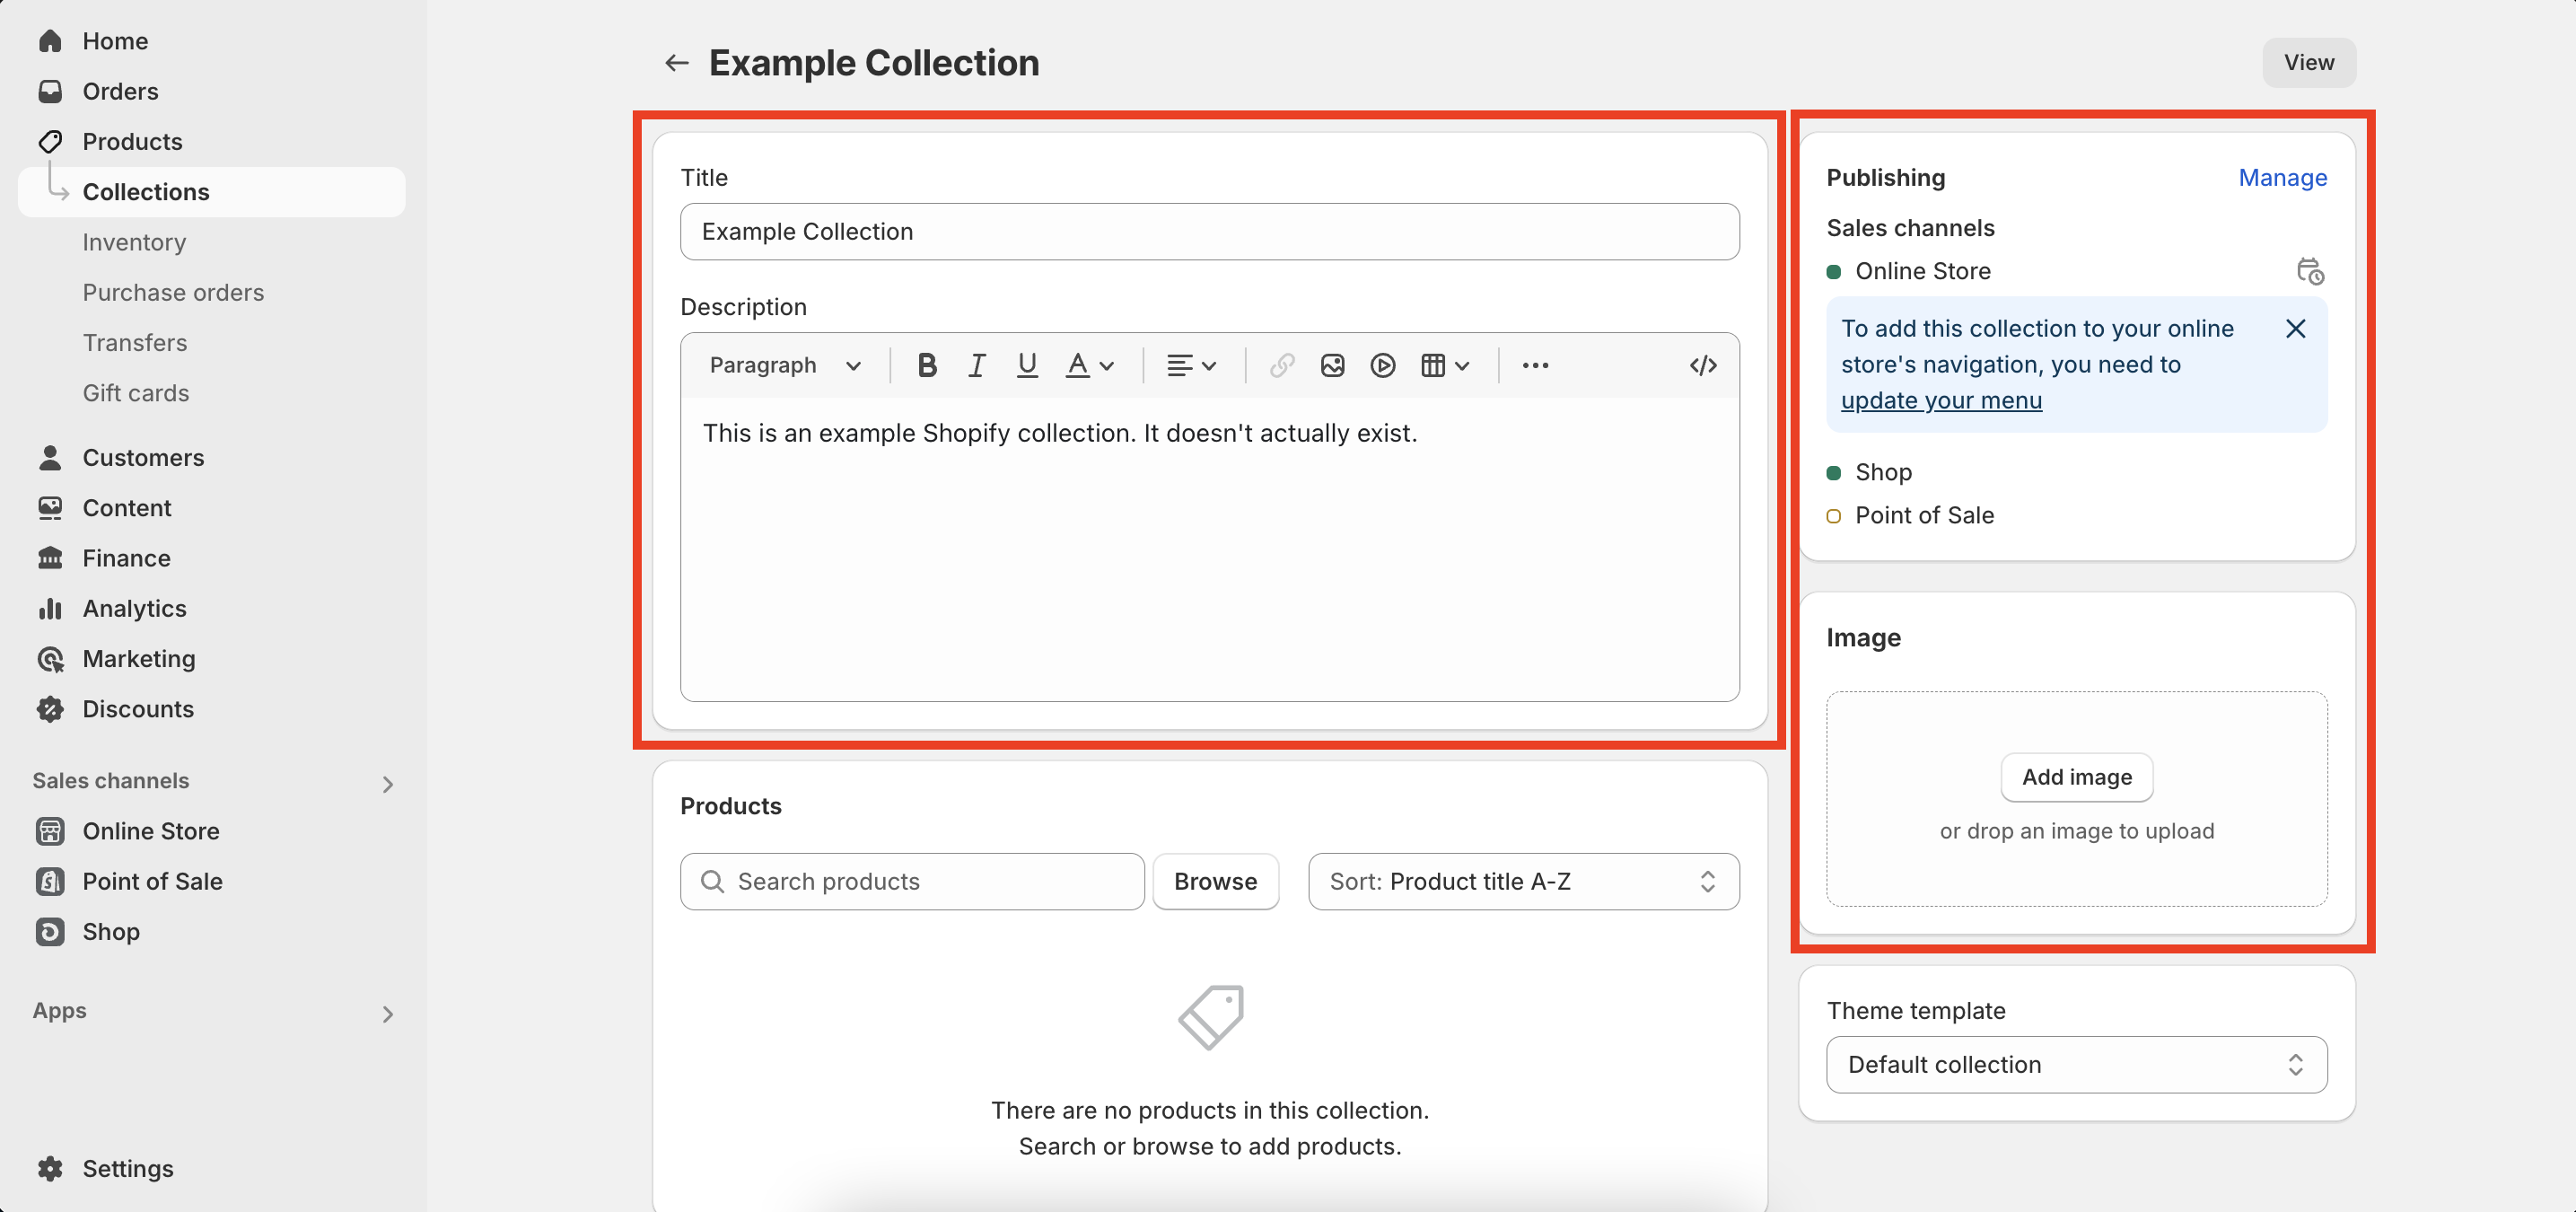
To get your collection creation started, name your collection and write a short, appealing description highlighting what the collection includes. Remember, this is an important component of your collection as it both gives customers more information and boosts your visibility on search engines.
You should also add a cover picture to supplement your collection and make it look more professional. All pictures you use for your collection should be at least 1080p quality to be clearly and easily seen by casual browsers.
The other option you’ll be faced with is where you want your collection to appear. You can choose to add it to the store’s main menu or the main store section or make it available at the point of sale. The latter option is best for upselling customers and increasing order value.
How to add automated collections on Shopify
Step 1: Navigate to collections on the Shopify dashboard
Creating automated collections on Shopify starts off in exactly the same way as manual collections, by clicking on the Collections button underneath Products. Once you’ve done this, you’ll be directed to the main collections page.
To begin the collection creation process, click the Create collection button located in the top right corner of the screen. This will direct you to the collection creation page, where you can begin the process of creating your automated collections.
There are multiple filtering options for your collections on the Collections page, as Shopify allows you to have up to 5,000. These options can be found just below the Create collection button in the top right corner of the page.
Step 2: Select automated collection type
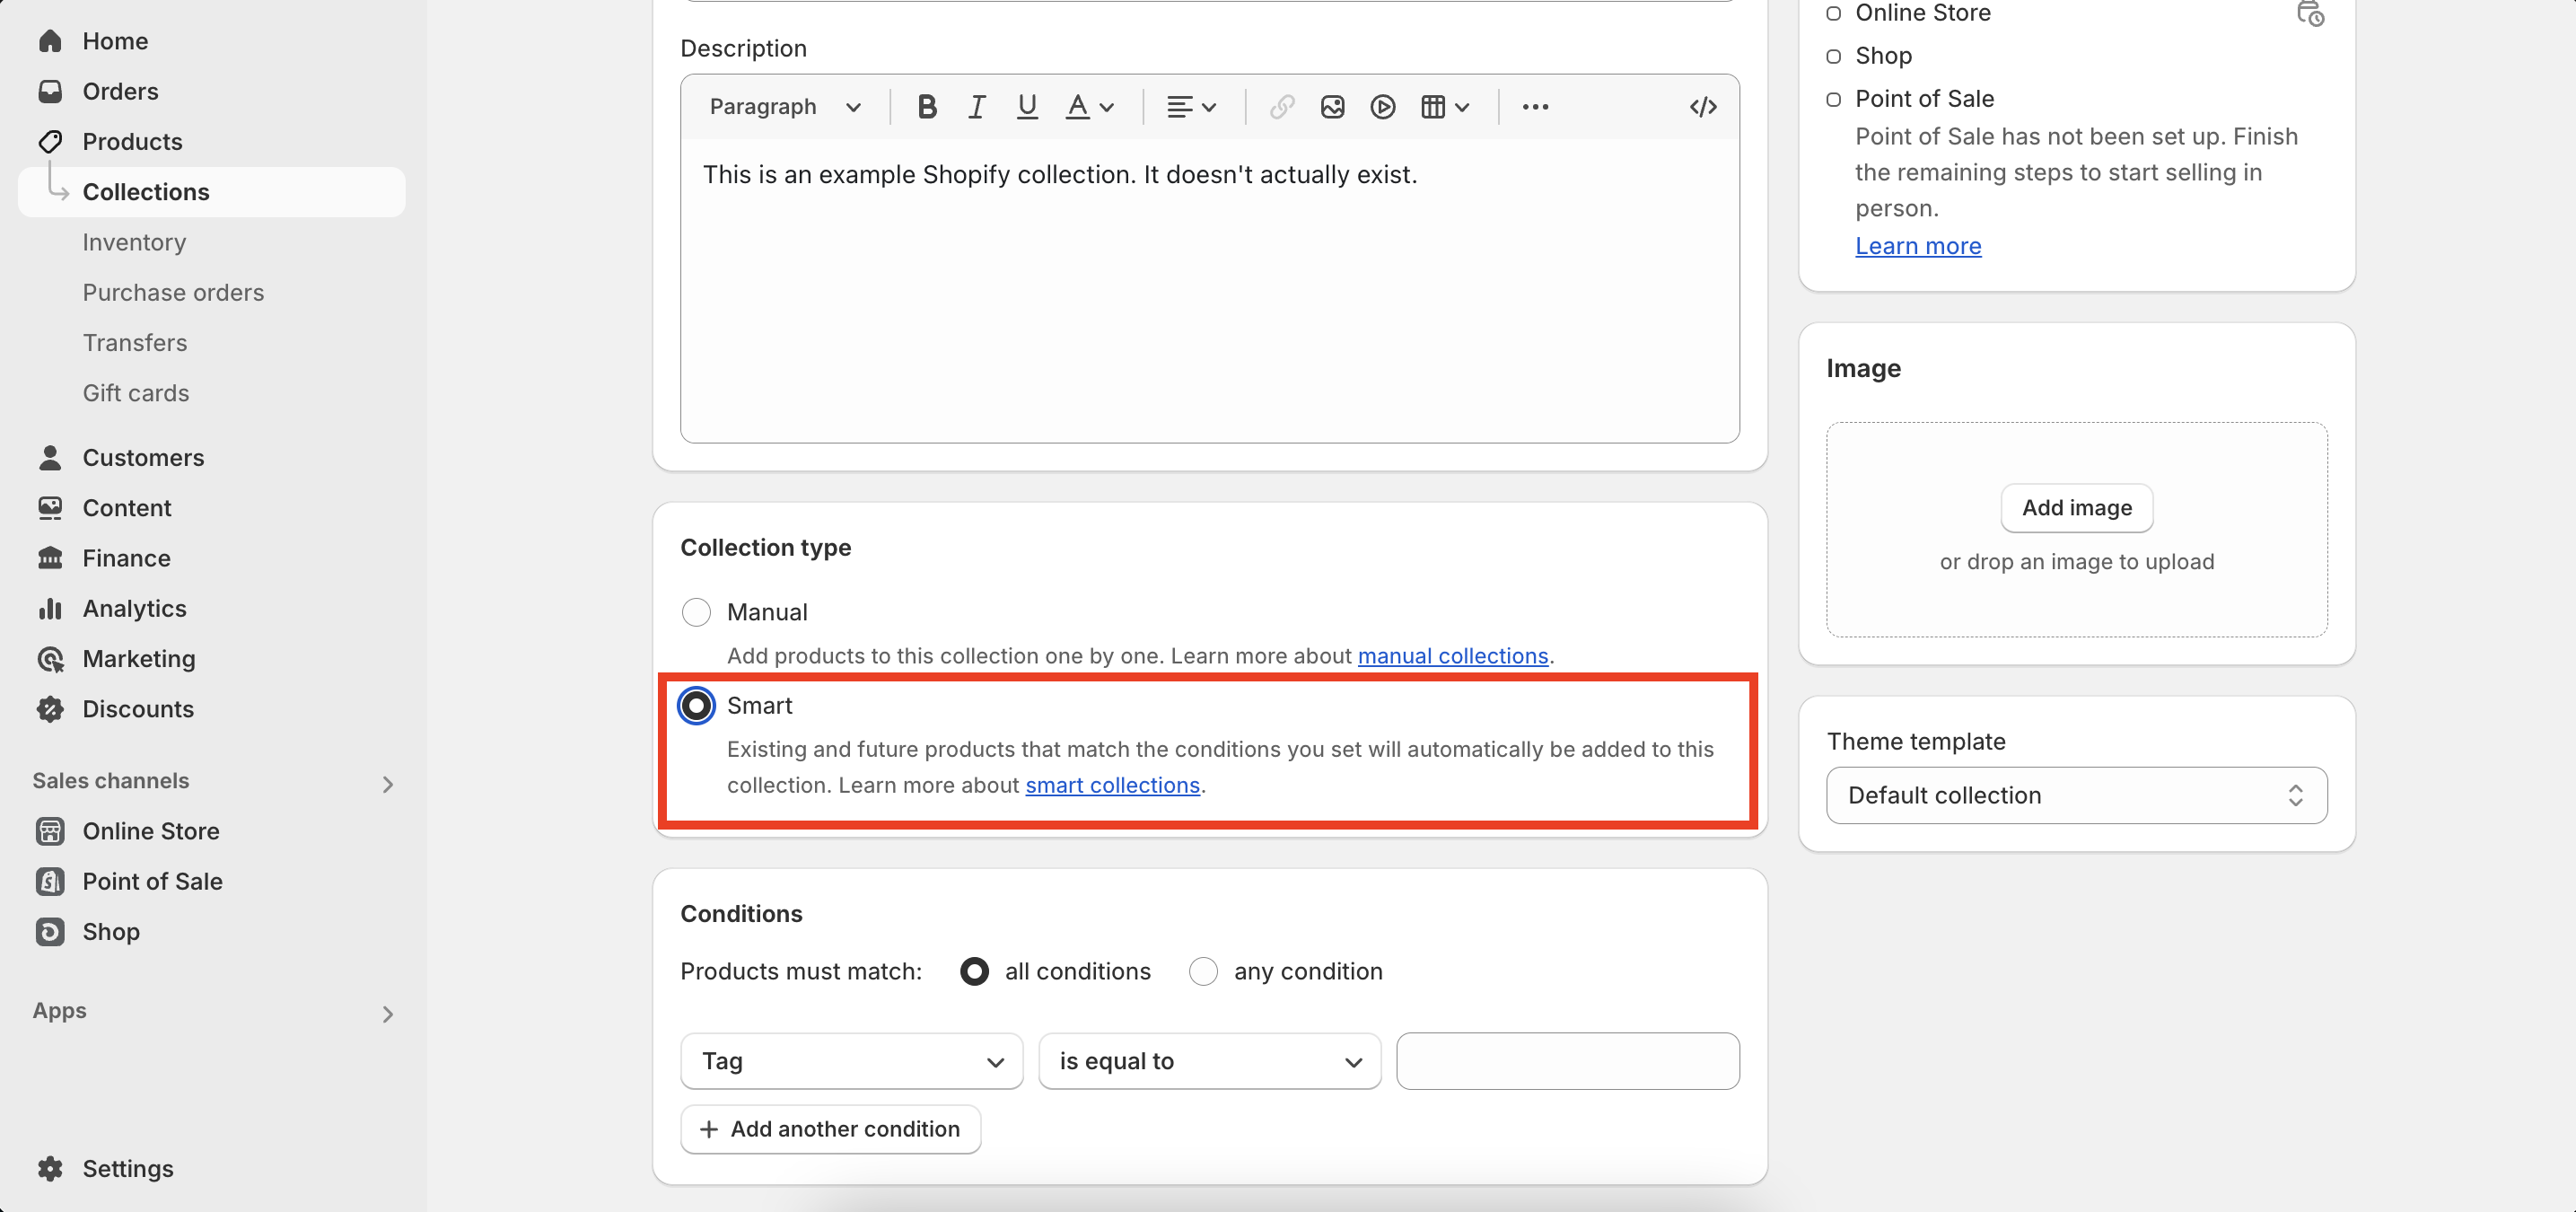
Once you have arrived on the collection creation page, you’ll be faced with two options: create a Manual or Smart collection. Manual will be the default selection, so make sure you select Smart.
This will then open up the Conditions section, where you can set the criteria for the collection you wish to create.
Step 3: Set conditions for automated collection
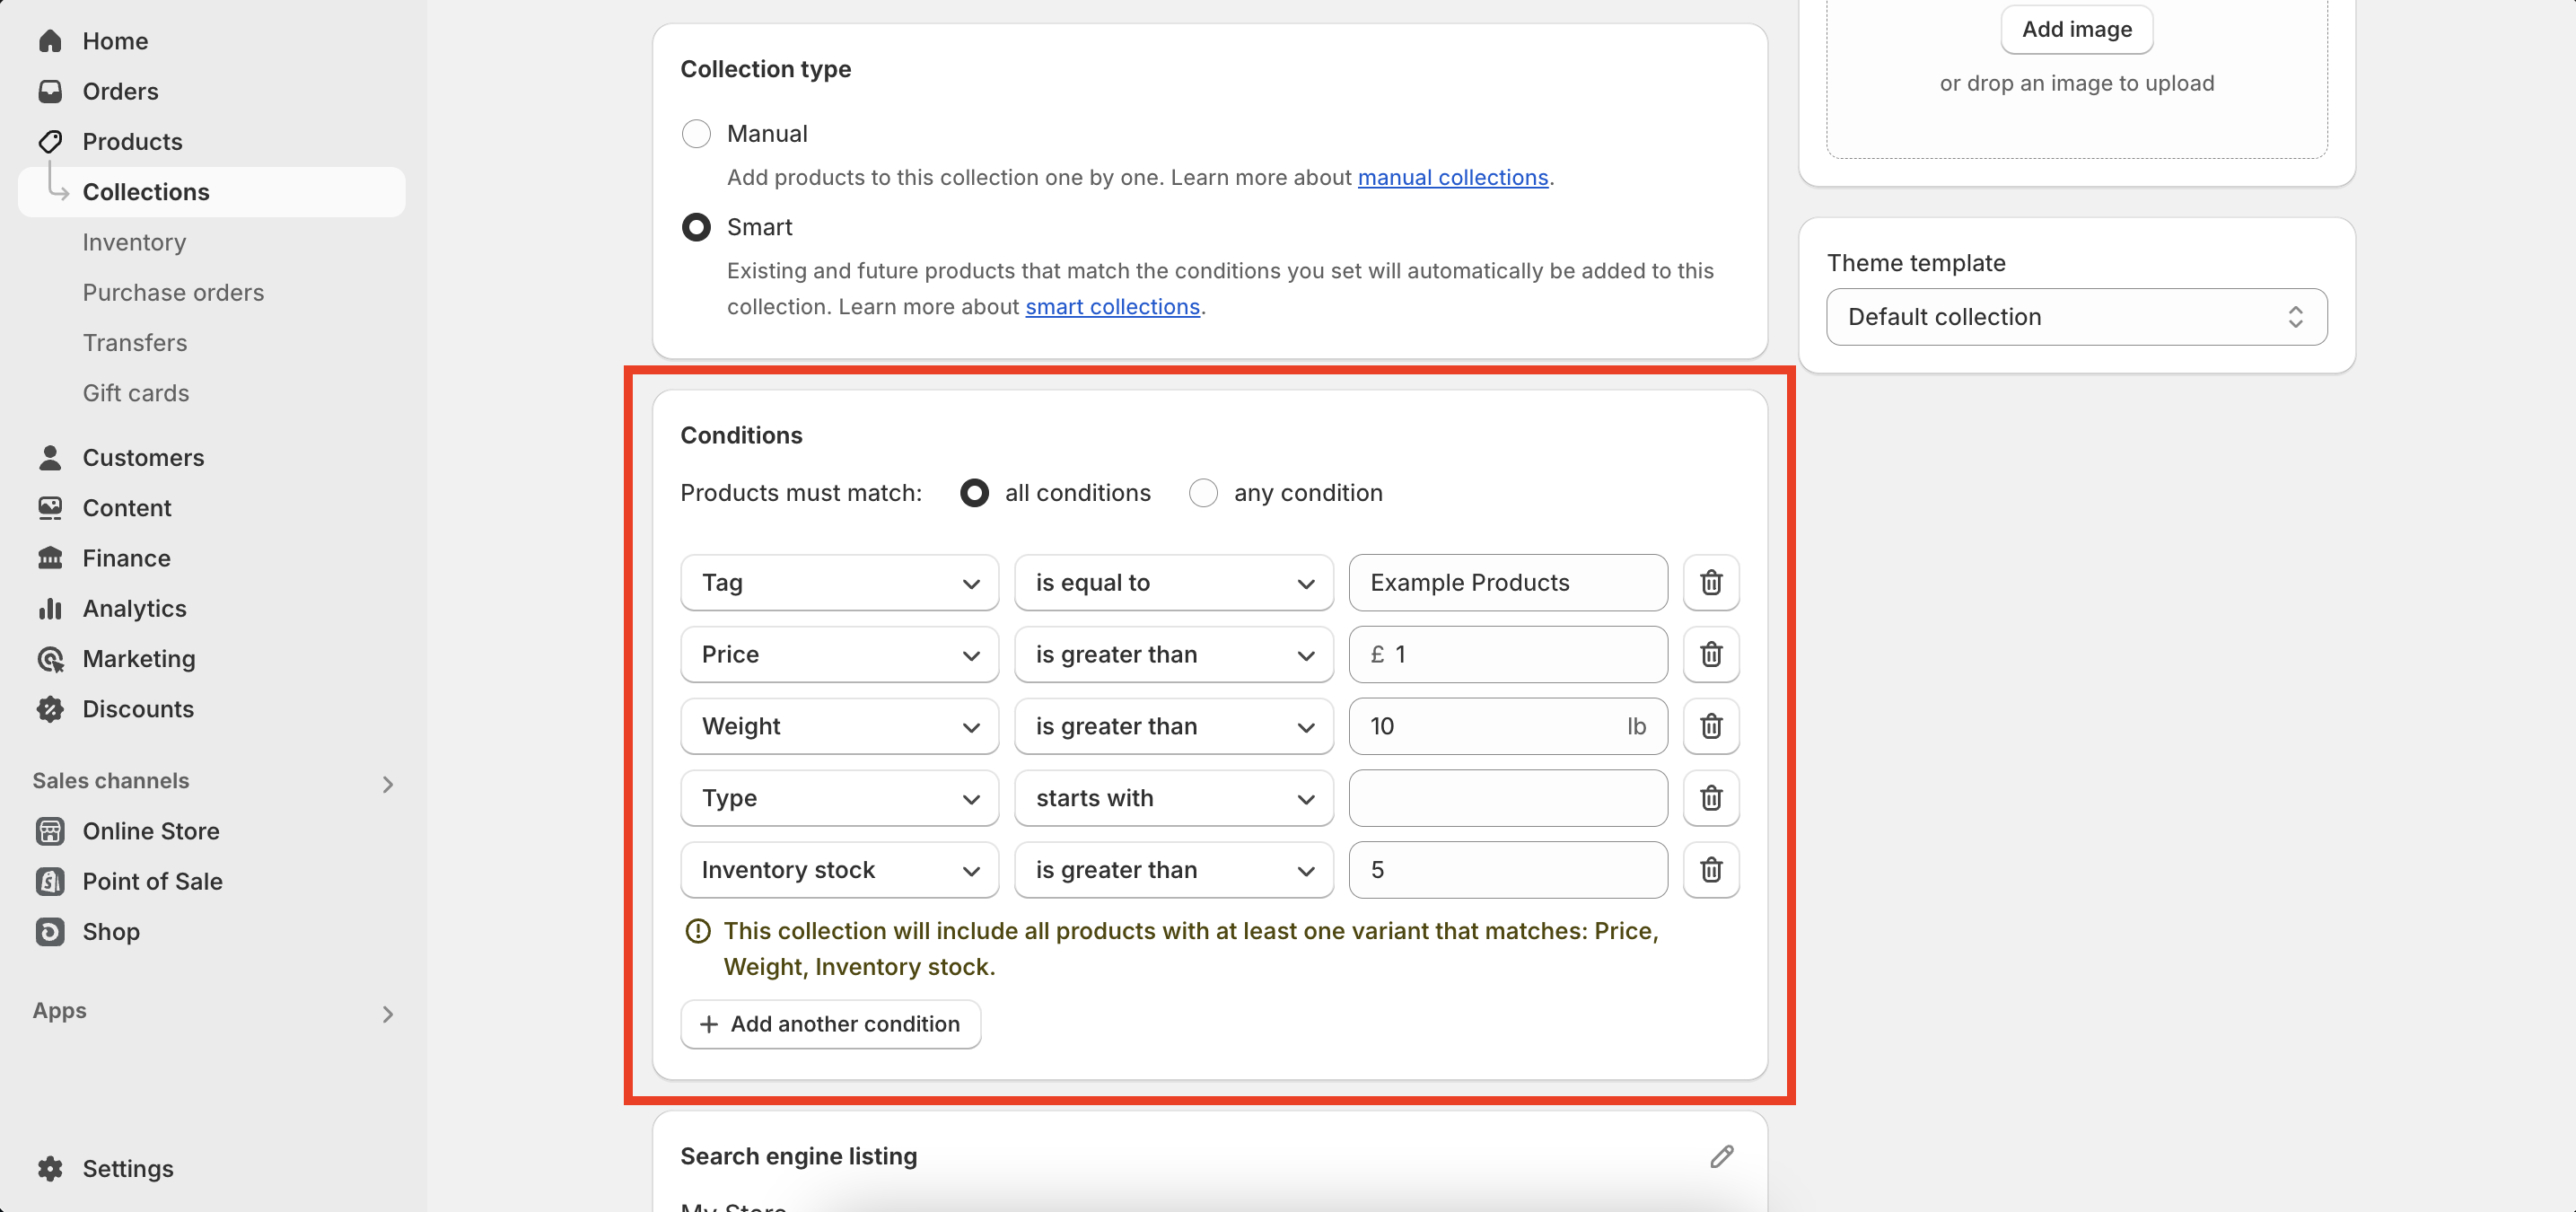
Creating the conditions for your automated collection is as detailed as you want it to be. There are 10 different criteria that you can use to filter down the products that you want to include, which are:
- Title
- Type
- Category
- Vendor
- Tag
- Price
- Compare-at price
- Weight
- Inventory stock
- Variant’s title
Select which ones you want to factor into your collection. For example, if you wanted to have a scented candle collection, you’d select candle as the type of product and scented in the tags section.
Automated collections rely heavily on the correct categorization and tagging of your products. If you add too many vague, inaccurate tags onto a product, you’ll risk the wrong items appearing in the wrong collections. On the other hand, if you don’t add enough information to your products, your automated collections won’t feature enough products to be worthwhile.
It’s especially important to label products correctly, as you can’t add or remove products to automated collections yourself.
Step 4: Customize your collection settings
The last step before finalizing your automated Shopify collection is to customize the title, description, and where you would like your collection to be published. You can either publish it in the main area of your store, in the shop section or have it appear at the point of sale.
This will involve writing a collection title and an optimized collection description. This description should be kept within a 100-word limit, containing a couple of keywords relevant to what it has to offer.
Inserting keywords into your collection description will not only help you keep your writing relevant, but it will also benefit you in terms of SEO. By implementing keywords into your description, you’ll stand a better chance of reaching the top pages of major search engines, making your collection more visible.
You should also customize your search engine listing, which is located at the bottom of the page. This includes a meta title, which will appear on search engines, and a meta description — a short piece of text describing your page’s content.
Quick sign up | No credit card required
Tips for managing and optimizing Shopify collections
There are multiple best practices for you to follow if you want to get the most out of your Shopify collections. They may take time to implement, but they will help streamline your customers’ experiences with your store and further drive sales.
- Take SEO seriously: Getting people through your store’s virtual doors is the first step, which means you’ll need to be visible on search engines. When writing descriptions for your collections, be sure to add relevant keywords. Also, ensure that products in your collections have keyword-oriented meta descriptions.
- Make collections visible: If nobody can find your collection within seconds of browsing your site, it will likely go unnoticed. If you have a specific collection you wish to promote, make it clear on your store’s homepage.
- Ensure easy navigation: A positive user experience will make customers more likely to buy from you. Make sure that it’s easy for customers to navigate your collection by enabling product filtering and ensuring products are in suitable areas. The checkout experience also needs to be made as straightforward as possible.
- Use high-quality images: Professionalism is key to success, so make sure every image in your collection is of a high standard and resolution. A phone camera will do the job as long as the lighting is good and the products can be viewed from multiple angles.
- Keep everything up to date: Remove products you don’t wish to include in your collections. Also, make sure that the products you want to include are tagged correctly so they appear in automated collections. This is especially important for Shopify sale collections to avoid confusion.
Common mistakes to avoid with Shopify collections
While Shopify’s collections feature can boost your sales, if you don’t do it right, you won’t feel its benefits. Here are a handful of common mistakes that you should avoid making for maximum success:
- Adding too many products: While you can add up to 2,000 products into a Shopify collection, having too many will be too overwhelming for the customer. It’s recommended you don’t add more than 50 products to a collection, as that’s the maximum number of products Shopify allows on one page.
- Adding unrelated products: The whole point of a Shopify collection is to organize relevant products in one place. Adding unrelated products into the mix will only confuse customers.
- Inconsistent aesthetics: While each product will have its own look and description, everything should have the same consistent theme. For example, the descriptions should be written in the same style, and the product branding should remain the same.
- Difficult to navigate: Online customers don’t tend to have a great deal of patience, so if your collection is muddled and difficult to navigate, you’ll lose customers. Make sure everything is tagged correctly, all the major products are easy to find, and all relevant information is included in product descriptions. Also, when marketing your site, don’t overcrowd any landing pages.
How Omnisend can help enhance your Shopify collections
Want to enhance your Shopify collection promotions? Here’s how Omnisend can help:
Segment your audience
Omnisend’s audience segmentation features will allow you to target specific customer groups based on their previous interactions with your site. You’ll be able to curate specific collections based on the information provided by Omnisend. You can then ensure the collections will land in front of the right people by using Omnisend’s targeted email features.
Target your emails
Using the information gathered from audience segmentation, you can send personalized automated emails highlighting the collections you have created to specific subscribers. This will help you attract an audience that’s highly likely to be interested in your Shopify collections, increasing the chance of them making a purchase.
Using Omnisend will help you streamline your email marketing by working with specifics rather than generalizations. It will give you far greater clarity on how to curate your collections based on items that customers frequently purchase together.
This will help increase order value, customer satisfaction, and, importantly, customer loyalty.
Don’t forget that Omnisend will also take care of your confirmation emails, making the process simple from beginning to end. With Omnisend’s retargeting features, you can help customers return to your store by reminding them of the items in their abandoned cart.
Conclusion
Implementing well-crafted, appealing collections into your Shopify store can improve your customer experience and increase sales — not to mention have significant SEO benefits.
You can choose from manual and automated “Smart” collections. Manual collections provide full control and are ideal for personalized or limited-time groupings. On the other hand, automated collections save time by grouping products based on preset conditions, though they offer less control. Both methods involve naming the collection, adding descriptions with SEO keywords, and choosing visibility settings.
Best practices include prioritizing SEO with optimized descriptions and meta tags, ensuring collections are easy to navigate, using high-quality images, and regularly updating product tags and inventory. You should also avoid common mistakes such as overcrowding collections, mixing unrelated products, and using inconsistent branding or product tagging.
Using Omnisend further enhances your Shopify collections by enabling targeted audience segmentation and personalized email marketing campaigns, improving customer engagement, order value, and loyalty.
Quick sign up | No credit card required
FAQ
To edit your collections, head to your admin page, click Products, and then Collections before selecting which collection you want to edit. From here, you can change your collection’s product list, including its layout, appearance, title, description, and more.
There’s a limit to the number of collections you can have on your Shopify site, although most users are unlikely to breach these limits. You can create up to 5,000 collections on Shopify, with each collection holding a maximum of 2,000 different products.
There are a few reasons why your collections might not be showing in Shopify. It could be due to a product visibility error, where you haven’t marked your collection status as available. You may also have linked the wrong collection in your navigation menu, which can be resolved in your Shopify admin panel.
You can create categories on your Shopify site in the admin panel. Head to the Products section, click Collections and Create Collections, and then enter your title and description. You’ll then be given the choice of whether you’d like to add products automatically or manually.
Products can be in two or more collections in Shopify. You can do this directly from the product’s details page by clicking on the Collections button. You can also create sub-collections within your collections if you want to further organize your store.
When you first create a collection, you’ll be asked to name it and write a description. If you want to rename a collection, head to your Shopify admin page. Go to Products, then Collections. Click on Collections Details, enter your new title, and make sure to click Save.
TABLE OF CONTENTS
TABLE OF CONTENTS

No fluff, no spam, no corporate filler. Just a friendly letter, twice a month.