Omnisend AI

 OFFER



Welcome email series currently drive a 52.98% click-to-conversion rate and generate roughly $6.30 per email, according to the Omnisend 2026 Ecommerce Marketing Report. They outperform all other automated workflows, let alone manual campaigns, by a significant margin in terms of revenue per email and click-to-conversion rates.
This guide will provide an email-by-email welcome series blueprint, core best practices, real ecommerce examples, and step-by-step setup instructions.
Quick sign up | No credit card required
What is a welcome email series?
A welcome email series is an automated sequence of three to six emails sent after someone subscribes. It’s designed to introduce your brand and move the reader toward a first purchase.
While you can, theoretically, put everything in a single welcome email, a full series spreads the incentive, story, and social proof across several emails instead of cramming them into one.
Why should you set up a welcome email series?
Automated welcome emails generate ~$6.30 per email, as shown by Omnisend’s 2026 Ecommerce Marketing Report. Manual campaigns, for context, only stand at $0.18 per email. To reach that number, however, you need to configure a series automation, not just a single email.
Here are three primary reasons why ecommerce brands build a welcome series:
- Better customer engagement: A welcome series spreads your brand introduction across multiple emails, which keeps subscribers engaged longer than a single message.
- Targeted segmentation: You can personalize each email in your welcome series based on your subscriber’s demographics and interests, which resonates better with new subscribers than a generic welcome email.
- More conversions: Not every new subscriber may be ready to make a purchase right away. You can introduce your product offerings gradually and guide them toward purchasing over time.
How many emails should a welcome series have?
A standard ecommerce welcome series contains three to six emails. The right number for you, however, depends on your product price, typical purchase cycle, whether an incentive is involved, and your overall list size.
| Situation | Number of emails | Why |
|---|---|---|
| High-ticket items | Five or six | To educate the buyer on material quality, sourcing, warranties, and other concerns |
| Low-cost consumables | Three | To send the promised sign-up incentive (discount, for example), introduce your brand in more detail, and send the reminder to use the discount before expiry |
The delivery schedule is also an important part that impacts the conversion rate. The first email must trigger immediately after a visitor subscribes. The remaining messages should be evenly spaced over the first one to two weeks. This will keep your brand visible during the initial period of high purchase intent.
What to include in each welcome series email?
| Timing | Goal | Main content | Call to action | |
|---|---|---|---|---|
| Email 1 | Immediately | Welcome and deliver incentive | Discount code, introduction, expectations | Shop now |
| Email 2 | Day 2 or 3 | Tell the brand story | Founder journey, mission, product differentiator | Read our story |
| Email 3 | Day 5 or 6 | Build trust and desire | Bestsellers, customer reviews, user-generated content (UGC) | Shop bestsellers |
| Email 4 | Day 8 or 9 | Drive final conversion | Urgency reminder for expiring incentive | Use your code |
Email 1: Deliver the welcome and the sign-up incentive
The first email needs to be immediate. Set it up so it arrives right after someone submits your sign-up form. Subscribers expect instant gratification when promised a discount or a free item. If you delay this message, you’ll most likely lose revenue. Deliver the incentive clearly at the top of the email, and make the code prominent and ready to apply at checkout.
Use the remaining space to set clear expectations for the relationship. Tell new subscribers what content they can expect to get, how often you’ll be emailing them, and what value they will get from staying beyond the first discount.
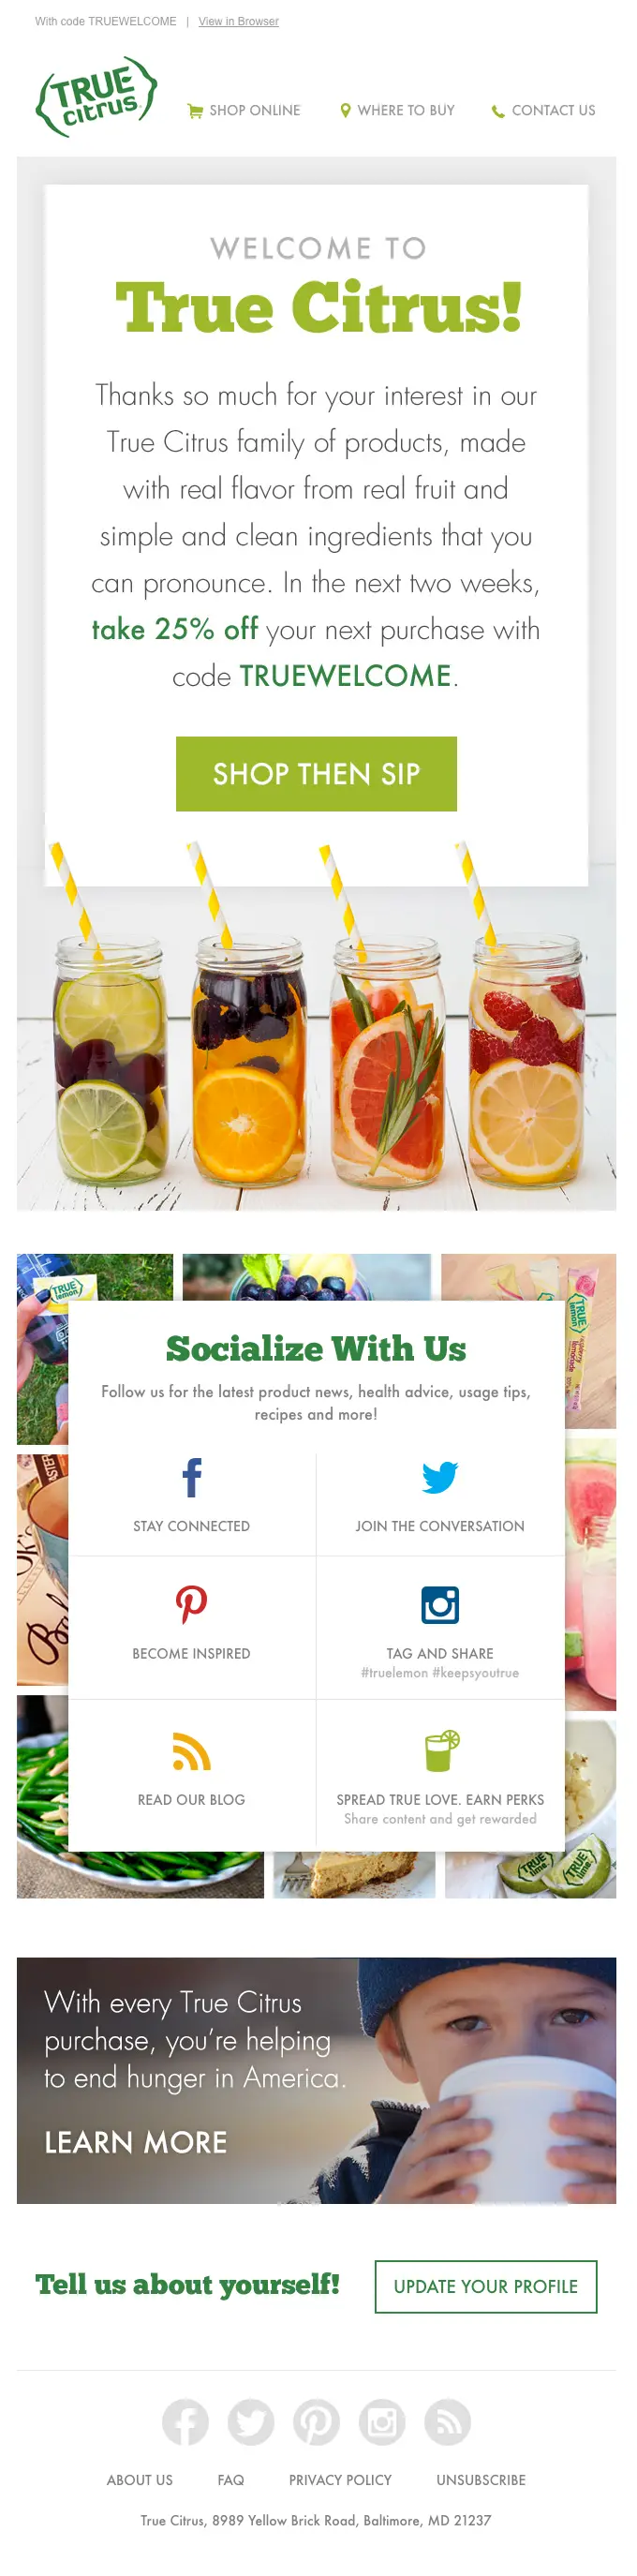
For example, True Citrus welcomes new subscribers with a 25% discount:
Email 2: Tell your brand story
The second email explains why your store exists and what makes your products different from others on the market. It’s the space to share your story, detail your sourcing practices, and highlight the problems that your brand solves.
Skip the attempts at hard sells for this email; instead, invite subscribers to understand your values and the good that their financial contribution could make. It gives buyers a reason to care not only about the product, but the people and cause behind it.
British children’s clothing brand Rachel Riley uses its welcome series to introduce new customers to its heritage and craftsmanship, like hand embroidery and smocking, to create an instant connection with the brand.
Email 3: Show bestsellers and social proof
The third email helps the reader decide what to buy. If they haven’t bought by now, they may not feel confident in their choice, or worse yet, be confused about your products. Add your top-performing products or break your catalog into popular categories with a brief explanation of how one differs from the other.
You can also add social proof alongside the bestsellers, if possible, to validate the recommendation. You can embed five-star customer reviews or user-generated photos in the email body. When new subscribers see that other people trust your products, their own purchase hesitation drops significantly.
Make sure both the reviews and photos are genuine; if someone catches on that you’re using fake social proof, your brand reputation will suffer.
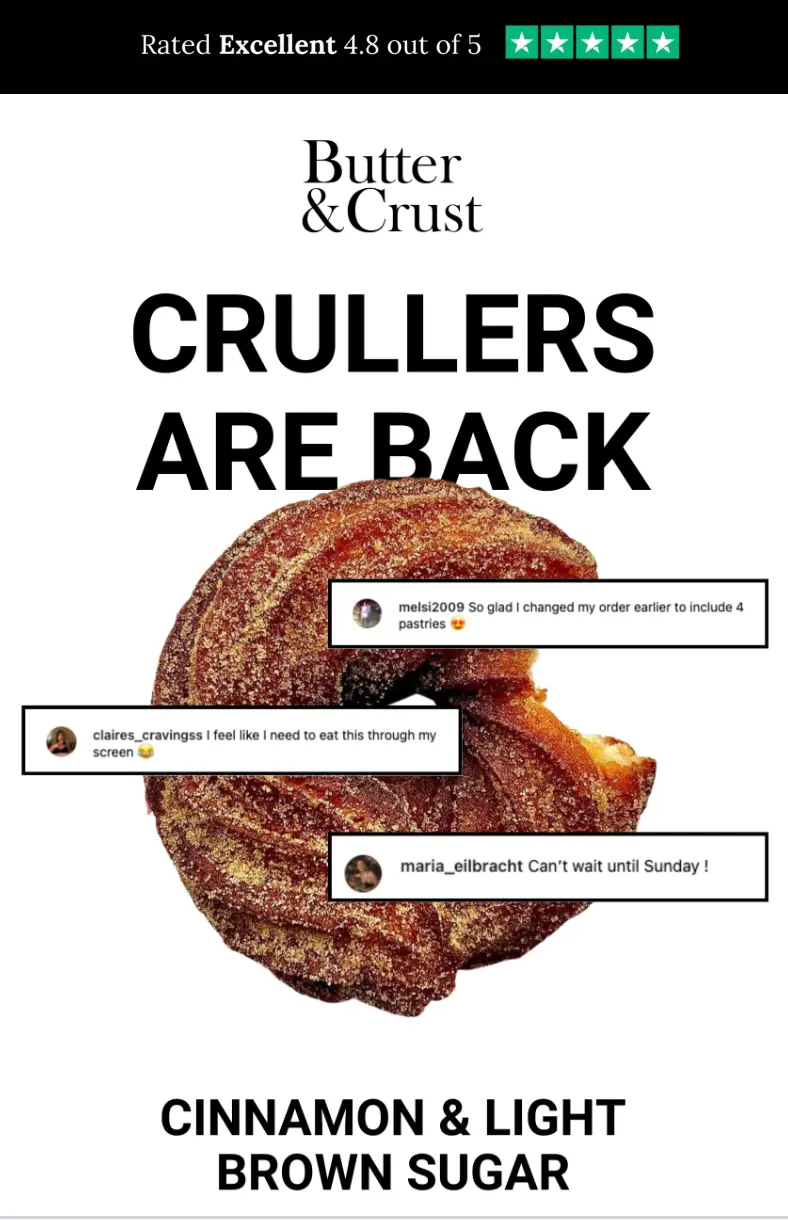
Butter & Crust includes Trustpilot rating plus social media comments to strengthen social proof:
Email 4: Remind subscribers before the offer expires
The final message in your sequence should focus on urgency and push your hesitant subscribers over the finish line. Send a reminder that the sign-up incentive expires in, for example, 24 hours. Don’t use this email to introduce more products; instead, focus on communicating expiring value.
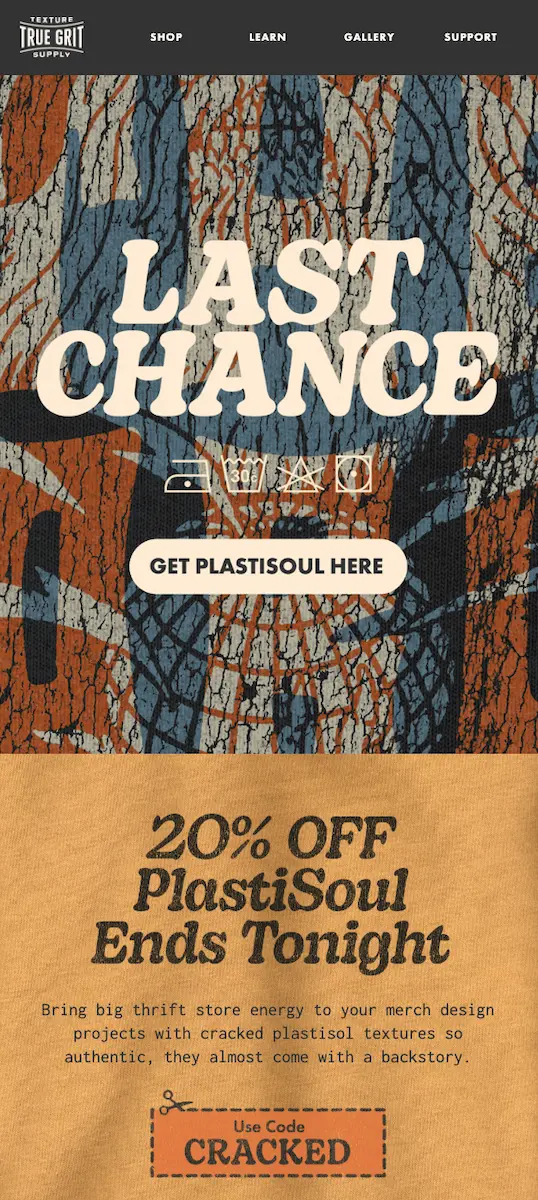
True Grit leads with “Last chance” in the headline to grab the reader’s attention and urge them to buy:
For more visual layouts, check out our blog post on the best welcome emails.
Email welcome series best practices
Six best practices matter most for a welcome series: segment by sign-up source, lead with the promised incentive right away, personalize product recommendations, apply strict exit conditions, integrate SMS, and track the right performance metrics.
Segment the series by sign-up source
Segment the series by how subscribers joined your list: a discount pop-up, a quiz, checkout, or social.
If the shopper subscribed via the checkout flow, they don’t need a discount code because they’ve already made a purchase. Sending your brand values and explaining how their purchase contributes to some greater good is a better option.
Similarly, a visitor who completes a skincare quiz should receive their skin type results with tailored recommendations, and a discount code (if it exists) should only serve as a secondary benefit.
If you want your messages to be relevant and impactful, you need to tailor them properly.
Lead with the incentive subscribers signed up for
Lead with the welcome discount (or any other sign-up incentive you had) at the very top of your first email. In most cases, the incentives are percentage discounts, cash discounts, free shipping, or free items with first purchases.
If your product doesn’t allow for frequent discounts, you can opt for a non-discount incentive like a free downloadable asset or exclusive early access to new collections before they hit the general market.
Personalize product recommendations
Personalize using dynamic product blocks so the email automatically populates different products for different people based on what they searched for in your store. For example, if someone checked out men’s fleece jackets and you send them women’s cardigans, they’ll stop opening your emails.
Dynamic recommendations won’t always be perfect. They’re still more relevant than picking one or two items by hand from a 10,000-product catalog.
Stop the series once a subscriber buys
Stop the series by applying an automated exit condition that stops subscribers from receiving promotional welcome emails the moment they place an order. Sending a discount-code reminder to someone who just used it makes your brand look careless and trains subscribers to ignore you.
Make sure you remember to set up a simple conditional split so your buyers immediately exit the promotional flow and move into your post-purchase sequence.
Add SMS to your welcome series
Add SMS to deliver urgent information, like incentive codes and expiry reminders, directly to their phone. However, make sure you don’t overuse it to the point that the subscriber decides to block you.
Also, email and phone numbers require distinct compliance paths, so you need to collect SMS consent separately on your sign-up forms before adding SMS to your workflow. Read our guide on SMS marketing to understand compliance rules and strategies better.
Track the metrics that show your series is working
The best metrics that show the success of welcome email sequences are conversion rates, revenue per recipient, click rates, and unsubscribe rates. You might be tempted to rely only on open rates, but since the Apple Mail Privacy Protection update, this metric has become less than ideal for tracking success. That’s why you need to pay attention to other metrics.
For example, a high unsubscribe rate on your second email may signal that the brand story comes off as disingenuous or irrelevant, whereas a low click rate on the third email may show issues with your product recommendation strategy. You’ll need to work on your strategy consistently to identify underperforming emails and optimize them until you reach the result you want.
Omnisend’s 2026 Ecommerce Marketing Report identifies the following metrics for welcome automations:
| Metric | Welcome email benchmarks |
|---|---|
| Open rate | 33.79% |
| Click-to-sent | 3.78% |
| Conversion rate | 2.00% |
| Click-to-conversion | 52.98% |
| Average order value (AOV) | $315 |
| Revenue per email | $6.30 |
For benchmarks beyond welcome automations, see our roundup of email marketing statistics.
Welcome series examples from ecommerce brands
These welcome email examples from ecommerce brands show how to structure a complete multi-day sequence. You’ll see how brands space out their messaging, transition from introductions to product recommendations, and drive the first purchase.
To’ak Chocolate tells its story through the founder’s eyes
“Our automated welcome series allows us to share our brand story with anyone who subscribes, which helps us communicate the uniqueness of our brand. We tell the story from the founder’s perspective, the farmer’s perspective, and from other voices. Today, customers get a personalized introduction to our brand. Email automation makes it possible, for a small team like ours, to show customers that we care about building a connection.”

Welcome series email 1: Telling the brand story
Subject line: It all started in a rainforest… 🌳
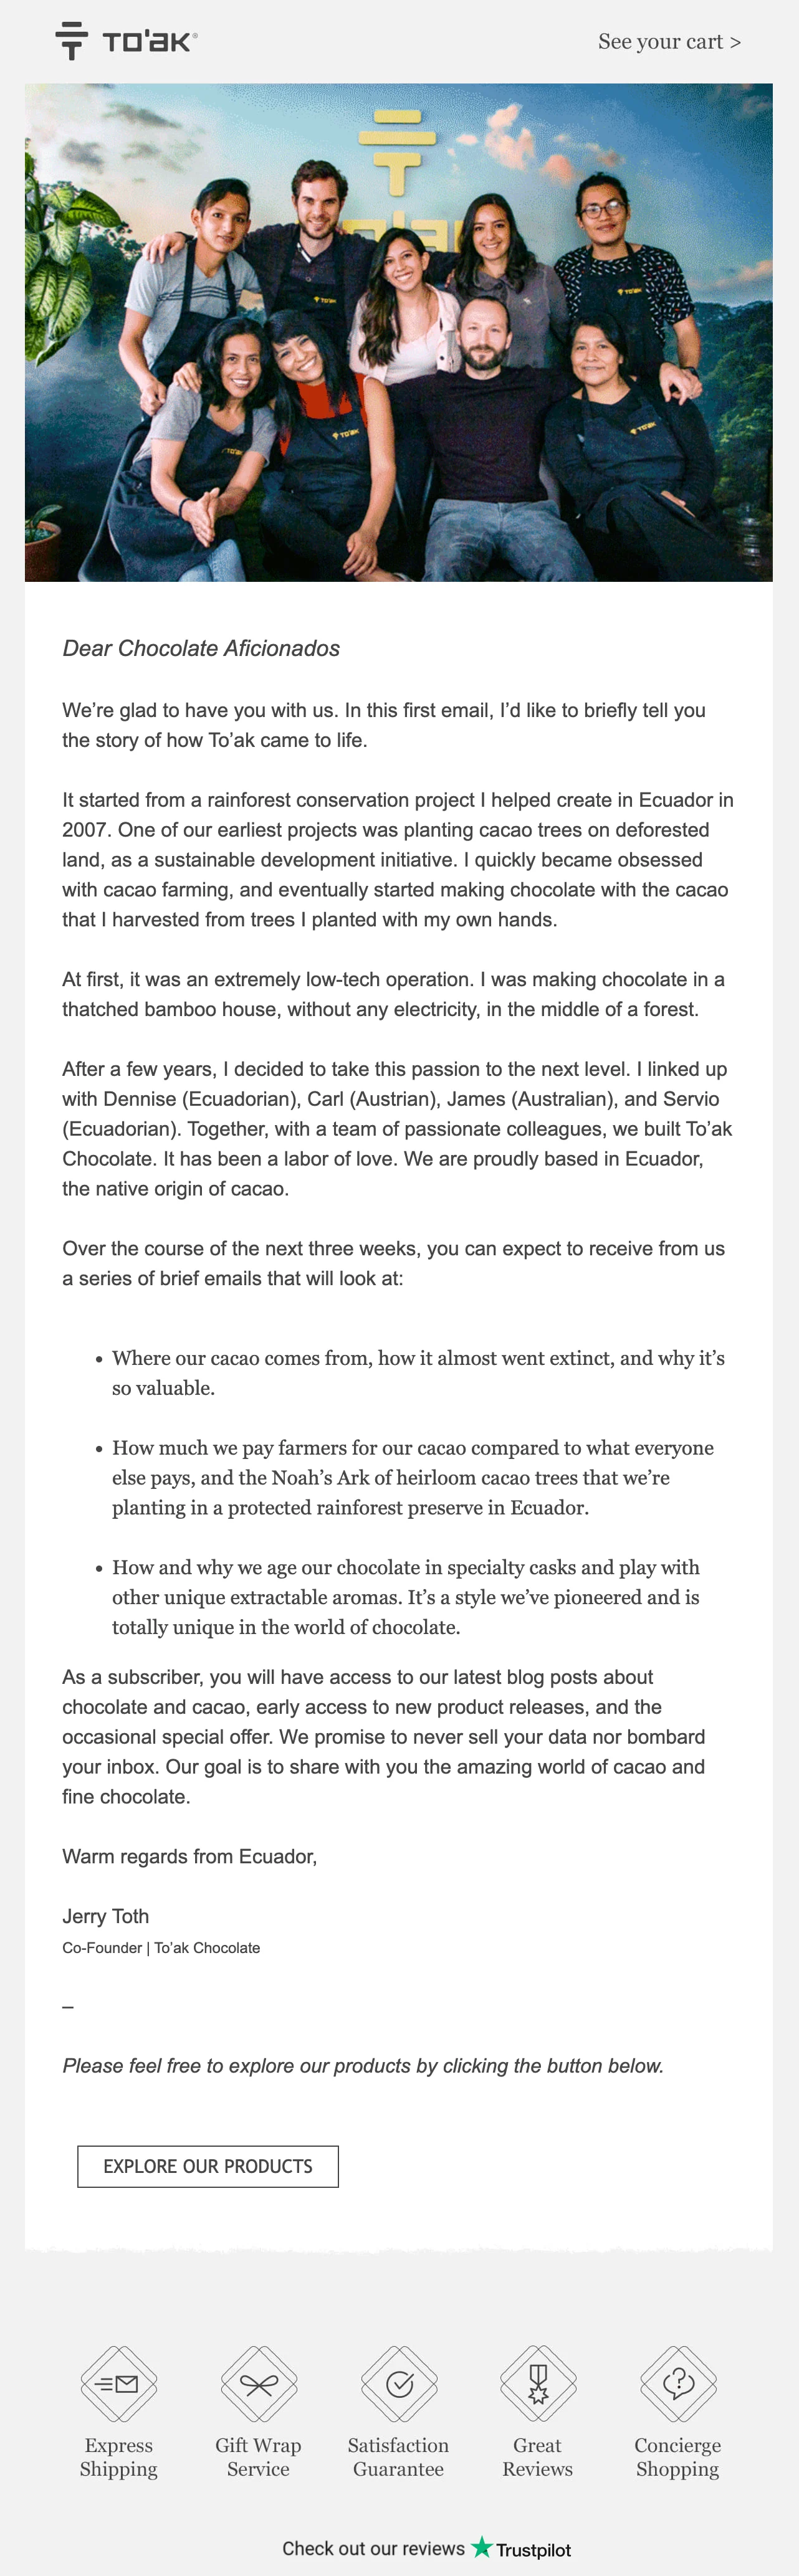
Tactics you can copy:
- Open with a plain-text letter from the founder to make the automated message feel more personal
- Reveal what topics the next emails will cover so subscribers can anticipate the upcoming messages
- Place a single CTA at the bottom of the email, inviting subscribers to explore your products
Welcome series email 2: Meeting the minds behind the brand
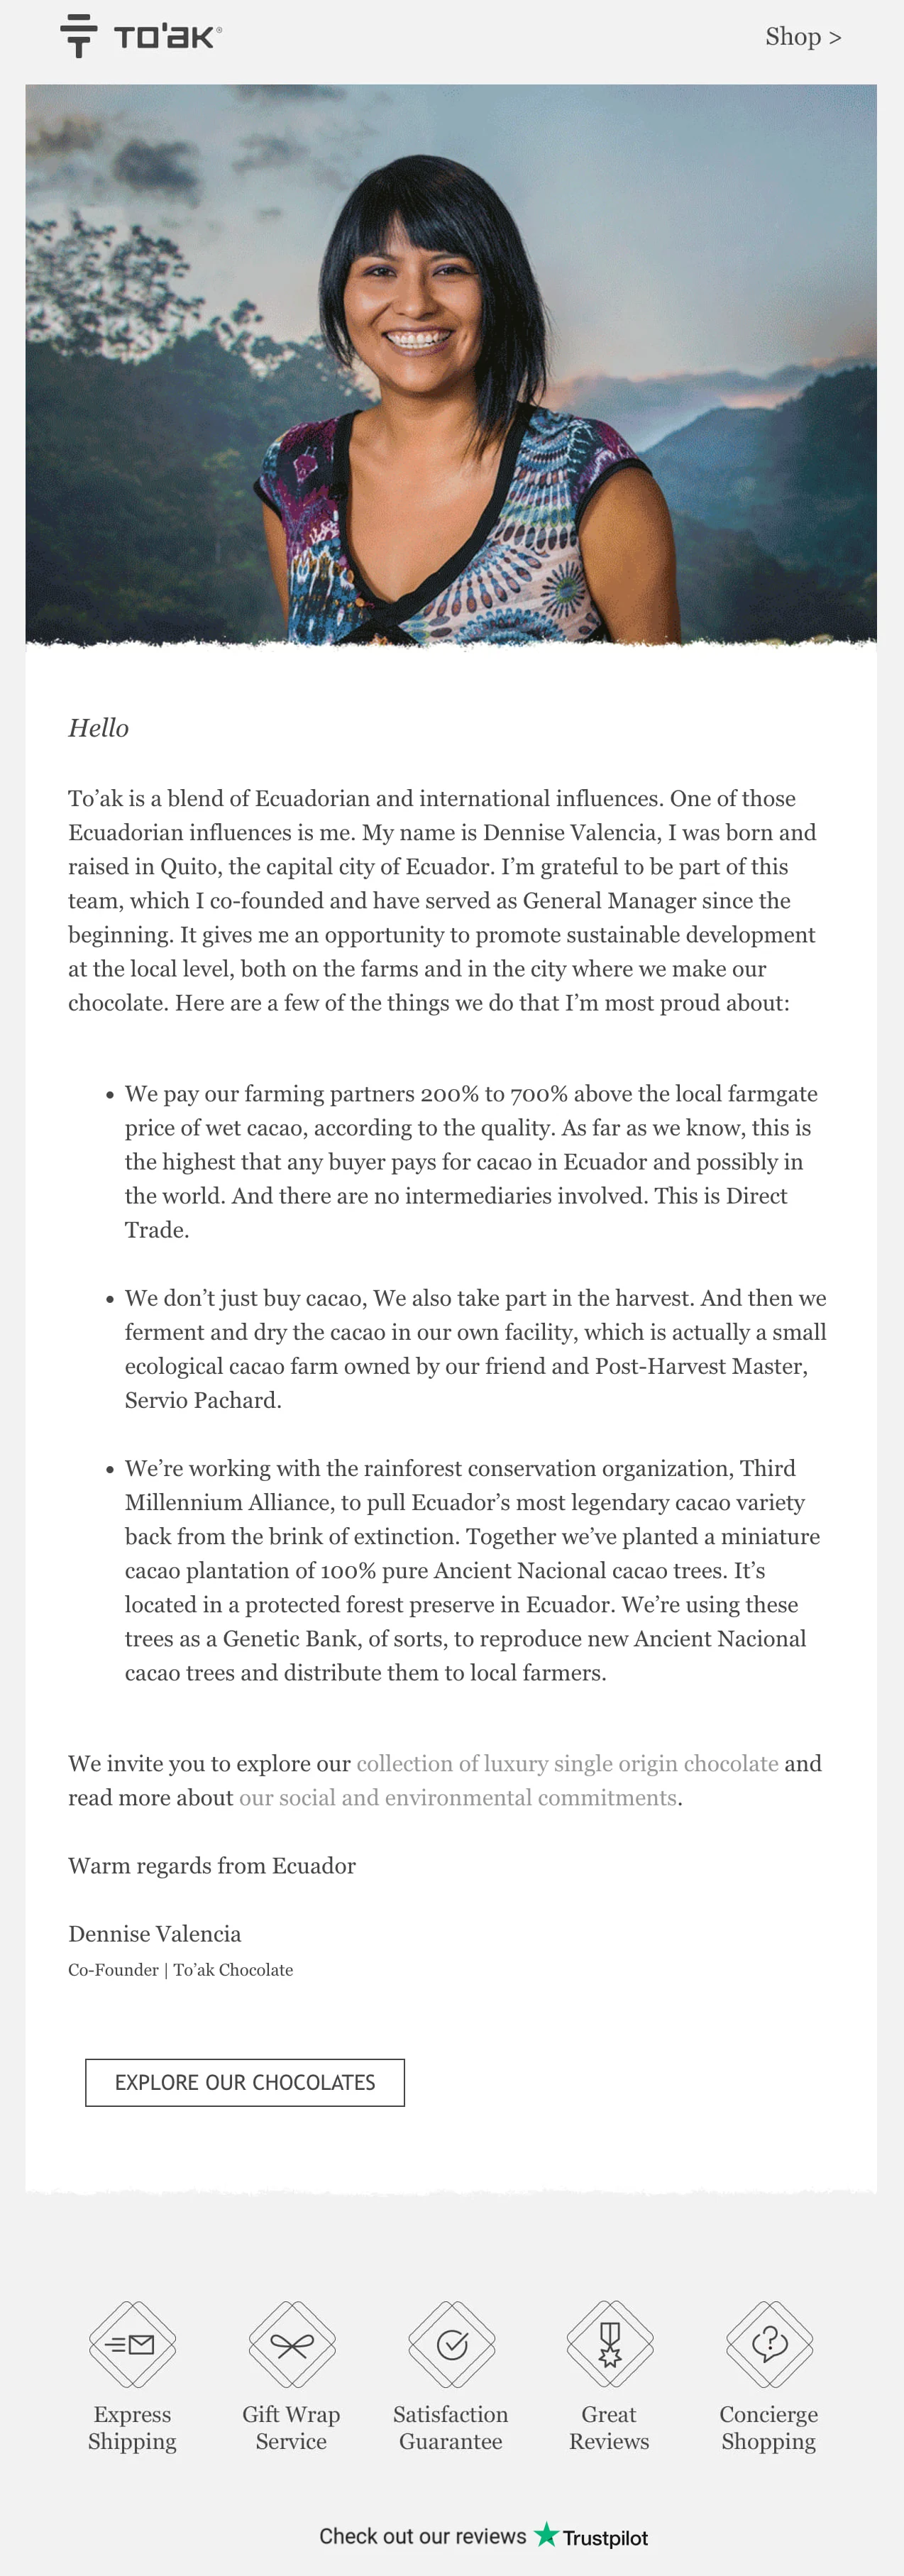
Tactics you can copy:
- Focus on the sourcing process to justify premium product pricing
- Include authentic photos of the product’s environment if applicable
- Link to more detailed articles on your website for subscribers who want to learn more about the production methods
Welcome series email 3: Brand identity and offerings
Subject line: Chocolate will never be the same again 🍫

Tactics you can copy:
- Break down your catalog into specific collections to simplify the purchase decision
- Add CTAs to each collection so they can reach the page conveniently
- Briefly explain what sets each collection apart so the reader knows the difference
Read the full To’ak Chocolate case study to learn more about their email strategy.
Island Olive Oil Company turns recipes into a reason to buy
“Welcome series helps to separate a small business like us from buying it on Amazon. No offense to Amazon, but it helps us to be boutique in the big world of the internet.”

Welcome series email 1: Getting to know the brand
Subject line: Welcome to Island Olive Oil Company! 🫒
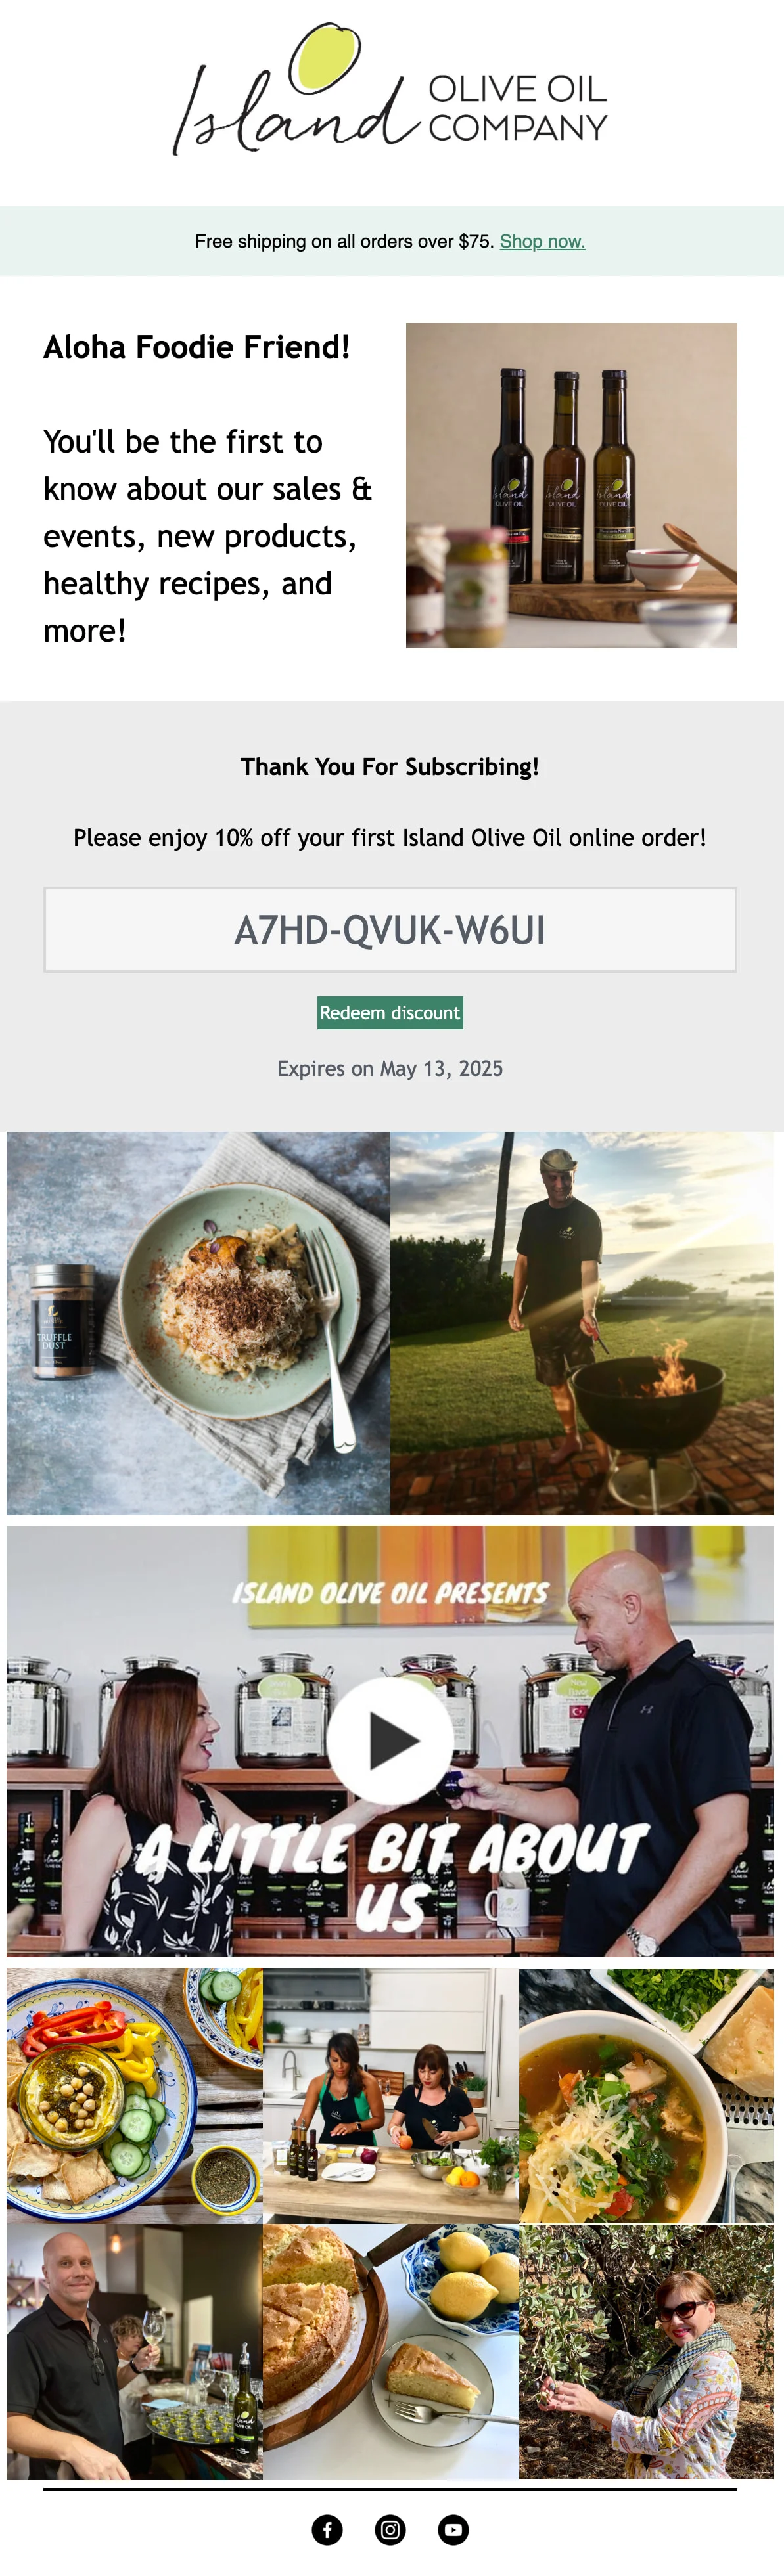
Tactics you can copy:
- Show the sign-up discount code in a big block at the start of the email
- Embed a brand introduction video in the email to switch up the format
- Show pictures of your team at work and the dishes you can make
Welcome series email 2: Revealing the brand’s recipes
Subject line: Savory Fall Recipe: Mushroom & Sage Bread Pudding 🍳
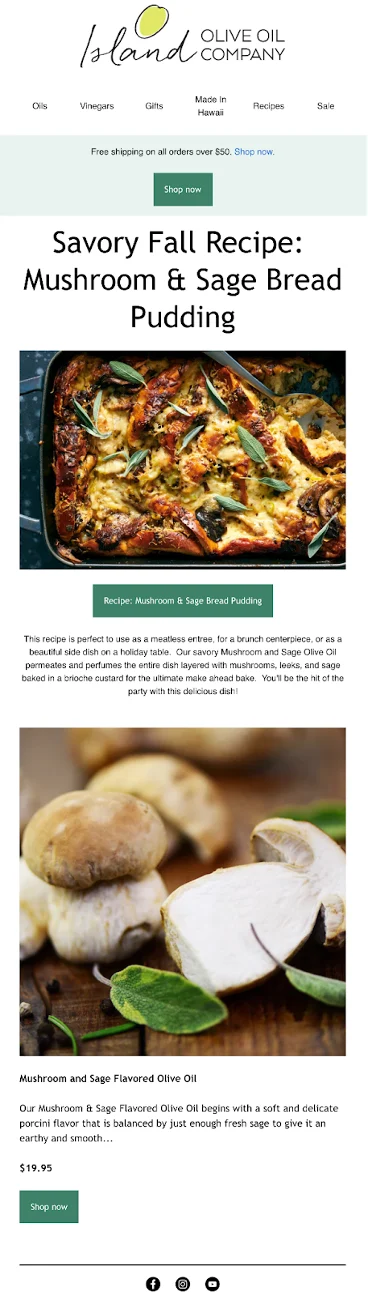
Tactics you can copy:
- Give a seasonal recipe for free to provide value without pushing for a hard sale
- Feature a product needed for the recipe right below the recipe itself
- Format the email like a blog post to make it feel less like a promotional email
Welcome series email 3: Exploring product offerings
Subject line: Get inspired with our favorite ingredients and healthy recipes! 🥗

Highlight distinct flavor profiles to guide the first purchase. Image via Island Olive Oil Company.
Tactics you can copy:
- Curate a list of top-selling items so new buyers don’t feel overwhelmed by the sheer selection of the full inventory
- Provide detailed information for each product either in terms of technical details or end benefits
- Include a secondary CTA pointing to a YouTube channel for users who prefer video content over reading
Read the full Island Olive Oil case study to learn more about their email strategy.
How to set up an automated welcome series in Omnisend?
Omnisend allows you to build a complete welcome series automation on the free plan, which includes up to 500 monthly emails. More than 150,000 ecommerce brands use the platform, and it maintains a 4.7/5 rating on Shopify and 4.6/5 on G2 as of October 2026.
1. Start with a pre-built welcome workflow
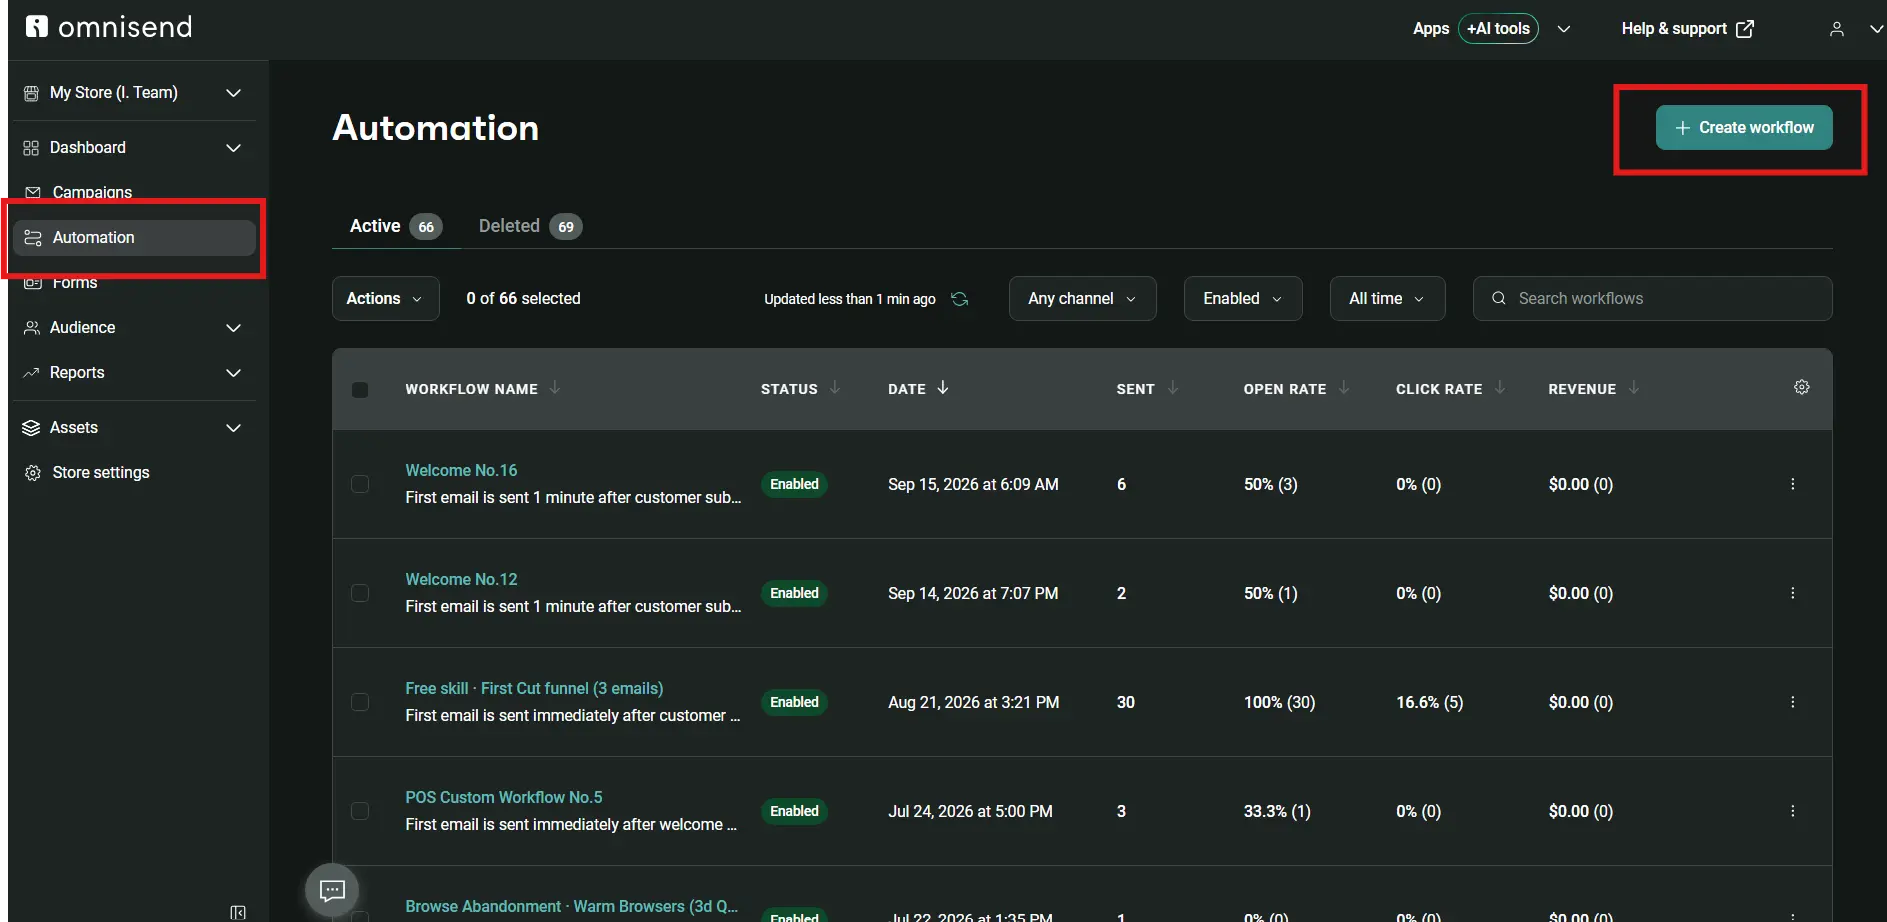
Go to the Automation tab and click the + Create workflow button at the top right of the screen.
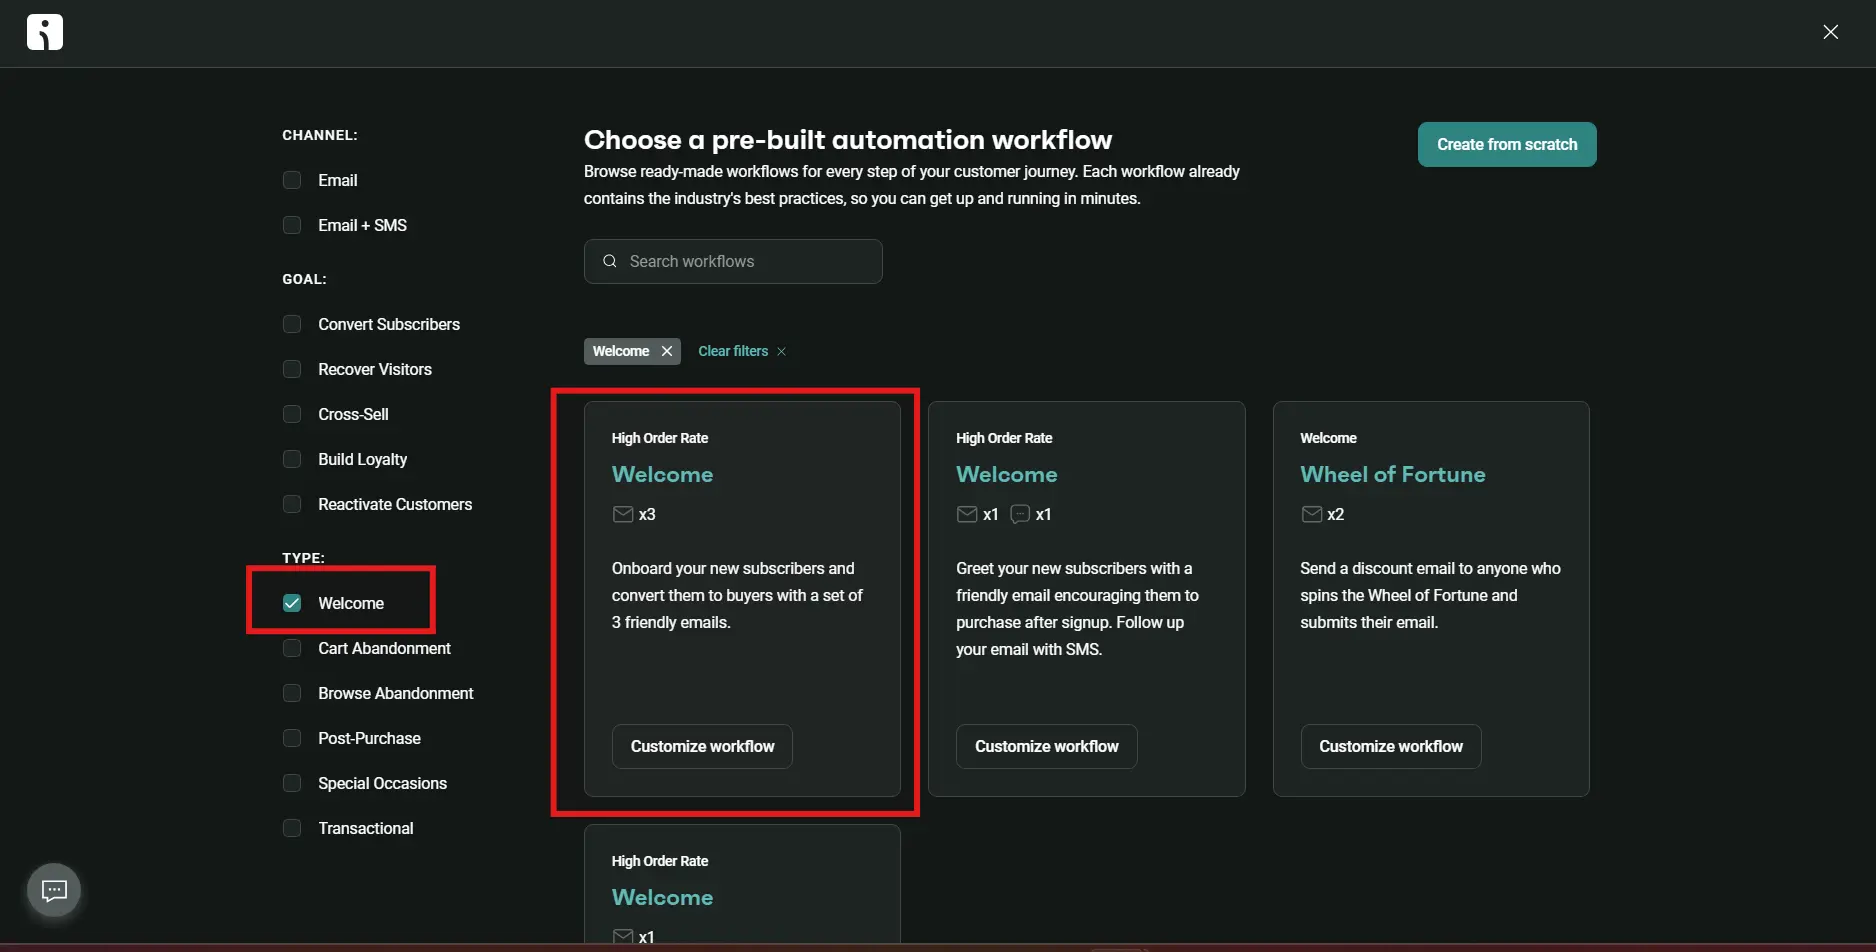
Under Type in the left-hand column, check the Welcome option and select the Welcome x3 preset by clicking Customize workflow.
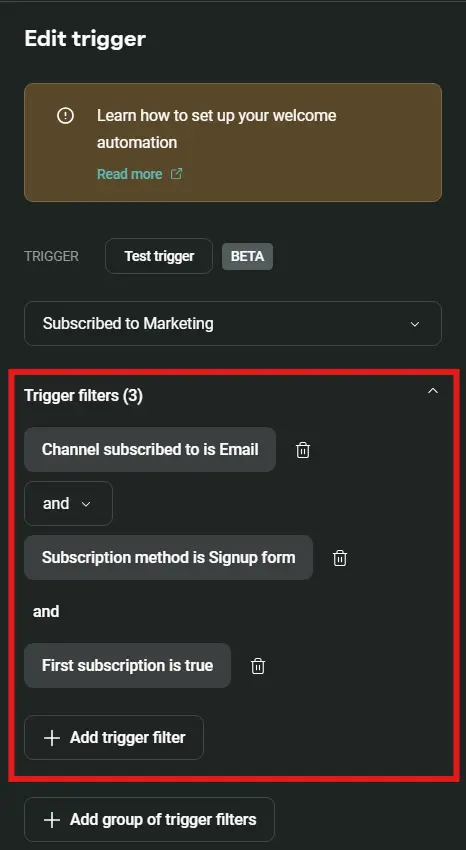
Pay attention to the initial trigger: if you use a dedicated landing page or a specific pop-up, adjust the trigger from a general Subscribed to Marketing to a specific form submission so you can segment your messaging.
2. Design the first email
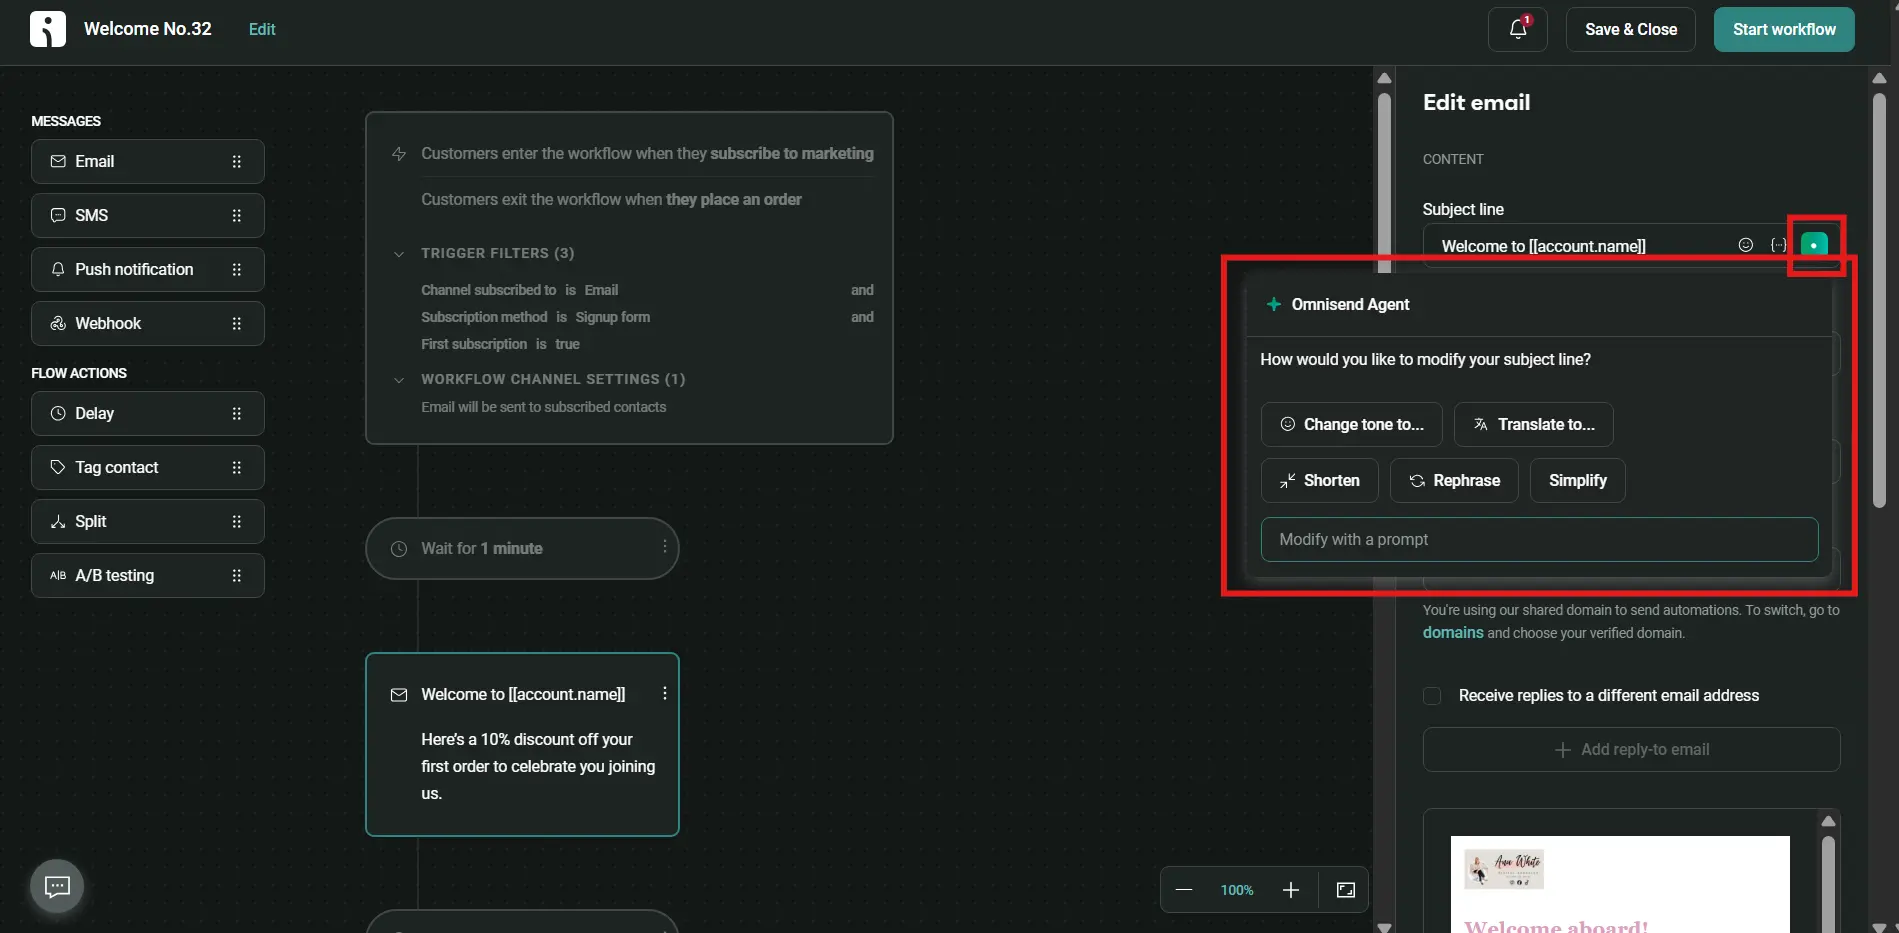
Click the first email block in the automation interface to open the right-hand sidebar. At the top of the sidebar, you’ll see a field for the subject line and an AI widget you can use to generate one.
From there, scroll down a bit and click Edit content.
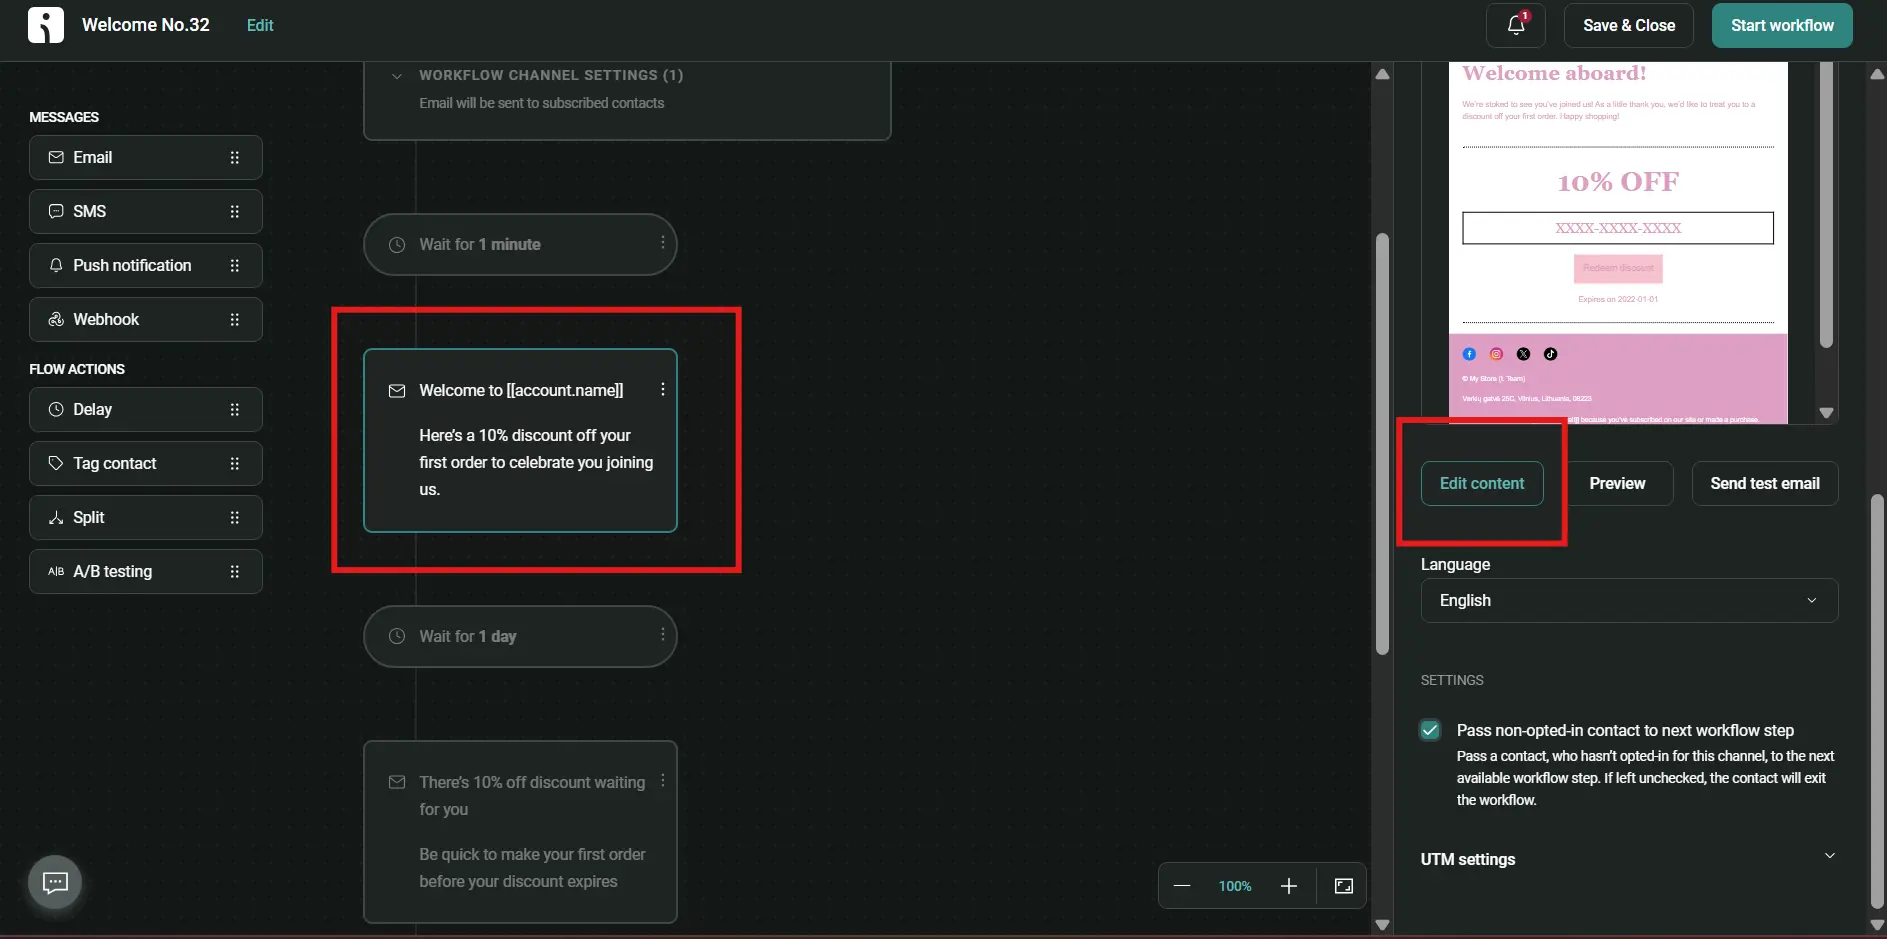
Click on the elements you want to change and adjust them until they represent your brand and your offer. Enter the discount code in the respective block. Then, click Finish editing.
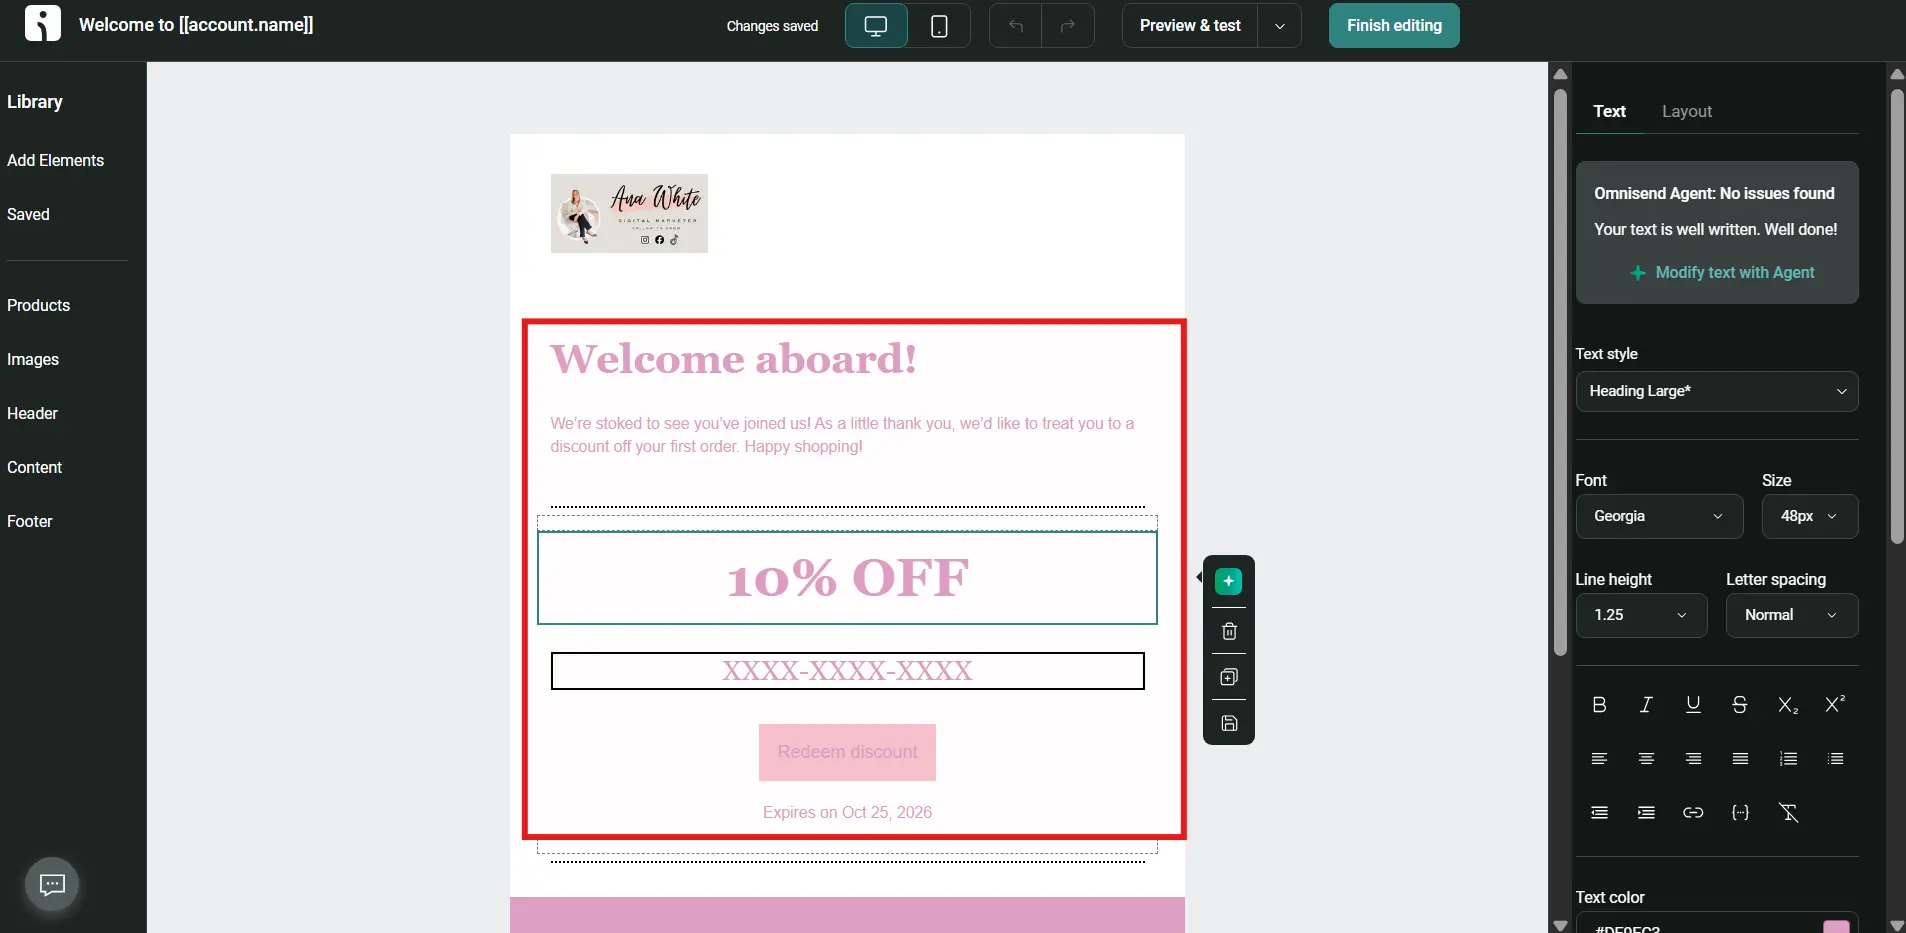
Keep this message focused purely on delivering the incentive, as you’ll have the remaining two welcome emails in the series to communicate your brand story, values, product recommendations, and the people behind the brand.
3. Design the second and third emails
Do the same with the remaining email blocks to draft your brand story and product recommendation messages before you start working on the time delays. Drag the Product recommender block into your third email to automatically pull your best-selling items from your Shopify or WooCommerce catalog. The regular Product recommender is available on the free plan, while the Pro plan offers a Personalized product recommender, which displays products based on each subscriber’s behavior.
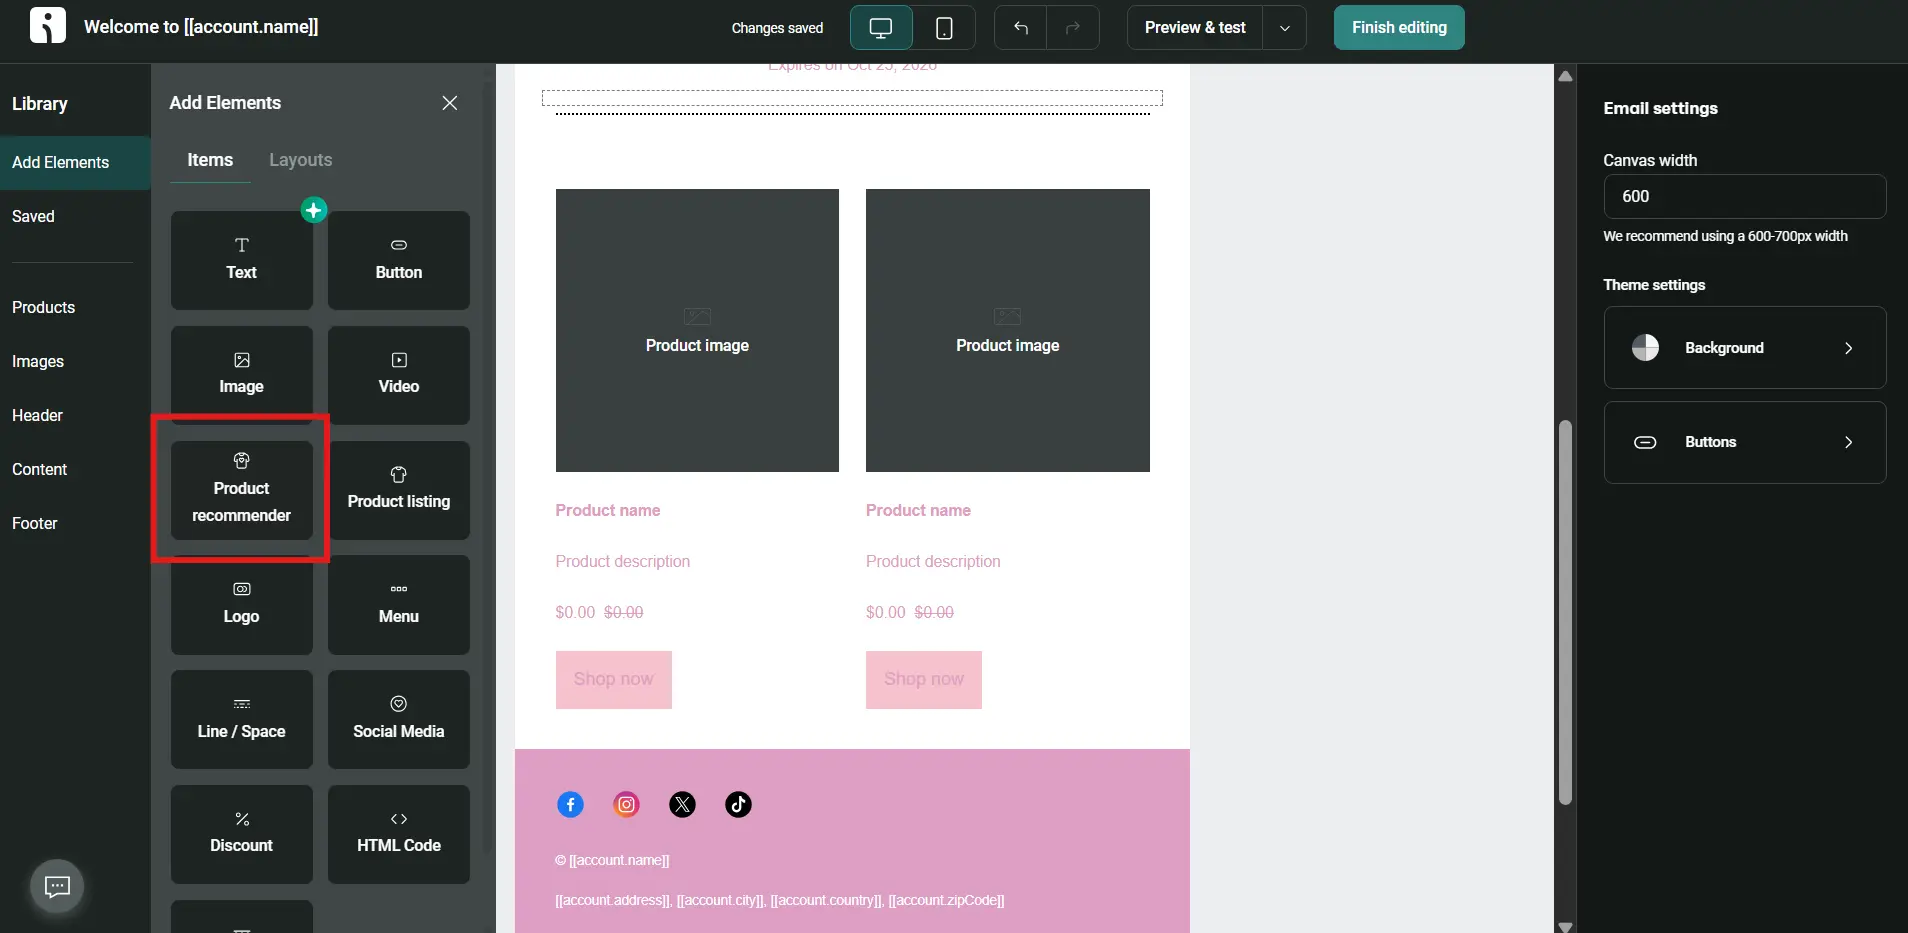
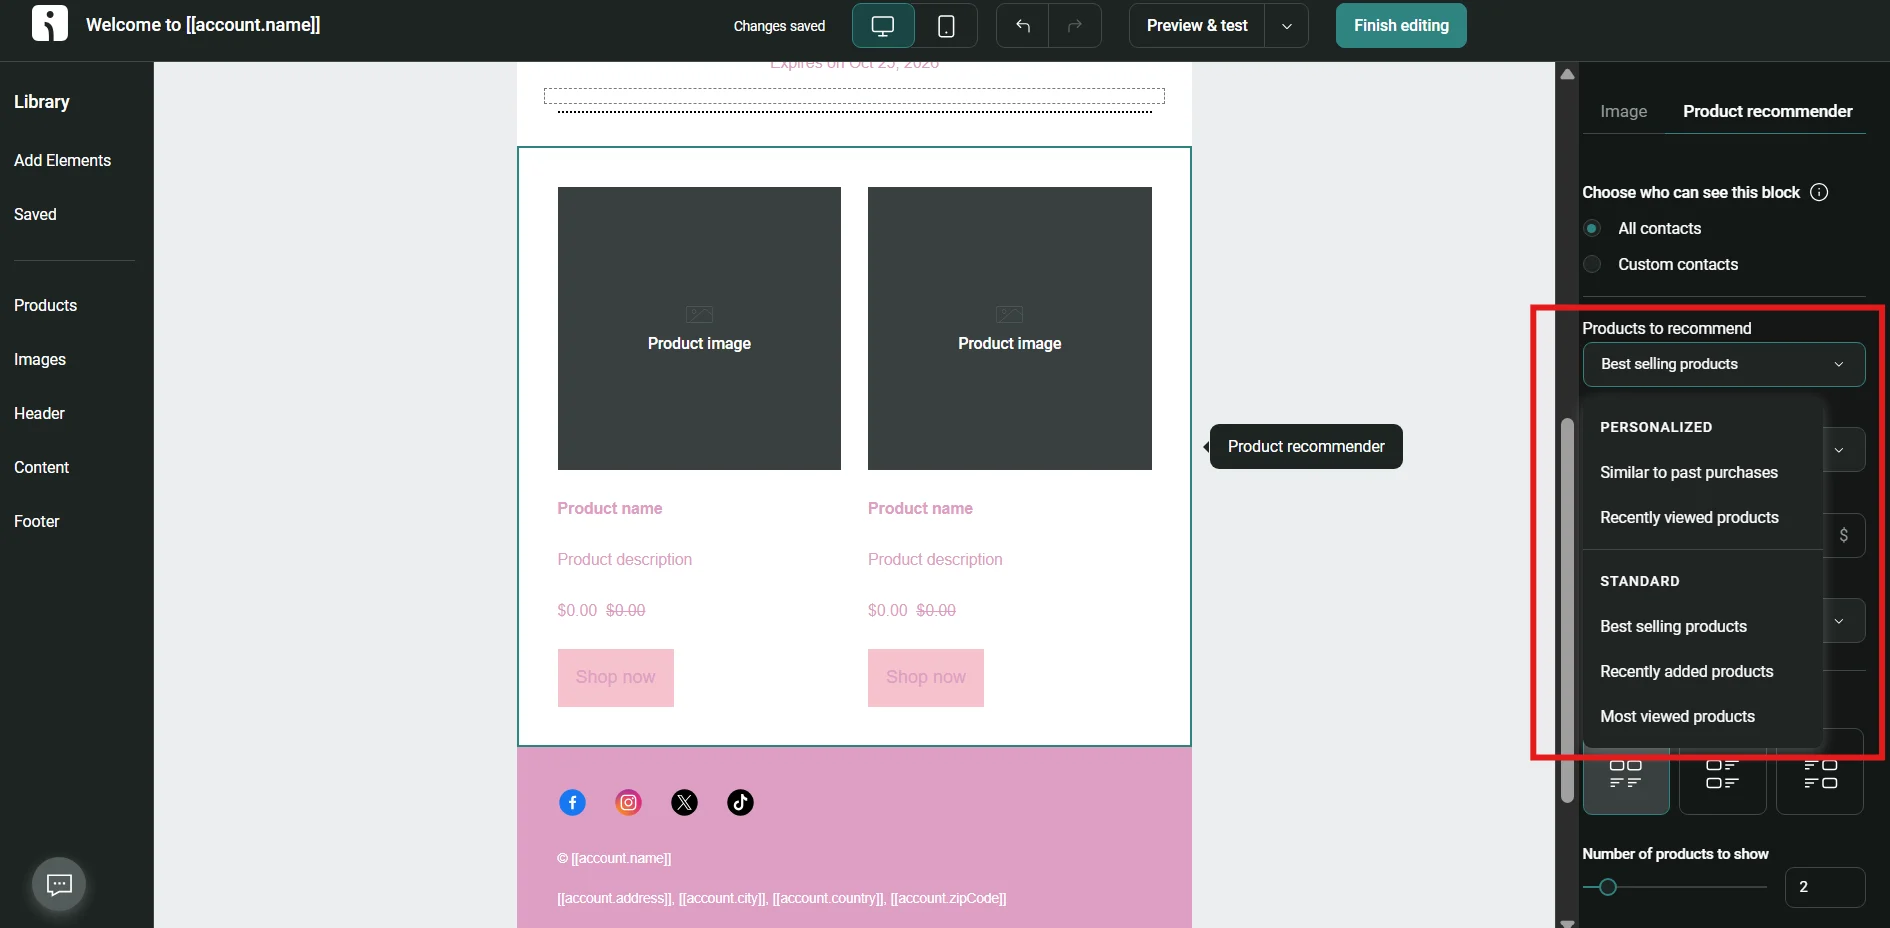
When you set up all email content before going into the technical details, you can create a more cohesive narrative flow from start to finish.
4. Set the timing between emails
Click the time delay blocks between your emails to space your messaging out over the first one to two weeks. Set the first delay to trigger one to two days after the initial welcome email to give the subscriber time to use their discount naturally. Space the final email three to five days later to catch them before their purchase intent drops.
To add the expiry reminder as a fourth email, add a time delay and an email block after the third email. Set the delay so the reminder arrives about 24 hours before the discount expires.
5. Exit subscribers who make a purchase
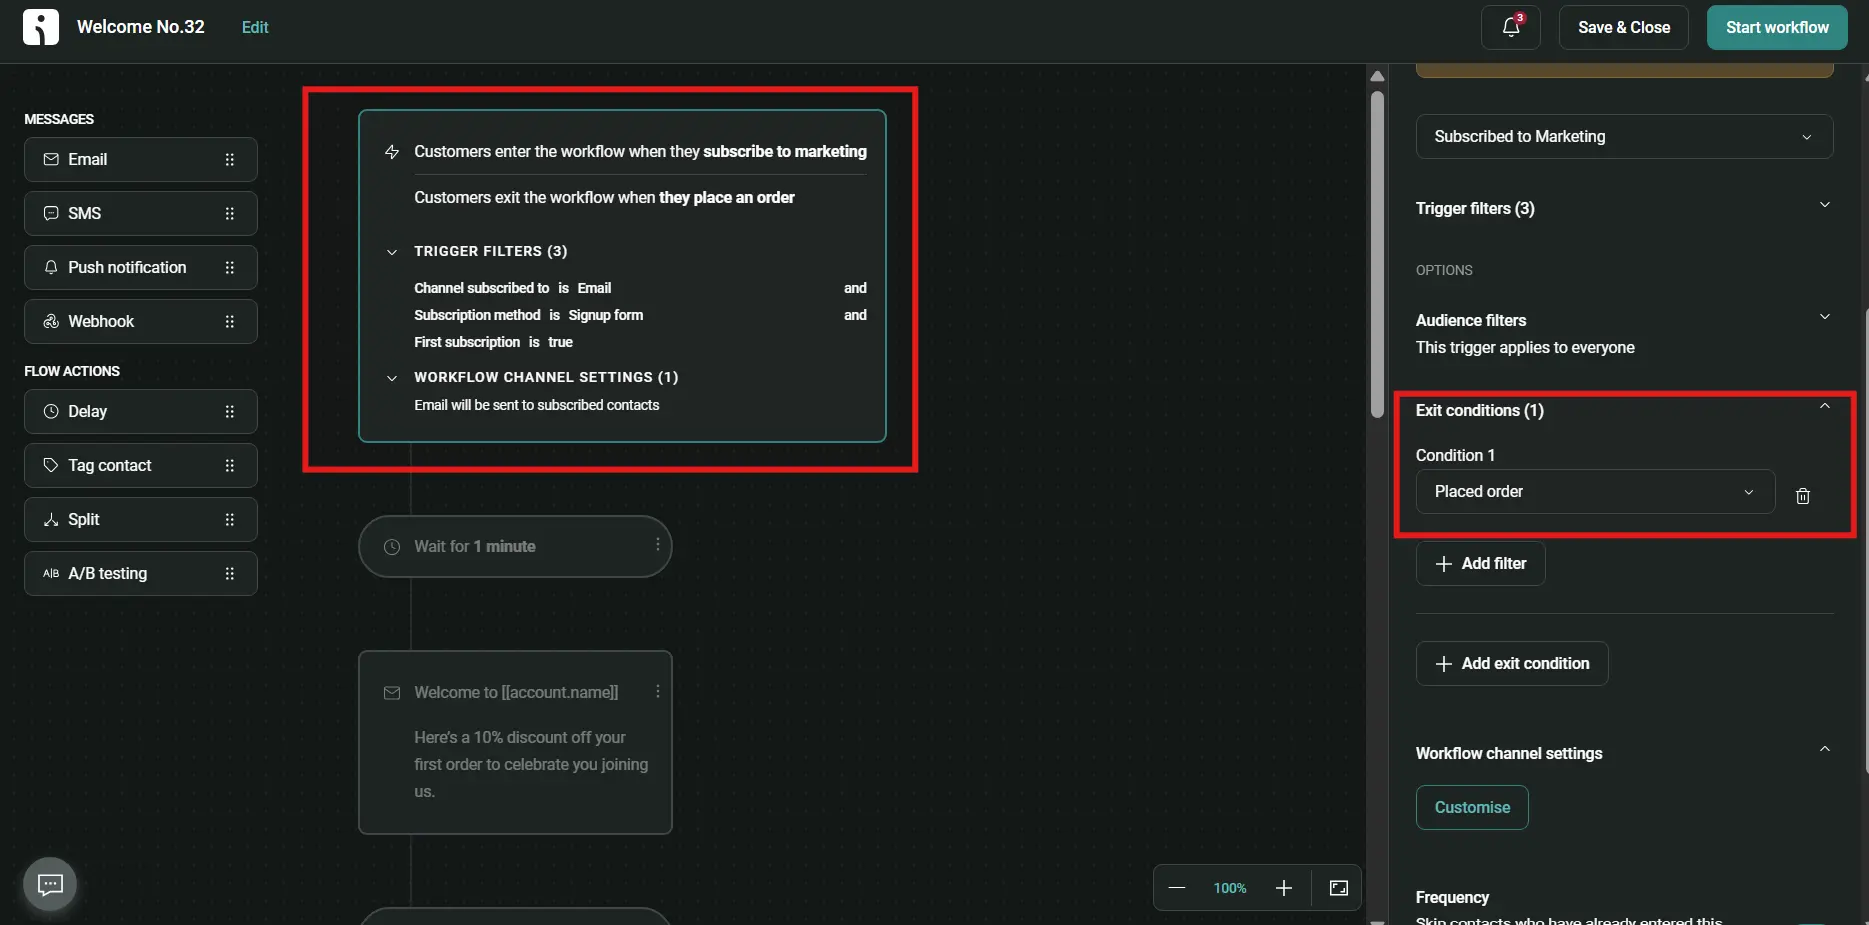
Click on the very first block in the automation builder to find exit conditions on the right-hand sidebar. The default configuration will automatically be Placed order, which means once the customer has made a purchase, they will immediately be removed from the automation.
To continue their user journey, make sure to create a post-purchase automation where you can nurture them for future purchases.
6. Test and enable the workflow
Inside the email builder, click Preview & test at the top once you’re happy with the result. A new interface will open, where you’ll need to click Send test email. Enter your email address in the field and click Send. In a few moments, the test email should arrive in your inbox, where you can check how it appears in the live environment.
If everything looks as intended, return to the automation builder interface and enable the workflow by clicking Start workflow at the top right of the screen.
Turn new subscribers into first-time buyers
An automated sequence of three to six emails spaced over your subscriber’s first two weeks promotes higher conversions than a single welcome message. Deliver the promised incentive first and share your brand’s story second. Then provide recommended products and make sure to set up exit conditions so people who have already used a discount code don’t get reminders about it.
Quick sign up | No credit card required