
 OFFER
OFFER


10 best tips for your WooCommerce store growth
With over 130+ pre-built integrations and flexible APIs, you can easily centralize data from across your tech stack
Make the most out of your data and unlock powerful growth marketing possibilities with these other top marketing tools.
Build any custom integration with our open, flexible APIs that are simple to use and implement.
Check out apps that have been stealing all the spotlight.
Email and SMS marketing insights, ecommerce resources, and the latest Omnisend news
Expert-led sessions covering email, SMS, and ecommerce marketing strategies.
Educational video and live training to help you make the most out of Omnisend.
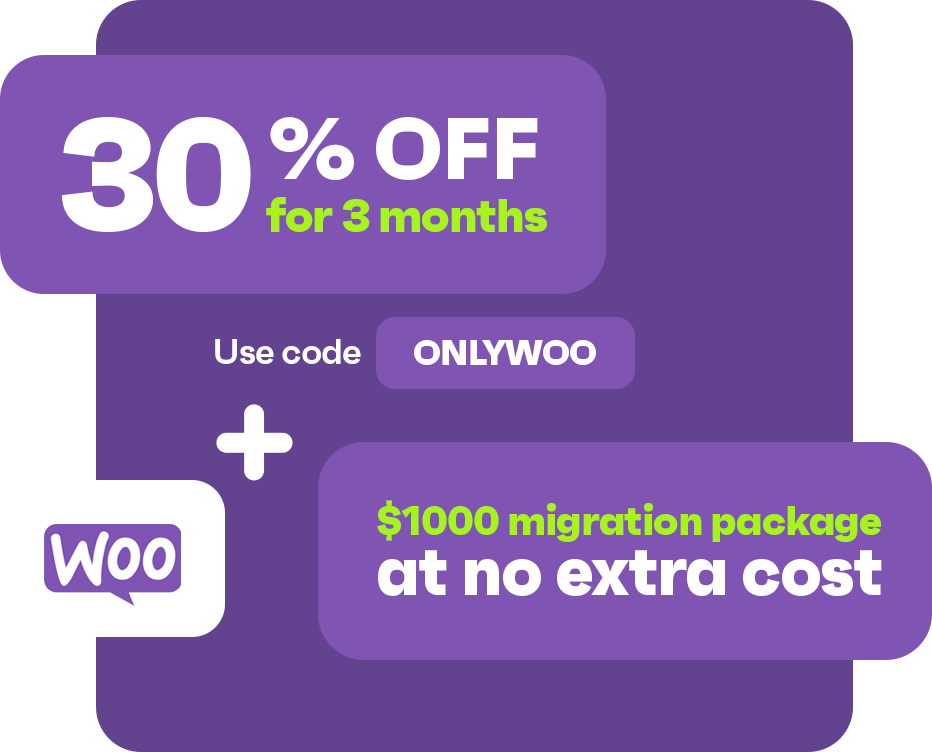
Get better email & SMS marketing made for WooCommerce for 30% off PLUS a bonus migration package valued at $1,000
Use code to get 30% discount COPIED ONLYWOO
Drive sales on autopilot with ecommerce-focused features
See FeaturesSetting up a WooCommerce store can be completed in just two to three hours with the right steps, allowing you to start accepting orders quickly.
Essential prerequisites for launching include having a registered domain, a reliable hosting provider, and a functioning WordPress installation.
Choose a hosting provider that meets WooCommerce's technical requirements to ensure optimal performance and security for your online store.
Integrating marketing automation tools like Omnisend can significantly boost your revenue, with users reportedly earning $79 for every $1 spent on the platform.
To set up a WooCommerce store, you must make several key decisions about hosting, design, payments, shipping, and taxes. That said, you don’t need coding skills to get started.
When you follow the right steps, you can complete your WooCommerce store setup in about two to three hours. By then, your store can accept orders.
WooCommerce is an open-source ecommerce plugin for WordPress. It has more than seven million active installations and a 4.5-star rating. Store owners choose it because it’s flexible, reliable, and easy to use.
However, simply installing the plugin isn’t enough to launch a store. You must know how to properly set up your WooCommerce store to ensure that it works smoothly. This leads to better performance, sales, and business growth.
This WooCommerce store setup guide is designed for anyone launching a new WooCommerce store.
You’ll also learn about Omnisend, a WooCommerce marketing automation platform, and how successful stores use it to grow revenue through email and SMS.
Before we tackle WooCommerce store setup, let’s first look at the key things you need.
The first requirement is an active WordPress installation. Since WooCommerce is a WordPress plugin, you can’t use it without a working WordPress website.
The easiest way to install WordPress is via your hosting provider. Most hosting companies offer a one-click WordPress installation in their dashboards.
After purchasing your hosting plan and connecting your domain name, log in to your hosting account and install WordPress.
If your hosting provider doesn’t offer one-click installation, you can install WordPress manually. You’ll have to download WordPress from WordPress.org, upload the files to your hosting account, and run the installation script.
Before you begin installing WooCommerce, review this simple checklist:
With these requirements, setting up the WooCommerce store becomes much easier.
Setting up WooCommerce the right way gives your online store a strong foundation for sales, performance, and long-term growth.
This practical WooCommerce store setup checklist can guide you through the process:
Steps 1 to 3: Foundation setup (about 45 minutes)
Steps 4 to 8: Store configuration (about 60 to 90 minutes)
Steps 9 to 11: Optimization and launch (about 45 minutes)
Follow these steps carefully for a smooth WooCommerce store setup. Your store should be fully functional and ready to handle customers and sales.
Estimated time to complete: 15–20 minutes
Before starting your WooCommerce store setup, you must choose the right host. This can save you from performance problems later.
Before selecting a provider, make sure it meets WooCommerce’s technical requirements for 2026:
Using PHP 8.0 or higher improves speed and security. An SSL certificate protects customer data and builds trust during checkout. Also consider storage space, bandwidth, automatic backups, and uptime guarantees.
Reliable hosting helps improve SEO because search engines favor fast and stable websites.
There are four main types of hosting to consider:
Below are some of the best WooCommerce hosting options recommended for users.
| Provider | Best for | Price starting from | Standout feature |
|---|---|---|---|
| Bluehost | Beginners launching their first store | $4.99/month | WooCommerce and WordPress pre-installed |
| Pressable | Agencies and growing stores need performance | $25/month | Built for WordPress with scalable infrastructure |
| SiteGround | Store owners want expert support | $3.99/month | Daily backups and built-in security tools |
| Hostinger | Store owners needing managed WooCommerce maintenance | £12.99 ($17.43) | Optimized WooCommerce hosting with free SSL, caching, and easy setup |
A reliable hosting provider will deliver the speed, stability, and security your WooCommerce store needs.
Estimated time to complete: About five minutes
Before installing the WooCommerce plugin, it’s essential to have a functioning WordPress website. If you use a recommended host, the setup will already include basic configuration.
However, if you’re using a host that doesn’t natively support it, you’ll need to install a WordPress full package first.
Once your WordPress site is running, follow these steps to install and activate the WooCommerce plugin:
Congratulations! You successfully installed and activated the WooCommerce plugin on your WordPress website.
If you see an error during installation, confirm that your hosting meets the minimum requirements listed in Step 1. Most issues stem from outdated PHP versions or limited server resources. Updating your hosting settings usually resolves the problem.
As you build your store, add more plugins to expand your website functions. To find trusted WooCommerce plugins, go to the official WordPress plugin repository and type “WooCommerce”:
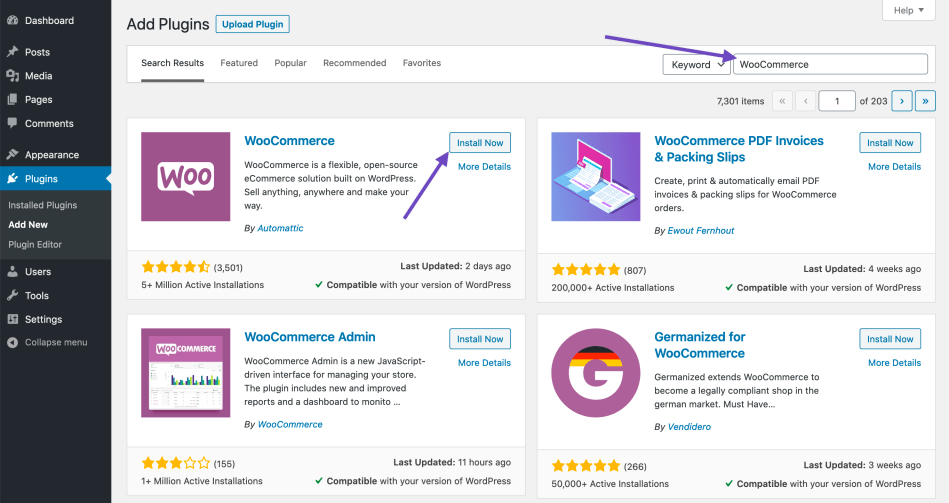
You can also take ideas from our list of the best WordPress plugins. Plugins can help improve SEO, speed, security, and marketing. However, install only what you need, as too many plugins can slow down your site.
With WooCommerce activated, you’re ready for the next step in your WooCommerce store setup.
Estimated time to complete: 10–15 minutes
After activating WooCommerce, you can now configure the WooCommerce store setup wizard. While this step is optional, it can help ensure that all WooCommerce settings run smoothly on your store.
You need to follow these five steps to complete the WooCommerce setup wizard:
The Store Profiler is the first and most important screen. It collects basic information about your business.
You’ll be asked to provide the following information:

Remember that all this information is flexible. You can update it later from your dashboard.
Next, WooCommerce will suggest free features to enhance your store. These may include automated taxes, WooCommerce payments, marketing tools, and other built-in enhancements.
You can accept or skip any recommendation:

As a general guideline:
The setup wizard recommends basic marketing features, which means advanced marketing automation isn’t included by default. You’ll need a dedicated tool for email and SMS automation, which we’ll cover in Step 9.
You can remove any feature later, so there’s no long-term commitment.
In this step, you’ll be prompted to connect your WordPress.com account to enable Jetpack:

Jetpack adds important features, such as:
Connecting Jetpack helps protect your store and improve reliability. For most new store owners, enabling Jetpack is recommended because security and uptime are critical for ecommerce.
Once you finish these screens, the wizard will finalize your settings and prepare your WooCommerce dashboard:
At this point, your core configuration is complete. WooCommerce will begin setting up your store environment based on your selections.
After completing the Store Profiler, you’ll see a built-in setup checklist inside your WooCommerce dashboard:

This checklist outlines important remaining tasks, such as:
As you go through the WooCommerce setup wizard, you might have a few questions. Here are answers to the most common concerns:
Yes, but it’s not recommended as this may leave important settings incomplete.
Yes. If you accidentally skip it, go to WooCommerce and navigate to Help > Setup Wizard. You can launch it again and review your configuration.
Estimated time to complete: About 10 minutes for a simple product
In this step of your WooCommerce store setup, you’ll add your first product. This is where your store starts to take shape and become ready for sales.
You have several options when choosing products to sell on WooCommerce:
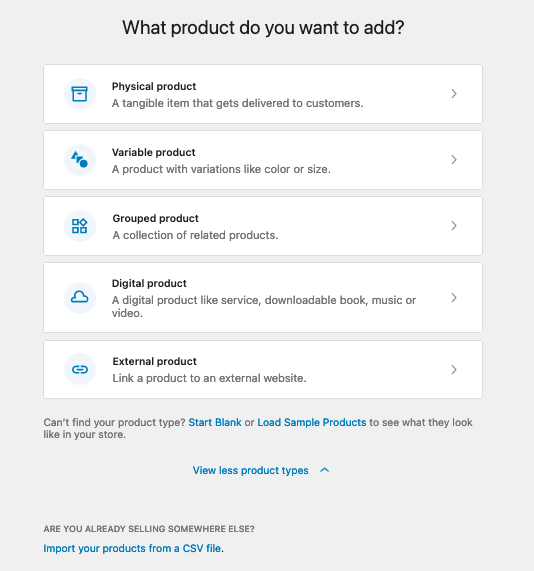
If you’re new to WooCommerce, start with a simple product. It’s the easiest way to learn the interface and understand how pricing, inventory, and images work.
There are several ways to input products into WooCommerce:
Take time to write clear product titles and detailed descriptions. Upload high-quality images. Strong product pages can increase sales and improve marketing campaign performance.
A more detailed guide to product management and optimization is covered later in this article.
Estimated time to complete: About 15 minutes, including basic customization
Your theme controls your store’s design, layout, and shopping experience. It influences how products are displayed, how fast pages load, and how smooth the checkout process feels. These details are critical because they affect conversions and revenue.
Your theme also impacts marketing performance. It determines where you can place email signup forms, popups, and promotional banners.
When selecting a theme, focus on:
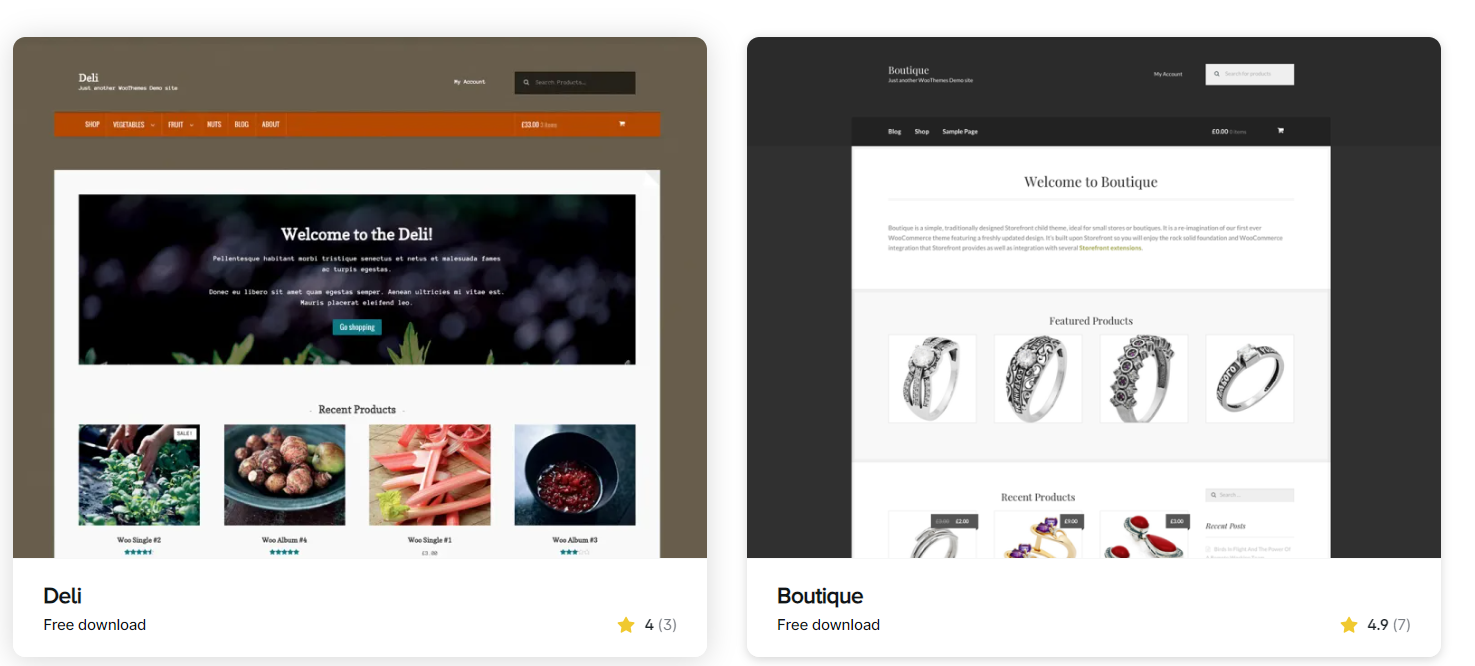
Some of the best WooCommerce themes include Astra, Shoppe, and OceanWP. They’re optimized for ecommerce and offer ready-made, easily customizable templates:
After installing your theme, go to Appearance > Customize in your WordPress dashboard. From there, you can adjust colors, typography, and product page design.
Don’t worry about making everything perfect right away. You can always update or change your theme as your store grows. If you want more design flexibility, you can use WordPress page builders to create custom layouts.
Estimated time to complete: About 15–20 minutes
WooCommerce shipping setup is key to delivering a smooth buying experience. For this step, you need to verify the store location that you specified in the Store Profiler. This location determines your default shipping origin. It also affects tax and delivery calculations.
Shipping zones allow you to define where you ship and how much you charge based on customer location.
To set up shipping zones:
You can create multiple zones for domestic and international customers. By default, international shipping is turned off, but you can enable it by creating a zone that includes other countries.
If shipping options don’t appear at checkout, make sure the customer address falls within a defined shipping zone.
If your store is located in the USA, you can install WooCommerce Shipping. It lets you link your store with WordPress.com, so you can print shipping labels:
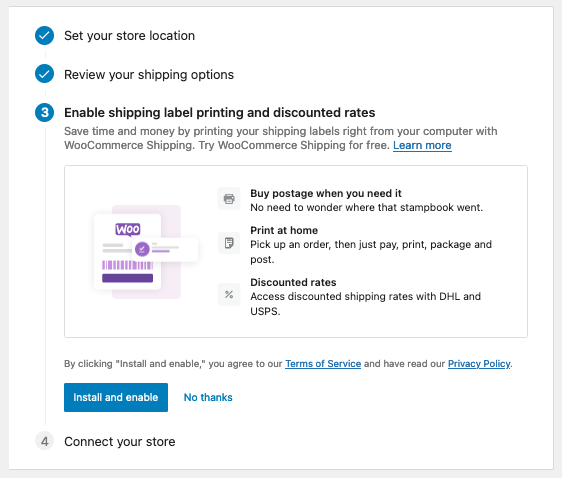
You can offer flat rate shipping, free shipping, or local pickup. A popular strategy is to offer free shipping on orders above a certain threshold to encourage customers to add more items to their carts.
For order tracking, you can extend your store with shipment-tracking tools that automatically update customers on their delivery status.
Due to their high open rates, shipping notifications also serve as useful marketing touchpoints. They offer a great opportunity to recommend related products through automated email workflows.
Estimated time to complete: About 10 minutes
Depending on your business needs, WooCommerce offers several ways to handle tax settings, including:
If you have Jetpack installed, you can start automatically calculating taxes by connecting your store to WordPress.com. This is a convenient choice for small and medium-sized stores that want automatic compliance:
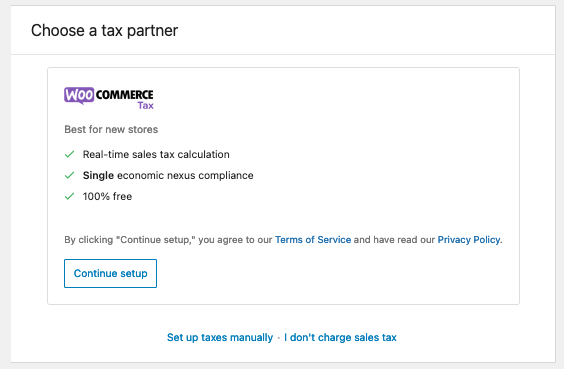
If you’re unsure which of these methods to choose, consult a tax professional to ensure compliance with local regulations.
Estimated time to complete: About 15 minutes
WooCommerce simplifies payment setup by automatically installing and activating gateways when you enable them in settings.
Before selecting a gateway, consider transaction fees, regional availability, and customer preferences. Major gateways handle PCI compliance, so sensitive payment data is processed securely.
The following are the most common ecommerce payment processing options for your store:
| Processor | Typical fee | Best for | Notable features |
|---|---|---|---|
| Stripe | 2.9% + $0.30 per transaction | Subscriptions and global sales | Supports cards, Apple Pay, Google Pay, and recurring billing |
| PayPal | 3.4% + fixed fee | Global payment recognition | Redirect checkout, strong buyer protection |
| Square | $49/month/location | Online and in-person stores | POS integration, gift cards, Cash App |
| WooPayments | Free | Native WooCommerce integration | Managed inside the dashboard, multi-currency support |

Stripe supports credit cards and digital wallets. It’s available in many countries. It offers a smooth checkout experience and supports recurring payments. This makes it suitable for subscription products and businesses serving international customers.

PayPal is widely recognized and trusted by online shoppers. Customers complete transactions on PayPal’s platform, which adds an extra layer of security. It works well for businesses that want a simple payment option with global recognition.
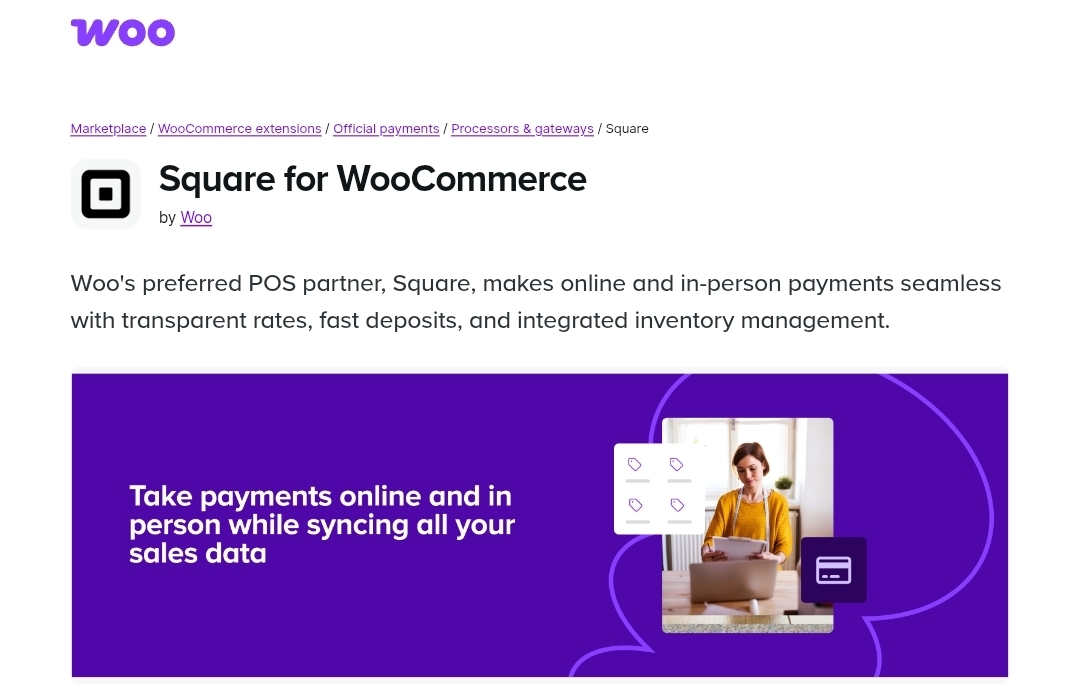
Square accepts online and in-person payments, making it useful for businesses that operate both online and physical locations. It also supports digital wallets and gift cards. This flexibility suits retailers with omnichannel sales.
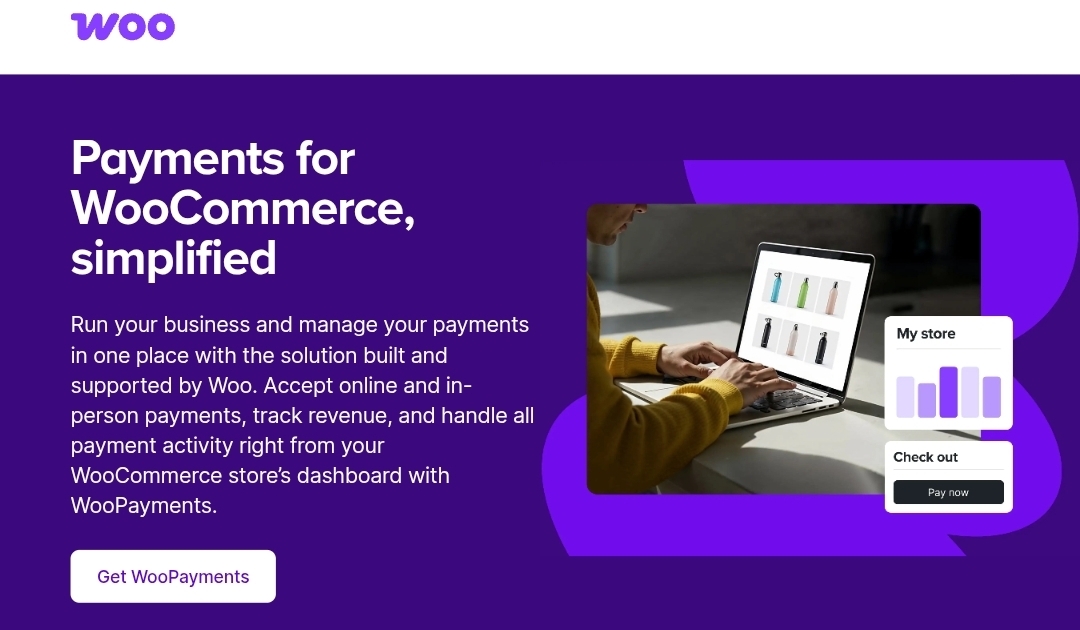
WooPayments integrates directly with your store and provides a streamlined checkout experience. It supports major payment methods and simplifies management inside the WooCommerce dashboard. It’s a convenient choice for businesses that want native integration.
Stripe works well for international customers and subscription models. Many shoppers trust PayPal, and it provides simple global coverage. Square is ideal if you also sell in person. WooPayments offers deep integration and easy management.
You can enable multiple gateways to provide several options at checkout. After configuration, test the checkout and payment process with a small order to confirm.
Estimated time to complete: About 20 minutes to research, choose, and install the right extensions
At this point, your WooCommerce store setup is complete. However, WooCommerce provides users with additional free or paid tools that help run their store smoothly.
Start with tools that directly impact revenue. You should prioritize marketing automation and analytics. Analytics tools help you collect store data and analyze it to make better decisions. Meanwhile, WordPress automation tools can help you connect different apps and reduce repetitive, manual tasks that could slow down operations.
As your store continues to grow, you can install other WooCommerce plugins as needed.
For now, here are some automation and analytics tools we highly recommend.

As a top WooCommerce plugin, Omnisend helps integrate automated email marketing and SMS functions into your marketing strategy.
Omnisend customers see an average of $79 in revenue for every $1 spent on the platform across email, SMS, and push notifications.
With pre-built automation workflows, you can launch welcome emails, abandoned cart recovery, order confirmations, and follow-ups within minutes. You also get SMS integration, advanced audience segmentation, and product recommendations inside emails.
Another great feature is the audience sync for ads. This synchronizes your existing subscribers or customers to Facebook’s or Google’s ad platforms for better targeting.
Unlike some marketing tools that restrict features to higher-priced plans, Omnisend’s free plan includes full ecommerce capabilities. You also get 24/7 customer support on every plan, including the free one.
Your WooCommerce store setup won’t be complete without marketing automation. Automated campaigns convert visitors into subscribers and subscribers into repeat customers.
Quick sign up | No credit card required

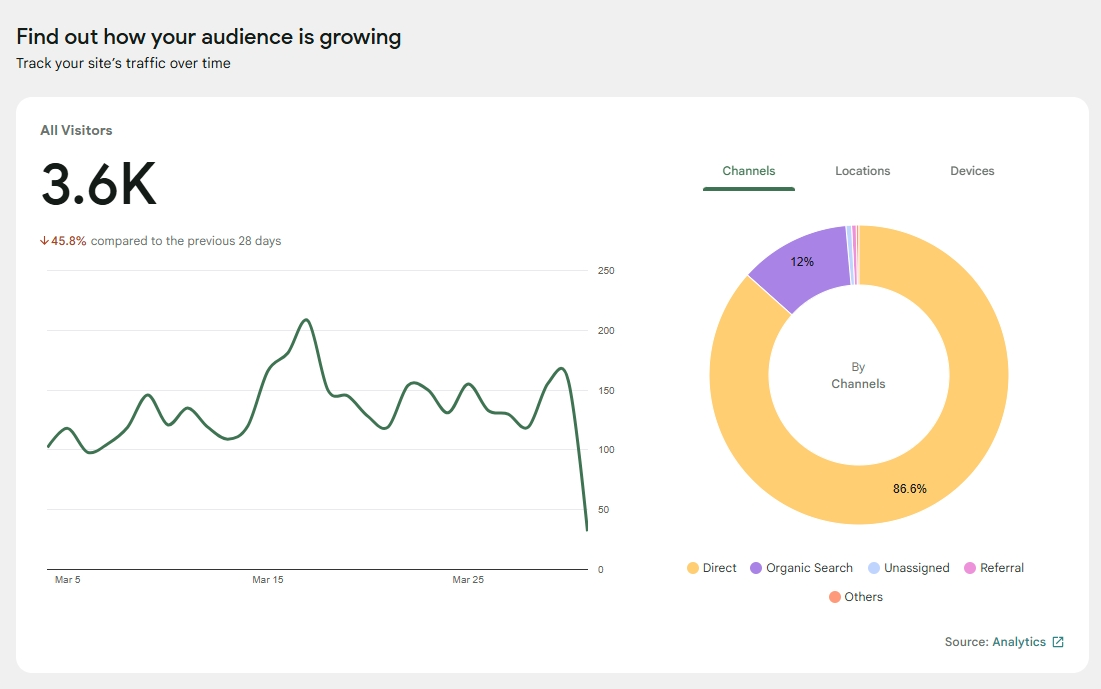
This Google plugin is a powerful tool for WooCommerce analytics. It brings the power of Google Analytics, Google Search Console, and Google AdSense to your store.
With this tool, you can understand where you stand in terms of SEO, page experience, and traffic generation.
The plugin from WordPress also provides detailed insights that can guide your store’s marketing strategy:
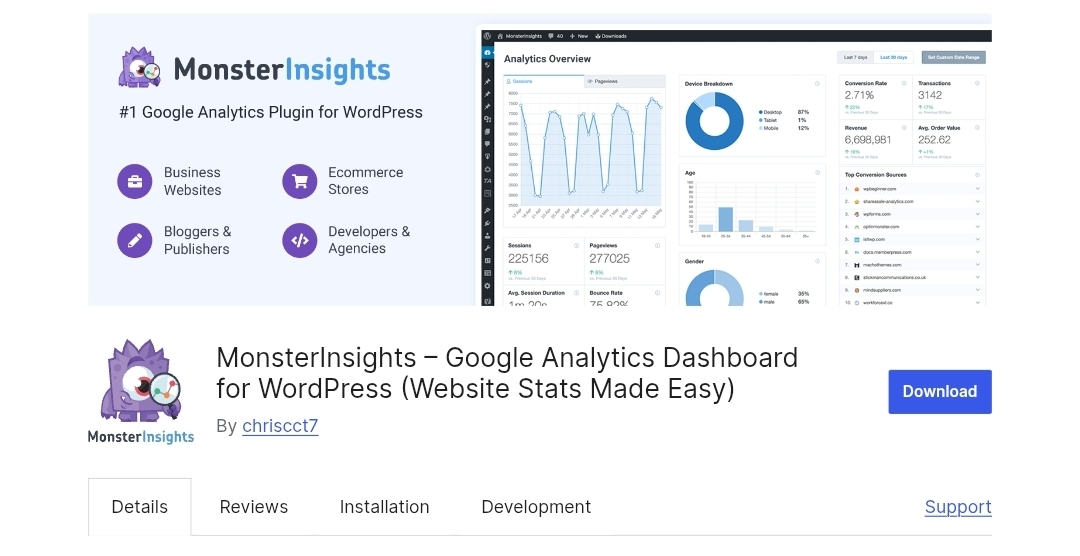
MonsterInsights is the best Google Analytics plugin for WordPress, used by 3,000,000+ website owners. It comes with an ecommerce add-on that lets you easily track your WooCommerce store’s conversions.
In MonsterInsights’ ecommerce reports, you can instantly view your revenue, transactions, average order value, and more.
Moreover, you can use MonsterInsights’ Popular Posts feature to identify your top-selling products. Then, you can easily display those popular products anywhere on your WooCommerce site to improve sales:

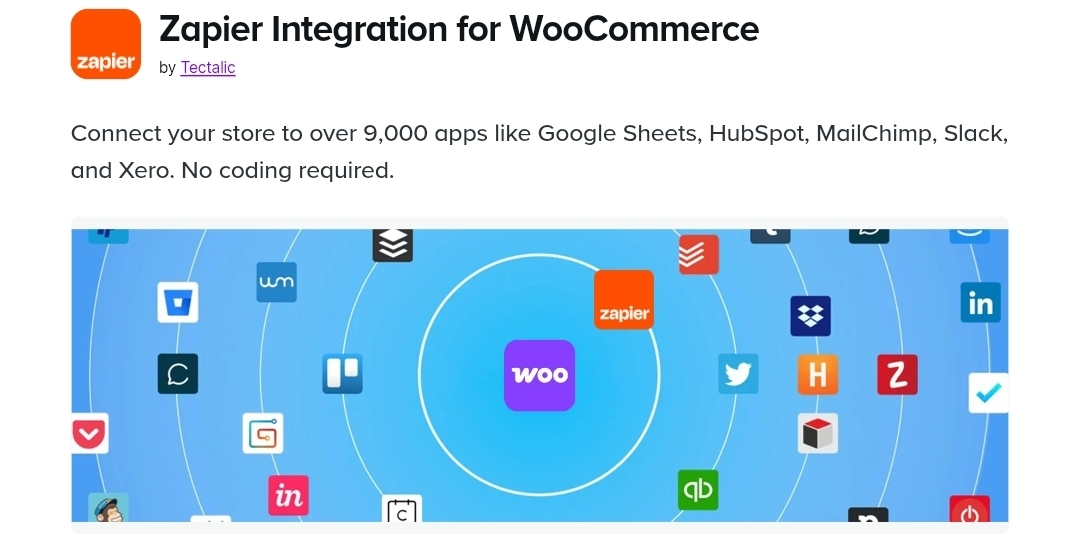
Adding Zapier to your list of WooCommerce extensions is a no-brainer. This versatile platform helps connect your WooCommerce store to 7,000+ cloud apps and services to expand its functionality. However, we’d like to note that this is a paid extension.
Estimated time to complete: Ongoing
After you finish the store setup checklist (or hide it), the store management widget will pop up. This widget provides convenient links to the most frequently used WooCommerce pages for store management:
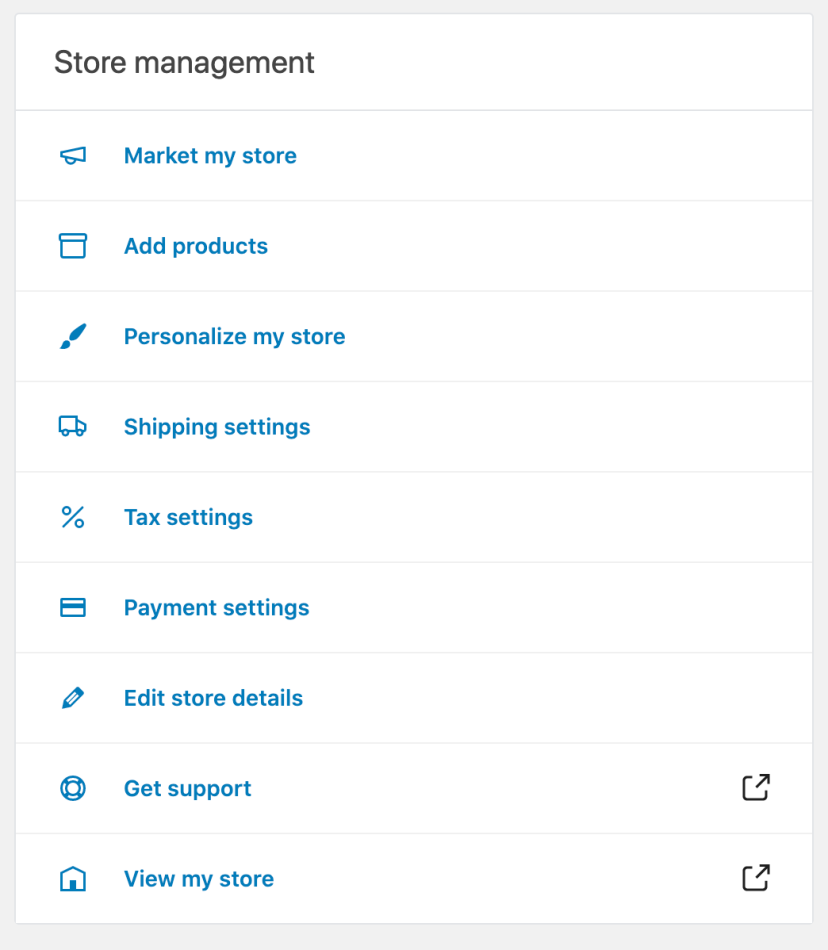
From here, you can process orders, update order statuses, manage refunds, and monitor inventory levels. The dashboard provides quick access to products, coupons, reports, and settings. This way, you don’t have to navigate through multiple menus to run your store.
Within your dashboard, you can update pricing, manage stock quantities, and edit product descriptions at any time. You can also sync customer and order data with marketing tools like Omnisend, enabling personalized campaigns based on real purchase behavior.
Estimated time to complete: 15–20 minutes for a thorough verification
At this point, your ecommerce store is almost ready for launch. All that’s left to do is to re-check whether all store pages are up and running:
Before going live, go through this structured checklist to ensure everything works as expected:
Visit your website as a customer would and go through your shop, cart, payment, and checkout pages.
Touring the skeleton pages lets you check that everything is set up correctly and matches your preferences.
You could also place a few test orders to see whether the entire system is functioning properly.
If your WooCommerce store requires any changes, you can make them at any time by going to the Settings tab. Here, you’ll be able to modify shop pages, inventory, shipping, payment, and more:

The estimated time is around 5–10 minutes per product, depending on the detail of your descriptions and images.
Now that you’ve installed and set up your store, let’s review how to use WooCommerce to add products.
To add a new product, click on the Products tab on the left-hand side of the dashboard and click Add New. A screen similar to the one below will appear:
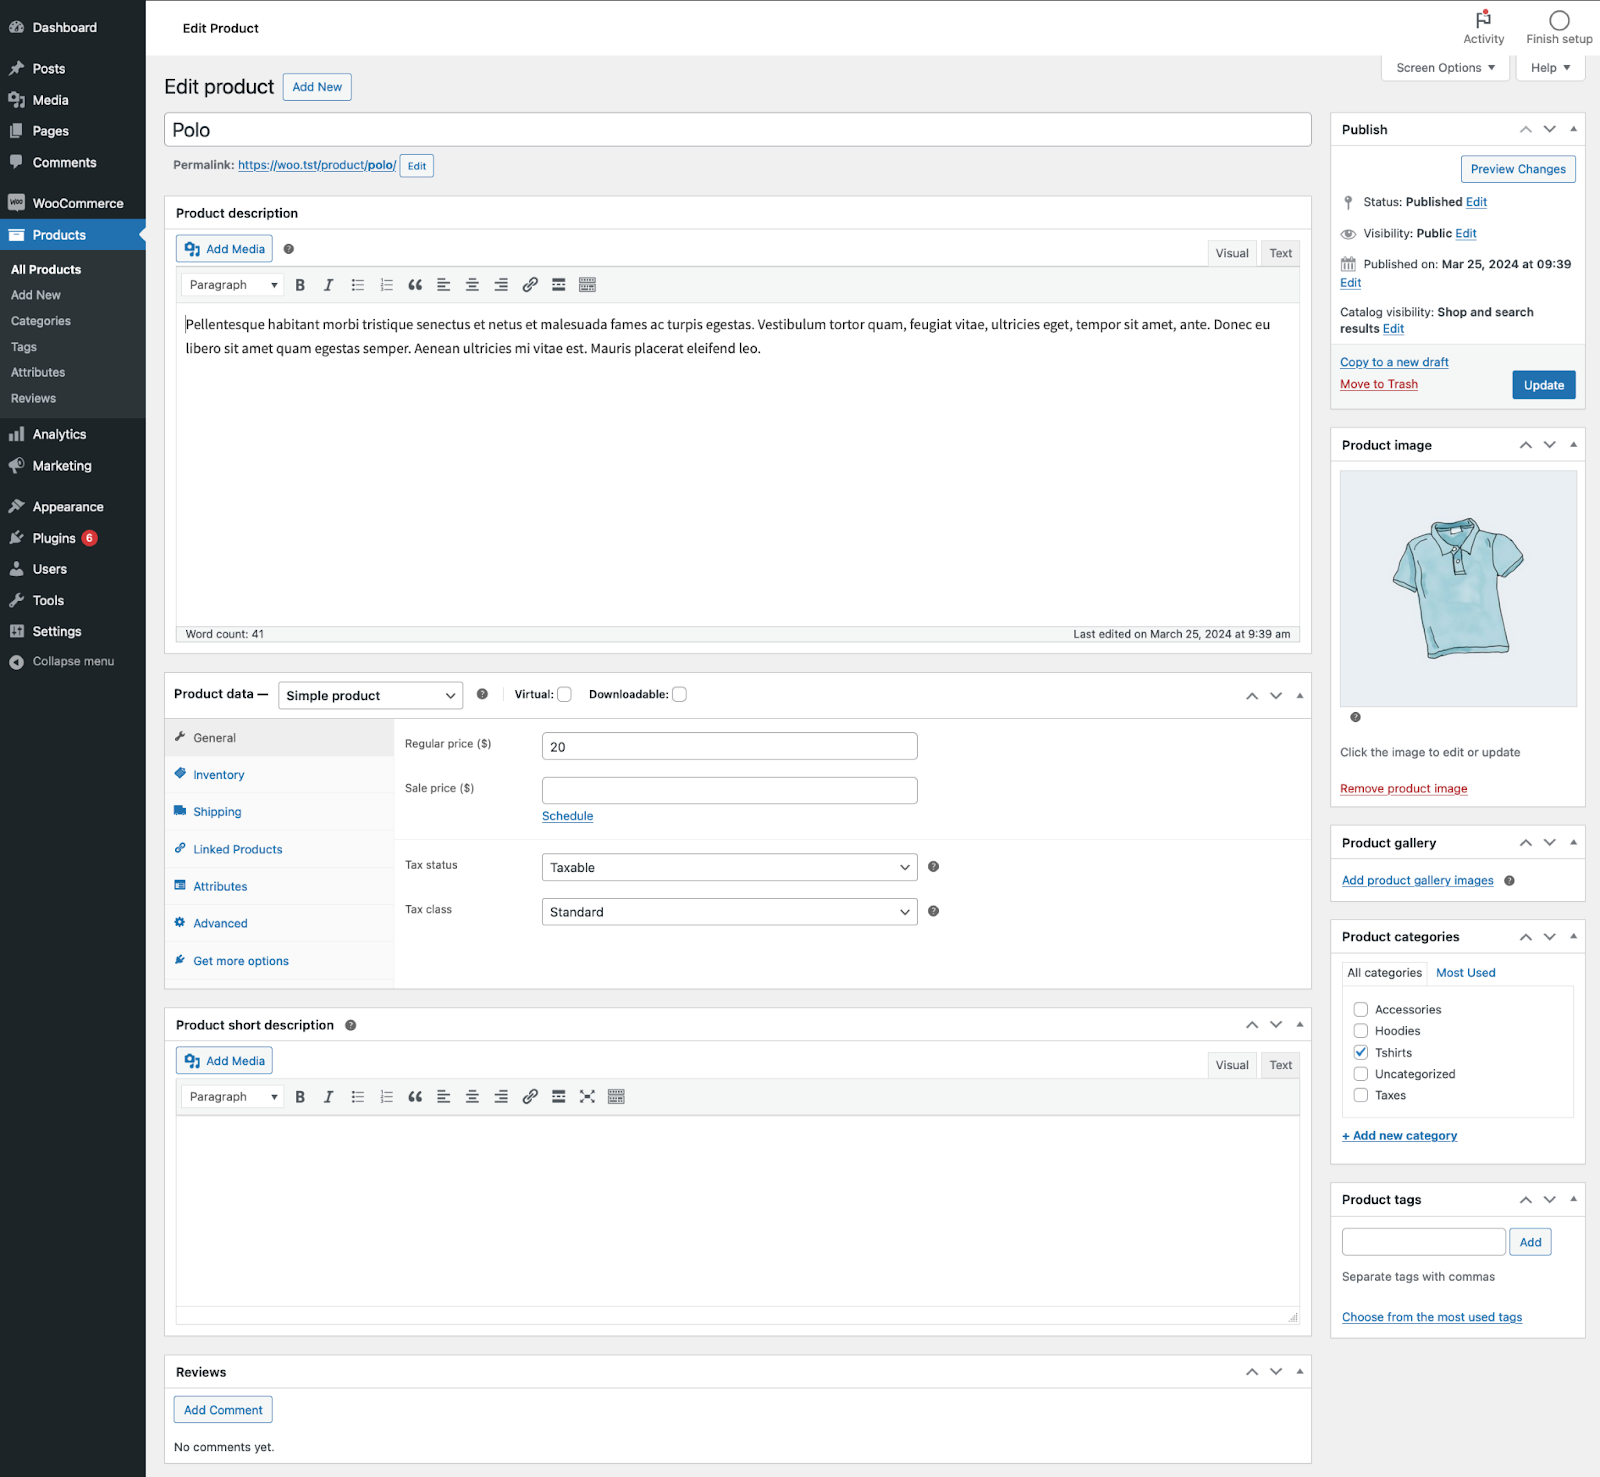
Proceed to add your product title and a description detailing its key features and benefits.
When writing product titles and descriptions, use keywords your customers search for. Also, write benefit-driven copy, not just basic features.
For descriptions, it’s also important to write short paragraphs or bullet points to make them easier to scan.
Well-crafted product descriptions and high-quality images can improve SEO and on-site conversions. It can also power your marketing campaigns when products are featured in emails and ads.
Managing your products is a vital part of running your WooCommerce store. Knowing how to enter, categorize, and label your products properly improves visibility, navigation, and reporting.
WooCommerce allows you to sell multiple product types, including simple, grouped, and variable products. Choosing the correct product type can ensure accurate pricing, variation handling, and inventory tracking.
Grouping your products into categories helps customers easily find what they’re looking for. For example, if you sell gym equipment, you would have categories for “weights,” “treadmills,” and “exercise bikes.” This way, customers can quickly locate products in the same category. You can create as many categories as you want and change them anytime.
Labels, also known as tags or attributes, help filter products. Size, color, and material are common examples that help users refine their search. You can assign labels individually to each product or configure global attributes to apply across multiple items.
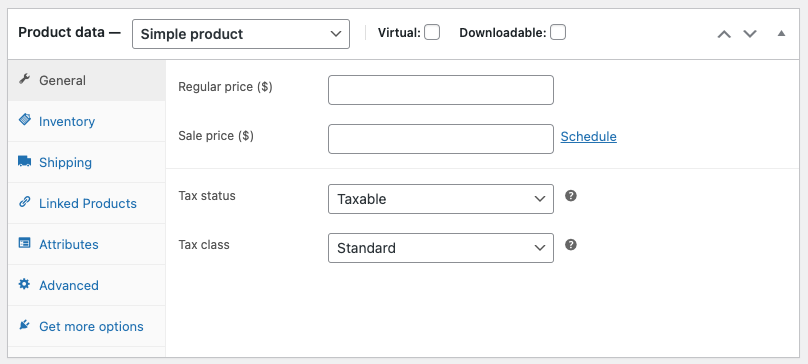
This section contains nearly all the critical information about your product. At this point in our WooCommerce setup tutorial, we’ll look at the various sections on the product data page.
To start, you’ll need to add the product’s price. Indicate the regular price. If there’s a sale price, enter the discounted amount. You must also show the product’s tax status and tax class:
This important section helps you manage products individually, including the ability to allow backorders. Here’s where you allow customers to choose products and add them to the cart.
For better inventory management, you’ll need to enable stock management:
Once you enter the stock quantity, WooCommerce will automatically manage the store’s inventory and update the status to show if an item is in stock or out of stock.
Better yet, you can specify the Low Stock Threshold. This sets the number at which you’ll be notified if a product is running low in your inventory.
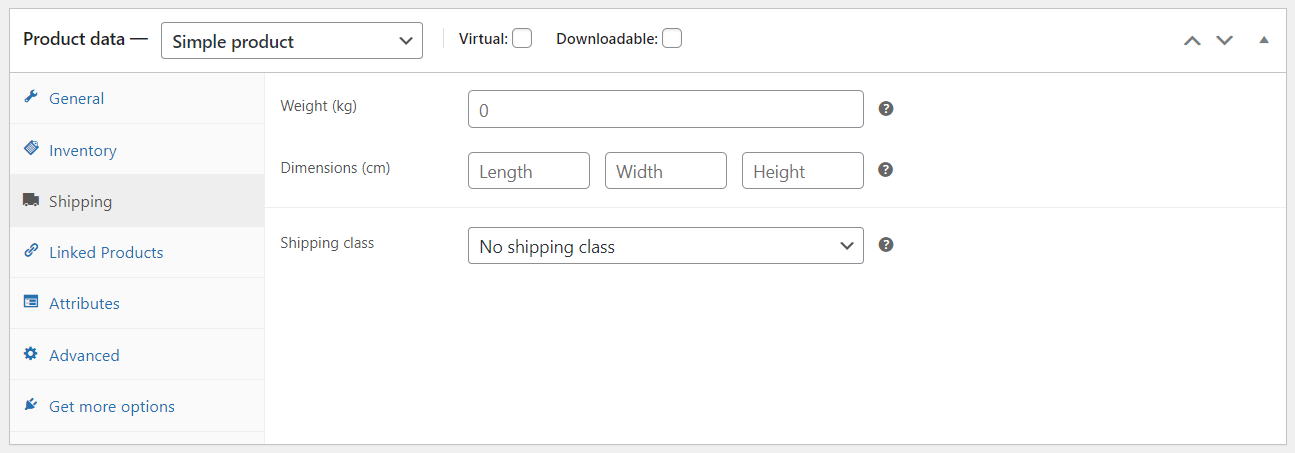
Here, you’ll have to enter shipping information, such as the weight and dimensions of the product and shipping class:
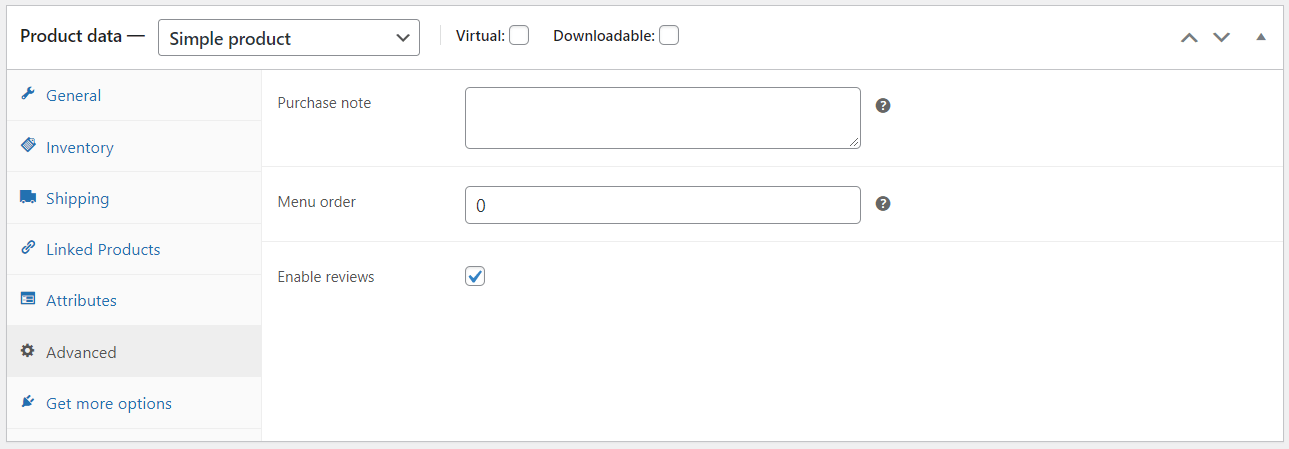
Although this is optional, you may add some advanced details to enhance the customer experience on the site:

You also have the option to include a purchase note. This is sent to the customer after a purchase. You can also turn customer reviews on or off.
Once you’ve completed all sections, click Publish. Repeat this process for each product in your catalog. Remember to keep formatting consistent and optimize descriptions.
So far, this WooCommerce store setup tutorial has shown you how to set up your store and add new products.
Now, let’s look at a couple of features you can customize to ensure your store runs smoothly.
WooCommerce lets you change some default settings and connect your store to external tools. To access these options, navigate to the Advanced option under Settings. Here, you’ll find Page Setup, REST API, Webhooks, and Legacy API.
You can assign pages other than the default ones for Cart, Checkout, My Account, and Terms and Conditions.
Changes in this section should be made with care. For instance, if you assign the wrong page as your checkout page, customers won’t be able to complete purchases.
You can create API keys to use the WooCommerce REST API. This will allow developers to connect the WooCommerce platform with external applications. Technical users may find this helpful when managing their own integrations across their marketing tech stack.
Coupons are a great way to improve sales. To add coupons, go to Marketing on your WooCommerce dashboard. Then, click on Create New Coupon.
Add the coupon code and a short description of the coupon.
In the General section, you can add basic information, such as the type of coupon, its value, and the expiry date:
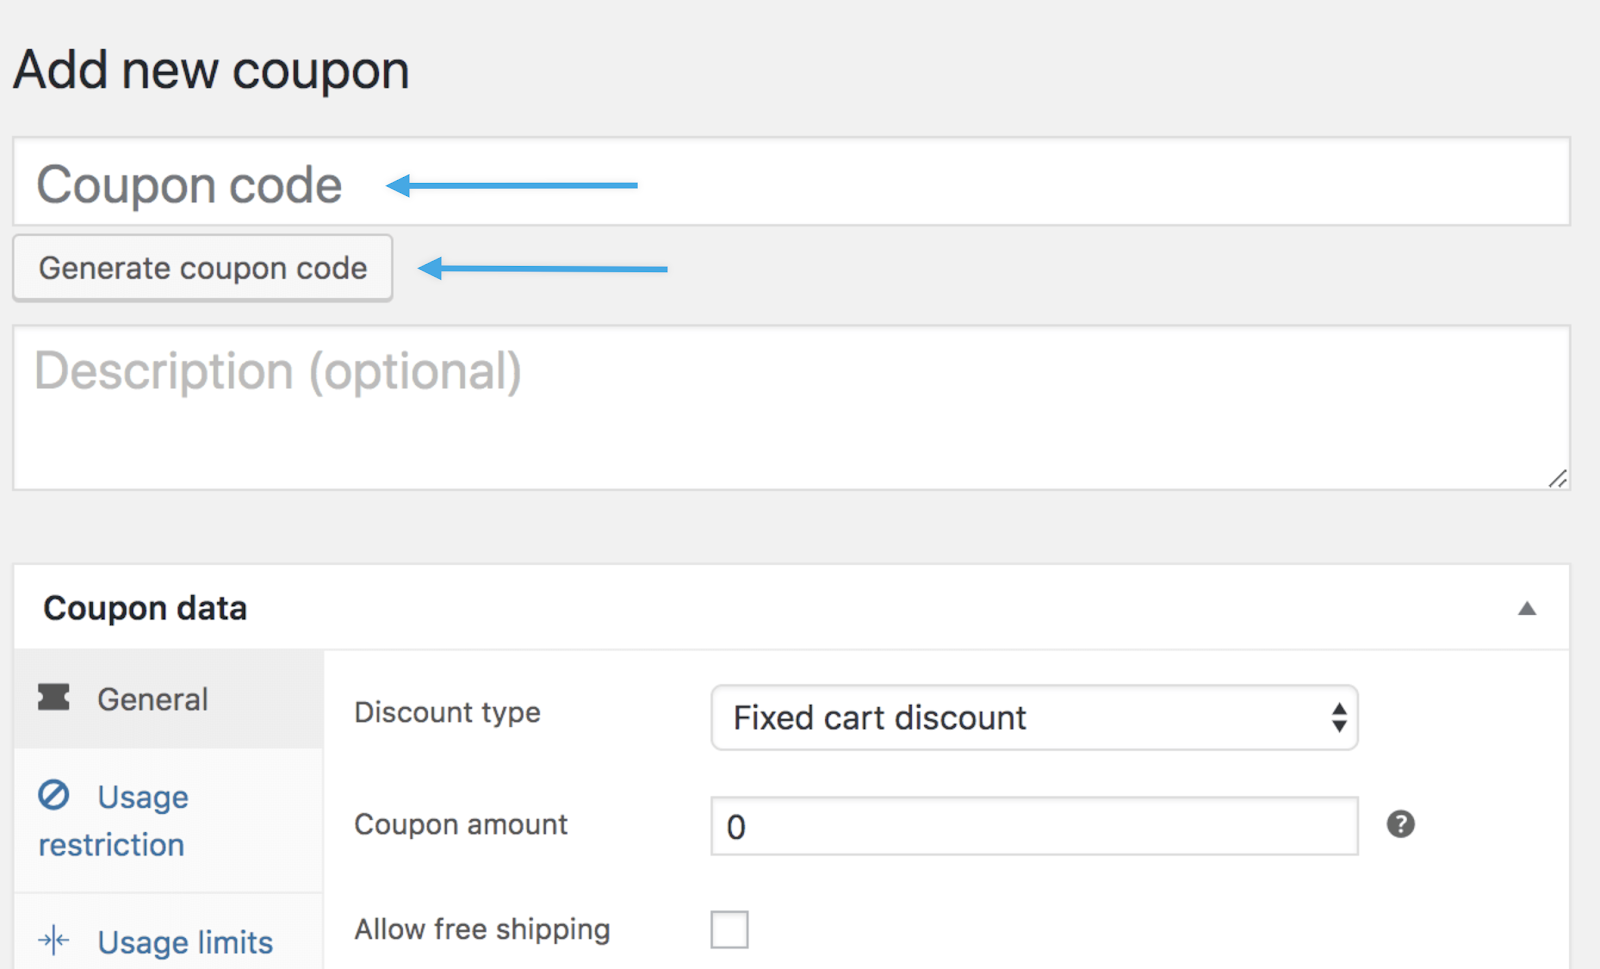
Moreover, under the Usage restriction tab, you can set the minimum spend necessary to activate the coupon.
You can also click on Individual use only to prevent the coupon from being combined with other coupons in the same order. Once set, publish the coupon and let customers know about it.
Coupons and discount codes are more powerful when integrated into your marketing automation strategy. Instead of displaying the same public code to everyone, you can send targeted or unique discount codes through automated email flows.
Personalized codes increase urgency, improve tracking accuracy, and help measure campaign performance more precisely.
Check out the Accounts and Privacy tab for more important settings that you’ll need to customize to help guide a customer’s experience:

By ticking the settings under Guest Checkout, you can allow customers to buy products without creating an account. This flexibility can help improve your conversion rate. It encourages more purchases, particularly among customers who might find filling out a registration form tedious.
You can also control account settings and personal data settings from here.
After you complete your WooCommerce store setup, you must know how to keep your store safe, secure, and running smoothly. Here are some tips to help you maintain your WooCommerce store.
You must keep your WooCommerce store’s software up to date. This is crucial for security and smooth operations.
For smaller stores, schedule a weekly check to review available updates and apply them during low-traffic periods.
Backups ensure you can quickly recover from technical issues, cyberattacks, or accidental changes.
Monitoring your store’s performance and analytics helps you make informed decisions.
Providing excellent customer support is key to boosting customer satisfaction and loyalty.
The WooCommerce setup checklist below gives you a concise reference, allowing you to track your progress as you build your store:
| Status | Step | Time | Outcome |
|---|---|---|---|
| [✔] | Step 1: Choose hosting | About 15 minutes | Hosting environment ready with WordPress and WooCommerce requirements |
| [✔] | Step 2: Install WooCommerce | About five minutes | WooCommerce plugin activated and ecommerce features available |
| [✔] | Step 3: Complete setup wizard | About 15 minutes | Basic store settings, such as currency and location, are configured |
| [✔] | Step 4: Add products | About 10 minutes per product | First product is live and visible to customers |
| [✔] | Step 5: Select and customize your theme | About 15 minutes | Professional store design applied |
| [✔] | Step 6: Configure shipping | About 20 minutes | Shipping zones and rates are set for accurate delivery options |
| [✔] | Step 7: Set up tax rules | About 10 minutes | Tax calculations are enabled according to your location |
| [✔] | Step 8: Connect payment gateways | About 15 minutes | Secure payment options are ready for customer transactions |
| [✔] | Step 9: Install extensions | About 20 minutes | Additional features added for store growth and functionality |
| [✔] | Step 10: Manage store settings | Ongoing | Dashboard configured for smooth daily operations |
| [✔] | Step 11: Test and launch | About 20 minutes | Store verified and ready to handle real customers and sales |
The total estimated time to complete your WooCommerce store setup is about two to three hours. Verify that every step of your setup is completed and that your store is ready for customers.
There’s no doubt that WooCommerce is the best ecommerce plugin on WordPress. It gives you full control over your ecommerce store setup and integrates perfectly with WordPress.
The process to set up a WooCommerce store involves choosing hosting, installing the plugin, configuring payments and shipping, and optimizing your store for growth. Once these steps are complete, you’ll have a functional and revenue-ready online shop.
However, the WooCommerce store setup is only the beginning. To build a successful ecommerce business, you need marketing and customer engagement.
WooCommerce marketing automation helps you send targeted emails and build customer relationships.
Easily automate your WooCommerce marketing with Omnisend’s automated features. With this tool, ecommerce businesses can generate up to $79 in revenue for every $1 spent across their marketing channels. This is according to Omnisend’s internal data.
With automation, you can optimize your store for customer engagement and long-term profitability.
Quick sign up | No credit card required
You need a domain name, web hosting, WordPress installation, and the WooCommerce plugin for WooCommerce store setup. You need about $50–$200 for the first year. This covers hosting, domain registration, and a basic theme.
The core WooCommerce plugin is free to install. However, running an online store involves other costs such as hosting, a domain name, themes, and extensions.
Basic hosting can cost anywhere from $3 to $30/month. Meanwhile, a domain can cost about $10–15/year. Premium extensions and themes are optional, but they can expand your store’s functionality and customization options.
Yes, WooCommerce is suitable for beginners because it integrates with WordPress and includes a setup wizard to guide you through the setup. However, it requires more hands-on configuration for hosting, plugins, and settings than hosted platforms. The learning curve is manageable, but you’ll have to follow step-by-step instructions.
A basic store with products, payments, and shipping configuration can be ready in one to two hours. Implementing full customization using extensions and marketing automation tools like Omnisend may add another 30–60 minutes. However, this can improve revenue potential. Use the WooCommerce store setup checklist to ensure you don’t miss any important steps.
WooCommerce and Shopify serve different needs. WooCommerce gives you control over your store and costs less because you pay only for hosting and optional extensions. Shopify is a hosted platform that simplifies setup and maintenance, but you’ll have to pay monthly fees and transaction costs.
WooCommerce requires self-managed hosting and regular updates. Unlike hosted platforms, you’re responsible for security and performance. The learning curve is steeper because you must configure settings and plugins.
WooCommerce doesn’t charge a monthly fee since the plugin is free to use. Your monthly costs come from hosting and optional premium extensions.
Monthly expenses depend on hosting and optional extensions. Hosting typically costs $3–$30. Premium themes and extensions are optional. Many essential extensions, including the Omnisend marketing automation solution, offer a free plan to start.
TABLE OF CONTENTS
TABLE OF CONTENTS
What’s next

No fluff, no spam, no corporate filler. Just a friendly letter, twice a month.