
 OFFER
OFFER


Drive sales on autopilot with ecommerce-focused features
See FeaturesSetting yourself up for success in the ecommerce space involves many elements, so having a Shopify checklist before launch can be incredibly helpful. You’ll need to consider factors such as selling quality products, ensuring there is sufficient demand for them, and marketing your online store effectively to reach the right audience.
And before even reaching the exciting launch phase, you have to actually build your store from scratch.
This involves steps like setting up your Shopify account, designing your storefront, adding inventory, and optimizing your sales and marketing operations. The smallest details can make the difference between a well-functioning store and one lacking essential aspects. This is why we compiled a comprehensive checklist to guide your journey as an online store owner.
Quick sign up | No credit card required
Shopify store launch checklist
- Shopify store setup
- Store design & user experience
- Product setup & inventory management
- Payment setup & security
- Shipping & taxes setup
- SEO & content optimization
- Marketing & sales channels
- Analytics & reporting
- Store launch checklist
1. Shopify store setup
- Sign up for a Shopify account: Your journey begins here. You can find the Start free trial button in the upper right corner of their website.
- Choose a Shopify plan: Your free trial lasts three days, enough to get you acquainted with the platform. You can then choose between multiple pricing structures, with the Basic one being the most popular for new online stores.
- Pick a store name and domain: The next step is choosing your online store’s name and domain, which is its associated web address. Starting out with a default Shopify domain is perfectly fine, but you’ll probably want to switch to a unique web address down the road.
- Set up your store’s basic information (location, currency, time zone): Now it’s time to decide on some foundational details for your store. Although they may seem less relevant than for a physical store, factors like currency and location are important for customers, influencing their payment methods, shipping costs, and delivery times.
- Configure store language: Shopify supports using multiple languages for your store. Whether you want that or decide to settle on English — or another local language — depends on your plans and goals.
- Enable SSL certificates for secure checkout: SSL (Secure Sockets Layer) is a crucial security element for any website that processes payments. You can check whether SSL is enabled by going to Settings > Domains on your Shopify admin page.
- Set up the Shopify admin dashboard: Your admin dashboard will be your base of operations, so setting it up early is essential. Here is where you’ll manage everything, from adding your products and customizing your website’s design to configuring shipping and payment details for your products.
- Customize store policies (refund, privacy, terms of service): Having clear and transparent rules can enhance customer trust. Create straightforward policies and enable them by going to Settings > Policies in your admin page.
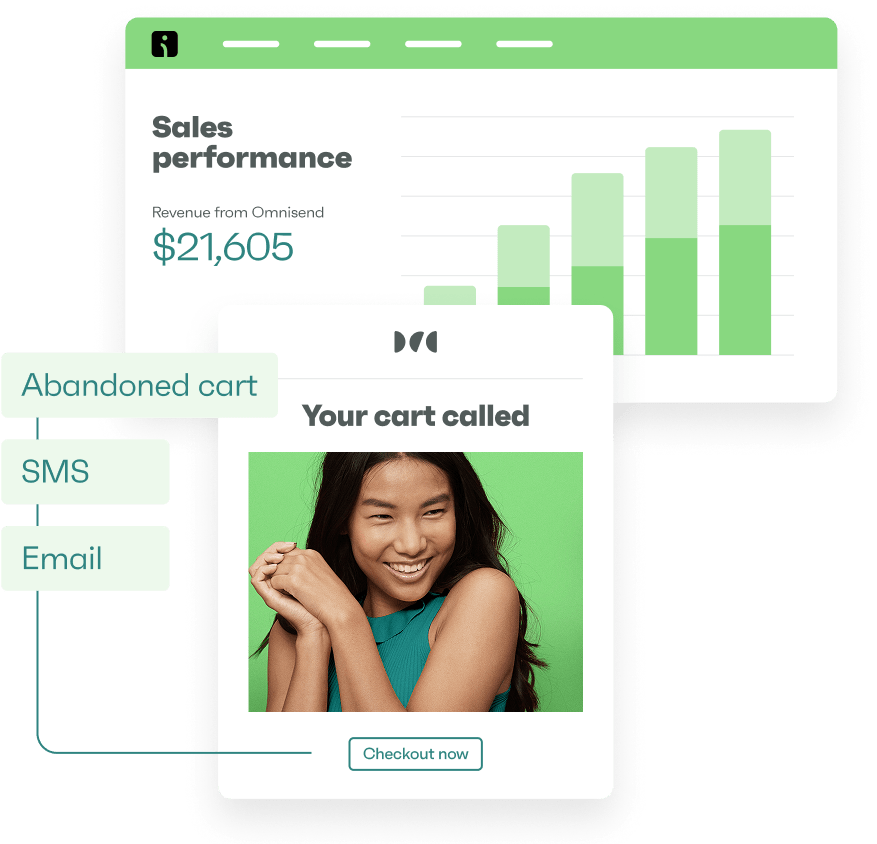
- Set up notifications (order confirmation, shipping updates, etc.): Go to Settings > Notifications in your admin page and set up your email and SMS templates for customer notifications. You can also integrate an app like Omnisend to make this more effective and efficient.
- Connect an email address for customer support: It’s essential that customers have a way of reaching you from day one. Either use an existing email address or create one specifically for this purpose.
2. Store design & user experience
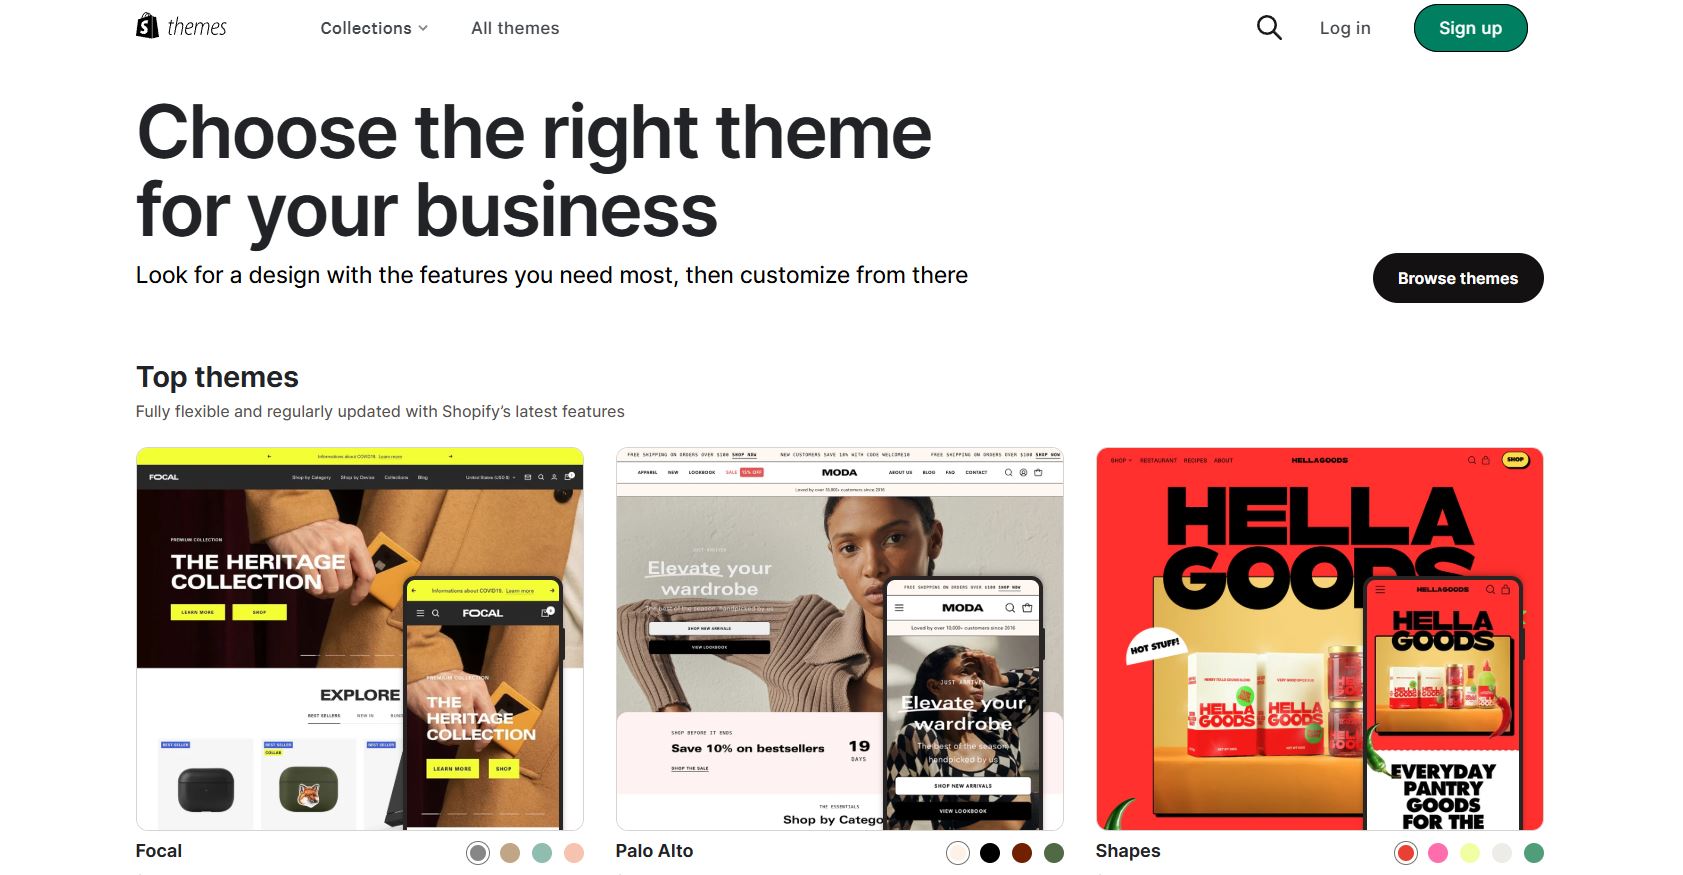
- Choose a responsive Shopify theme: When choosing your Shopify store’s theme, prioritizing a responsive design can be essential for customer experience. Responsive themes automatically adapt to multiple types of devices, including smartphones, tablets, and PCs.
- Install and customize the theme: After choosing a theme that fits your store’s profile and image, it’s time to install it and make it your own. Shopify’s drag-and-drop tools can help you change aspects like fonts, colors, and more.
- Optimize theme for mobile devices: While a responsive Shopify theme automatically adapts to mobile devices, you can still tweak it to make your customers’ online experience even better. This might include creating simplified menus and compressing images for quicker loading times.
- Add essential pages (About us, Contact us, FAQ, Shipping info): Being transparent with your audience can help build trust. Don’t forget to add all essential information, including your store’s backstory, ways to contact you, frequently asked questions about the store and its products, and shipping information.
- Use high-quality images: We tend to prioritize what we see over any other senses, so having professional-looking images is crucial for your store’s success.
- Create an engaging homepage layout: Your homepage is your store’s front window. Make it as attractive as possible based on the type of audience you want to attract.
- Set up a straightforward navigation menu: Your navigation menu should be highly intuitive and quickly take the user to where they want to go. Separate your products into distinct categories and make them easily reachable.
- Implement breadcrumb navigation for better user experience: The term “breadcrumb navigation” comes from the classic Hansel and Gretel story, where they left breadcrumbs behind to help them make their way home. Similarly, this feature displays a trail of links as your visitors go deeper into your website’s navigation menu, allowing them to easily return to any previous page.
- Add trust badges and customer testimonials: Trust badges, like those showing your SSL certificate and payment method badges from Visa or PayPal, can help build trust in your Shopify store. Later on, you can also add testimonials from happy customers.
- Create a blog section for content marketing: A blog section with content that directly relates to your products can educate people on how to use them, redirect search engine traffic toward your website, and establish you as an authoritative figure in your field. You might start by writing them yourself, but as your business grows, hiring freelance writers could be a smart move.

3. Product setup & inventory management
- Add product listings with detailed descriptions: Buying products without seeing and touching them in person requires a level of trust from your customers. Provide them with detailed listings and descriptions to make their decision making process smoother.
- Upload high-quality product images: As with every other part of your store, having high-quality images for your products can make them much more attractive to viewers. Include as many as you can, and use different angles and perspectives.
- Set product prices and compare-at-prices: Determine the right prices for all your products and make them visible to viewers. If you’re offering a discount, ensure the original price is easy to see to highlight the savings.
- Organize products into collections: As your Shopify store grows, you’ll probably have more and more products. Placing them into collections makes them easier for you to manage and for your audience to find.
- Add product tags and categories: Make the search even easier for your audience by creating tags and categories. This not only makes it easier for them to find what they need but also allows for quick comparisons between similar items.
- Set up product variants (sizes, colors, etc.): A single product may have multiple variables, with color and size being two of the most popular. You can reduce your product return rate by helping customers choose exactly what suits them.
- Enable inventory tracking: Getting ready to buy a product and discovering it’s sold out is a major disappointment for online shoppers. Shopify can help you keep track of your stock and help you avoid such situations.
- Enable automatic inventory updates with third-party apps: You can save time by enabling automatic inventory updates. A variety of third-party apps can help you do that, saving you significant time and effort.
- Set up low stock notifications: When enabling automatic inventory updates, be sure to include low stock notifications. This can help you proactively prevent a popular product from selling out.
- Enable product reviews and ratings: Your previous customers can be your most effective salespeople. As such, make sure positive user reviews are prominently displayed when visitors check out a product.
4. Payment setup & security

- Set up payment gateways (Shopify Payments, PayPal, etc.): Payment gateways are services that enable the transfer of funds from your customers’ accounts to yours. With your store now up and running, focus on ways to make payments as quick, easy, and safe as possible.
- Test payment gateways for functionality: Payment gateways that don’t work can quickly deter customers. Try them out yourself first for a seamless customer experience.
- Enable multiple payment methods (credit cards, Apple Pay, etc.): Having various payment methods can help you appeal to a broader audience. Some common ones include credit cards, Apple or Google Pay, and PayPal.
- Set up taxes based on location: You also want to avoid any troubles with authorities. Research your local tax code and make sure you comply.
- Enable fraud prevention tools: Shopify has its own fraud analysis tool that can identify suspicious activity based on factors like the user’s IP and payment method. You can also set up third-party fraud prevention tools.
- Set up SSL certificates to secure payment information: If you haven’t set up your SSL certificates yet, now is the perfect time. Doing so reassures your customers that their banking information is safe.
- Enable 3D secure payments: You can make bank transactions even safer by enabling 3D secure payments. These require customers to verify their identity with their bank via SMS or their banking app.
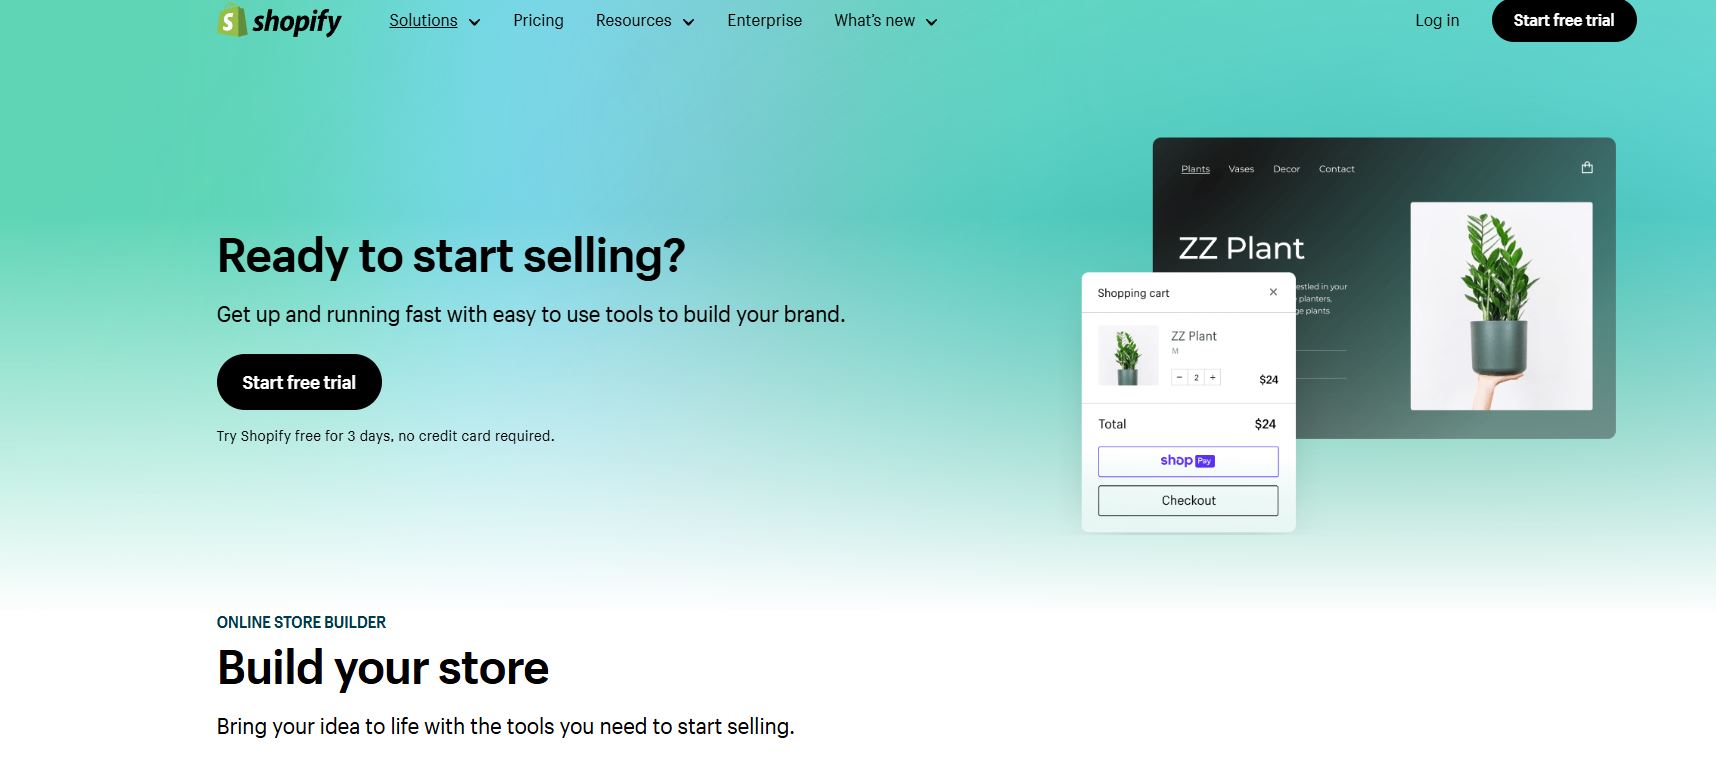
- Test the checkout process: Your checkout process should be quick and intuitive. Test it thoroughly before launch to guarantee a smooth experience for your customers.
- Implement a secure password policy for customer accounts: Ask your customers to use hard-to-guess passwords that include multiple elements, such as upper and lowercase letters, numbers, and special symbols. While they can be annoying, they play a major role in preventing fraud.
- Ensure PCI compliance for credit card payments: PCI (Payment Card Industry) compliance is a security standard for credit card transactions. All Shopify stores are PCI-compliant by default.
5. Shipping & taxes setup
- Set up shipping zones: Shipping costs differ depending on the distance between you and a customer. Calculate your shipping costs and create multiple zones, helping customers quickly determine their shipping fees.
- Configure shipping rates (flat, weight-based, or carrier-calculated): Depending on what you sell, you may find different shipping rates more appealing. Shopify offers flat rates, weight-based rates, and the option of leaving it up to the carrier.
- Offer free shipping options: Free shipping is a favorite among customers across the board. If you can afford it — it should become a “must-have” in your marketing strategy.
- Enable local delivery or pickup options: You can reduce or even eliminate your customers’ shipping costs by enabling local delivery and pickup options. The former involves a third party that handles deliveries in a specific area, while the latter refers to the customer visiting a physical location to pick up their items.
- Set up taxes for different regions: Customers from different geographical areas may have different taxes, such as customs fees. Shopify can help you implement this to ensure you and your customers comply with local tax laws.
- Set up automated tax calculations: Making the customers calculate their own taxes may lead to you losing them. Set up automated calculations and make sure the customers understand what they’re paying.
- Add packaging options (custom or generic): You can generate extra funds by adding a special packaging feature for your products. Since many people buy items as gifts, this added convenience can enhance their overall shopping experience.
- Enable tracking for shipped orders: Many customers want to know exactly when their packages will arrive. You can help them by integrating your Shopify store with carriers and enabling customers to track their shipments.
- Set up shipping insurance options: Some products may get damaged during shipping, and you’ll have to send new ones to your paying customers. You can mitigate this risk by setting up shipping insurance through the carriers you’re using, third-party apps, or directly through Shopify.
- Connect to third-party shipping providers (UPS, FedEx, etc.): Go to your third-party shipping providers’ websites and set up accounts. Then, set up the connections to your Shopify Dashboard Settings under Shipping and Delivery.
6. SEO & content optimization
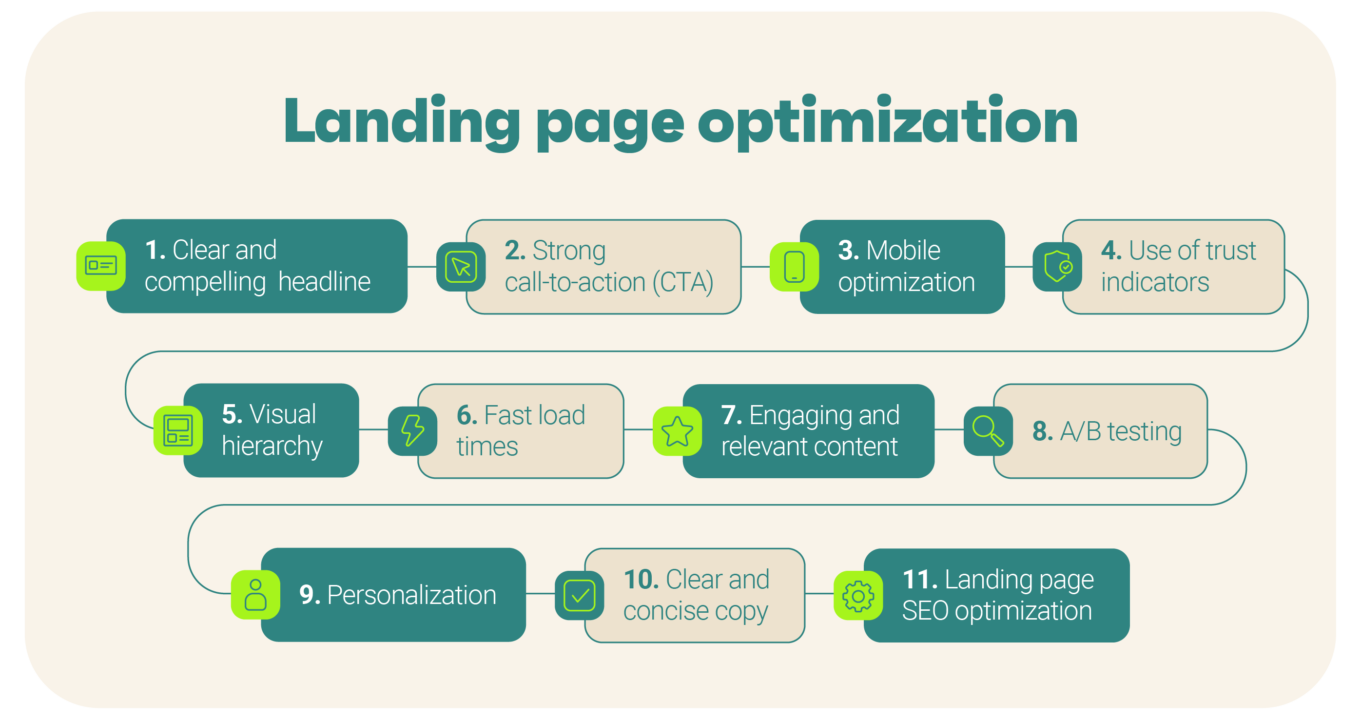
- Conduct keyword research for products and content: One of the biggest challenges as a Shopify store owner is ensuring that potential customers discover your products. Identify the most effective keywords for each product and category to boost visibility and attract the right audience.
- Optimize page titles and meta descriptions: Optimize your titles and descriptions to align with SEO best practices. Some of those include keeping page titles under 60 characters and incorporating relevant keywords into your meta descriptions.
- Use descriptive URLs with target keywords: Ensure your URLs are descriptive. Use hyphens to separate words and include relevant keywords.
- Set up Google Search Console and submit your sitemap: Google Search Console is a useful tool that can help you improve your Shopify store’s Google search performance. Set it up and use it to see how you can improve your SEO.
- Add alt text to images for SEO: Alt (alternative) text is an image description that helps search engines understand its content. It also improves accessibility for visually impaired users who rely on screen readers.
- Enable structured data for rich snippets: Rich snippets are more detailed search results showing product prices and availability. Enabling structured data can help search engines get a better understanding of your website, and you can automatically enable it in your Shopify store with the help of third-party apps.
- Optimize content for long-tail keywords: Long-tail keywords are more detailed, including at least three different words. They are easier for search engines to rank and can attract more targeted traffic.
- Create internal links to boost SEO: Internal links are an easy way for your customers to get from one page of your website to another. Besides improving customer experience, they also boost SEO.
- Create high-quality product descriptions with keywords: Avoid quick and unclear product descriptions. Writing high-quality text with relevant keywords will improve SEO and help customers better understand what you’re selling.
- Add social media sharing buttons on product pages: Social media is a relatively inexpensive marketing channel for your products. Encourage visitors to share your products online by adding visible social media sharing buttons.
7. Marketing & sales channels
- Integrate Omnisend with your Shopify store: Omnisend can help you save time and boost your marketing efforts by automating email and SMS marketing. Integration with the Shopify store is seamless, and you can start using it for free.
- Create automated email flows (welcome emails, abandoned cart recovery): As you start getting more and more customers, manually sending emails will take more and more time. Omnisend’s intuitive tools can help you set up email automation for every event.
- Design branded email templates for promotions and newsletters: Emails are also a good opportunity to promote your brand. Omnisend’s customizable email templates and powerful email builder will allow you to create stylish branded campaigns.
- Segment email lists to send targeted campaigns: Try to segment your audience based on relevant criteria. Then, create personalized messages that appeal to each category.
- Set up promotional discount codes and link them to Omnisend campaigns: With Omnisend you can also create discount codes to further enrich your marketing strategy. You can then add those codes to email and SMS campaigns, increasing the engagement of your customers.
- Use Omnisend’s SMS marketing tools for real-time promotions: Omnisend’s automation and segmentation tools can also help you set up real-time promotions. For instance, a potential customer who abandons their cart can get an instant discount message, which may persuade them to complete the purchase.
- Connect Omnisend to social media platforms (Instagram, Facebook): You can also integrate Omnisend into your social media. This can help gather more user data, and you can also send marketing messages directly to your social media followers.
- Track the performance of Omnisend email campaigns: Omnisend also has powerful built-in analytics tools that can help you determine whether or not an email campaign is achieving its desired goal. Besides seeing relevant data like the percentage of users who opened an email or its conversion rate, Omnisend enables you to perform A/B testing and determine which approach is more effective.
- Offer upselling and cross-selling via Omnisend emails: Email marketing can also help convince paying customers to purchase additional products. Omnisend emails are powerful tools for upselling, which refers to convincing customers to buy a more expensive version of their chosen product, and cross-selling, which involves selling complementary products.
- Set up Omnisend popups and forms for lead capture: Collecting as many contacts as possible can help boost your future marketing campaigns. You can use Omnisend to create forms and popups to encourage visitors to submit their info.
Learn about Shopify bundles and how they can help your marketing strategy.
8. Analytics & reporting
- Install Google Analytics and connect to Shopify: Google Analytics is an essential tool, as it can help you determine your online store’s performance. Connect it to your Shopify store to gain more insight into what you can improve.
- Set up Google Tag Manager: Google Tag Manager can help you integrate marketing tags without coding knowledge. These tags can help you track visitor behavior and interactions.
- Track ecommerce goals and conversions: Constantly analyzing your Shopify store’s performance is essential for continuous improvement. Typical goals include increasing sales and reducing cart abandonment rates, while a common conversion is determining if a visitor makes a purchase.
- Enable Shopify reports (sales, traffic, conversion rates): Shopify has robust reporting tools you can use. Make sure to enable them to learn more about your store’s performance.
- Set up customer behavior tracking: Tracking your customers’ behavior can give you valuable insight into what you can improve. You can use multiple tools, like Omnisend, Shopify Analytics, and Google Analytics, to do that.
- Monitor traffic from different channels: Segment your audience based on how they got there. This can help you determine which marketing strategies work best and which you need to improve or eliminate.
- Implement heatmaps to track user interaction: Heatmaps can show you which parts of your store are most attractive to visitors. You can integrate third-party apps with Shopify to make heatmaps for your store.
- Regularly check and fix broken links: Broken links lead to non-existing pages and can prevent visitors from continuing to visit your store. Make sure you find them before your audience does.
- Set up automated reports to track sales and traffic: Shopify can send you automated reports to track your website’s performance. Set them up early on and leverage the insights to continuously optimize your store.
- Monitor product performance and adjust pricing or stock as needed: Implement discounts or price reductions to sell your unpopular products. Likewise, ensure you have enough stock of your popular ones to avoid missing any sales.
9. Store launch checklist
- Test the entire store before launch (products, checkout, payments): Regardless of how thorough you are, some things will probably not work perfectly from the beginning. Test everything and fix as many issues as you can before launch.
- Ensure all legal requirements (privacy policies, terms of service) are in place: Legal issues can seriously affect your bottom line. Make sure you’re in perfect order before starting to sell.
- Check the speed and performance of the site: Try out your website from different devices and locations. Make sure it’s loading quickly and if not — determine the reasons and fix them.
- Set up a launch plan with marketing campaigns: Hit the ground running with a well-advertised launch. Promote your website before launch through social media and similar channels.
- Ensure mobile optimization and responsiveness: Don’t neglect mobile optimizations. Over three-quarters of retail website visits are done through mobile devices, so your website must be prepared for mobile visitors.
- Check that your site is SEO-ready: Double-check all SEO-related aspects before going live. This can help you maximize your reach from day one.
- Double-check your inventory and product information: Make sure you have enough inventory to fulfill all orders. Also, check if all products have the correct information.
- Set up your email marketing list in Omnisend: Omnisend can also help you quickly set up an email marketing list. Also, the segmentation based on relevant criteria is intuitive and smooth.
- Test the customer service channels (email, chat, etc.): Your customers should be able to reach you easily and get a quick response from you. Try out your customer service channels to make sure they work as intended.
- Announce the launch on social media and through email marketing: Be as visible as possible with your launch. Email everyone on your list and announce it on all your social media channels.
These 10 Shopify tips for new store owners can help you hit the ground running.
Conclusion
Being thorough when setting up and launching your Shopify store can help you generate early sales and gain your customers’ trust from day one. From setting up your store to opening it up to the general public, the steps and decisions you take now can also impact your Shopify store’s medium and long-term success.
Having a Shopify store setup checklist like this one can help ensure you’re not missing anything important. You can keep it nearby and tick all its boxes while setting up your store, but it can also be helpful later on to improve your website’s performance and popularity.
Shopify checklist FAQ
These are some common questions that future Shopify store owners ask:
You can determine the steps you need to take when creating an ecommerce website by reviewing this Shopify website checklist. Some essential ones are designing your store, adding products and their descriptions, setting up payment and shipping methods, optimizing SEO, and testing everything before launch.
Some essential functional requirements for any website include quick loading times through performance optimization, intuitive navigation options, compatibility with multiple types of devices, sound SEO practices, and robust security regarding payments and user information. Other requirements are specific to the website’s purpose. For instance, ecommerce websites need to integrate seamlessly with third-party apps.
While there’s no definitive answer to this question, the general recommendation is to start with a limited number of products and work your way up as you increase your popularity. A generally accepted ballpark range is somewhere between five and 20 products, but it depends on factors like inventory costs and your specific niche.
Quick sign up | No credit card required
TABLE OF CONTENTS
TABLE OF CONTENTS

No fluff, no spam, no corporate filler. Just a friendly letter, twice a month.