
 OFFER
OFFER


40 best Shopify stores crushing it in 2026 (examples)
With over 130+ pre-built integrations and flexible APIs, you can easily centralize data from across your tech stack
Make the most out of your data and unlock powerful growth marketing possibilities with these other top marketing tools.
Build any custom integration with our open, flexible APIs that are simple to use and implement.
Check out apps that have been stealing all the spotlight.
Email and SMS marketing insights, ecommerce resources, and the latest Omnisend news
Expert-led sessions covering email, SMS, and ecommerce marketing strategies.
Educational video and live training to help you make the most out of Omnisend.
Drive sales on autopilot with ecommerce-focused features
See FeaturesIn 2025, to stand out on Shopify, you need a strong Shopify domain — not just great products. This is your store’s website address that customers type into their browser, Google ranks in its search results, and — crucially — it’s where your email marketing campaigns originate.
Memorable Shopify domain names build brand recognition, while a branded email address improves your marketing performance with better deliverability and trust among customers.
Join us below as we cover Shopify domain search, purchasing, connecting third-party domains, changing primary domains, and integrating with email marketing tools.
Quick sign up | No credit card required
New to Shopify? Read these articles:
10 Shopify tips all beginners should know
40 best Shopify stores in 2025 for inspiration
Every Shopify store gets a free domain that follows the yourstore.myshopify.com format. The default domain works perfectly for testing your store before launch.
A custom domain name on Shopify, like yourbrand.com, replaces that default address and creates a professional storefront. Custom Shopify domains signal credibility to customers and enable branded email addresses for marketing platforms like Omnisend, improving email deliverability and trust.
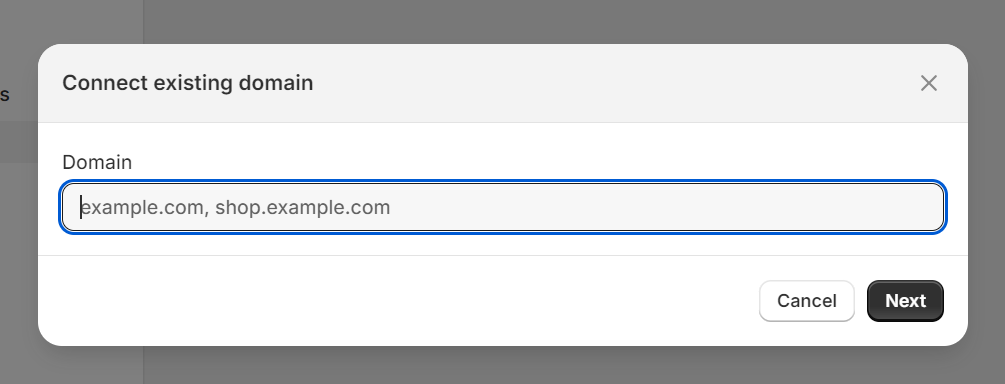
A third-party domain means you bought your domain from a registrar other than Shopify and need to connect it.
Popular domain providers include:
GoDaddy offers automatic domain connection, but you can manually configure DNS if needed. Here’s how to connect a GoDaddy domain to Shopify:
You can find the latest official Shopify instructions here.
Namecheap simplifies the process with a Shopify DNS template.

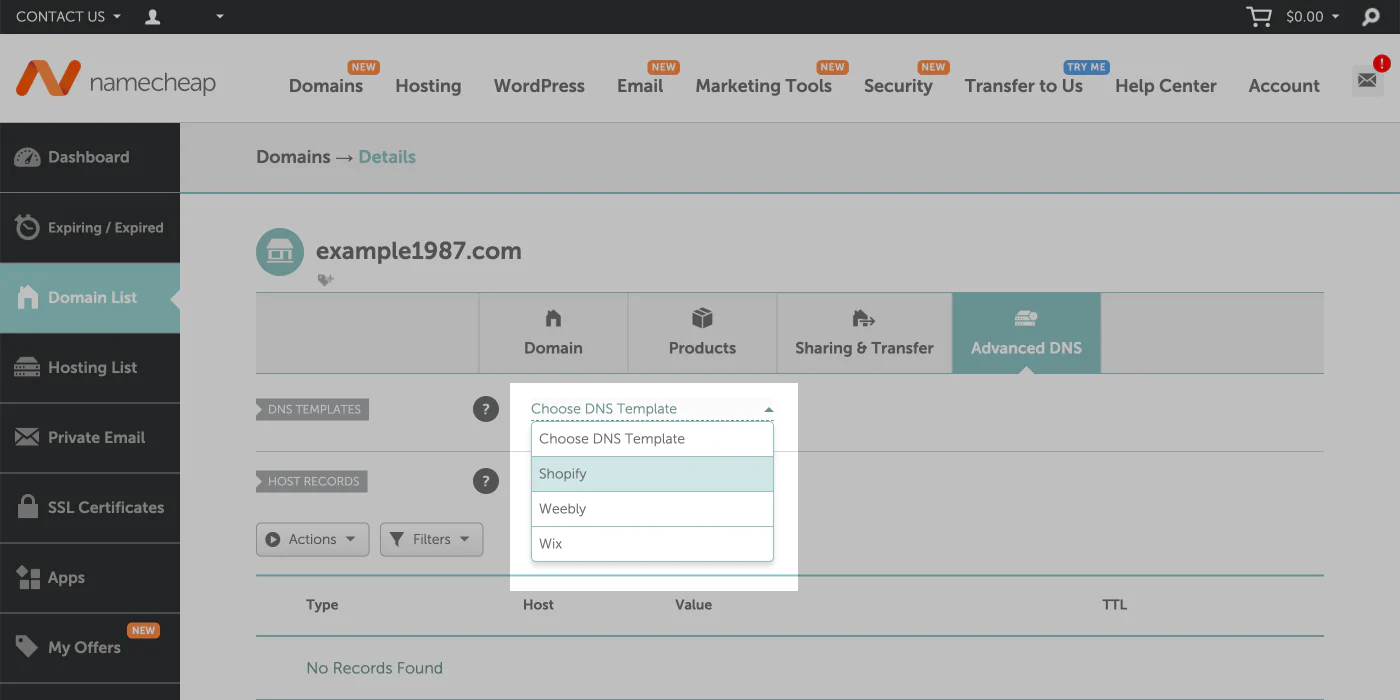
Check Shopify’s latest Namecheap domain instructions for further clarification.
Hostinger requires manual DNS configuration for all records.
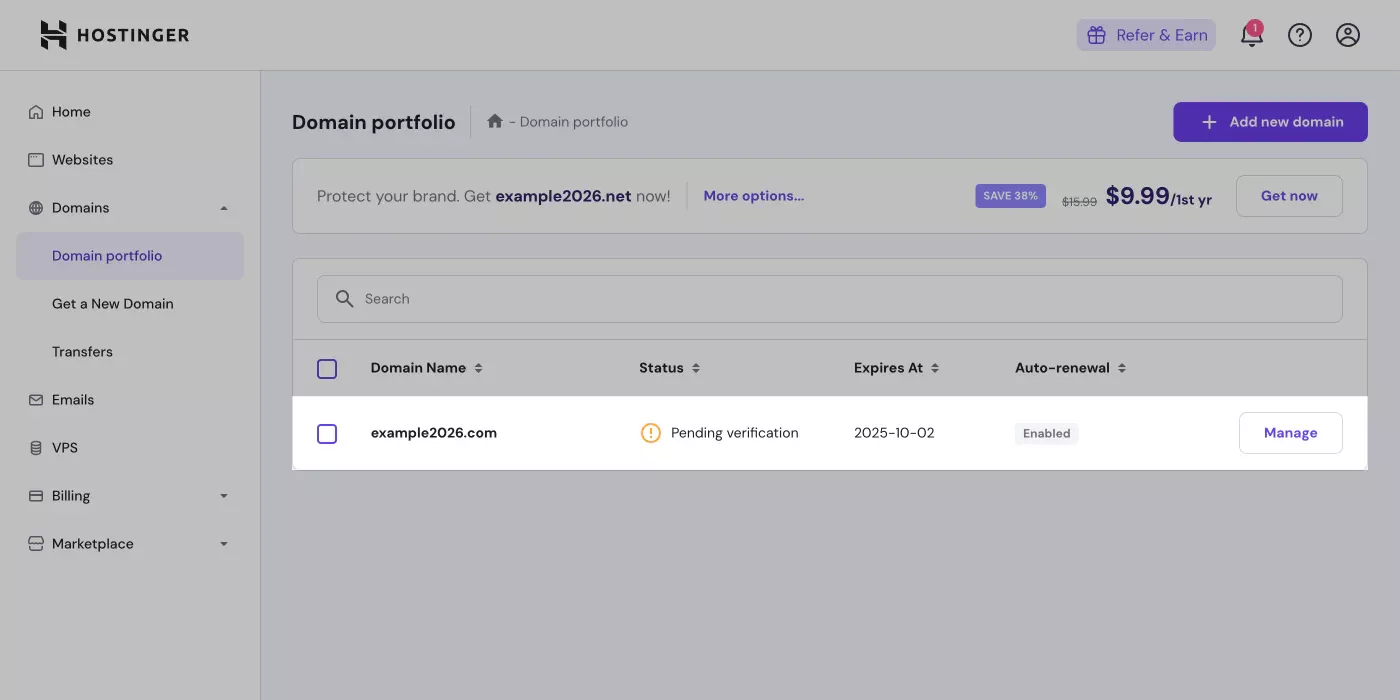
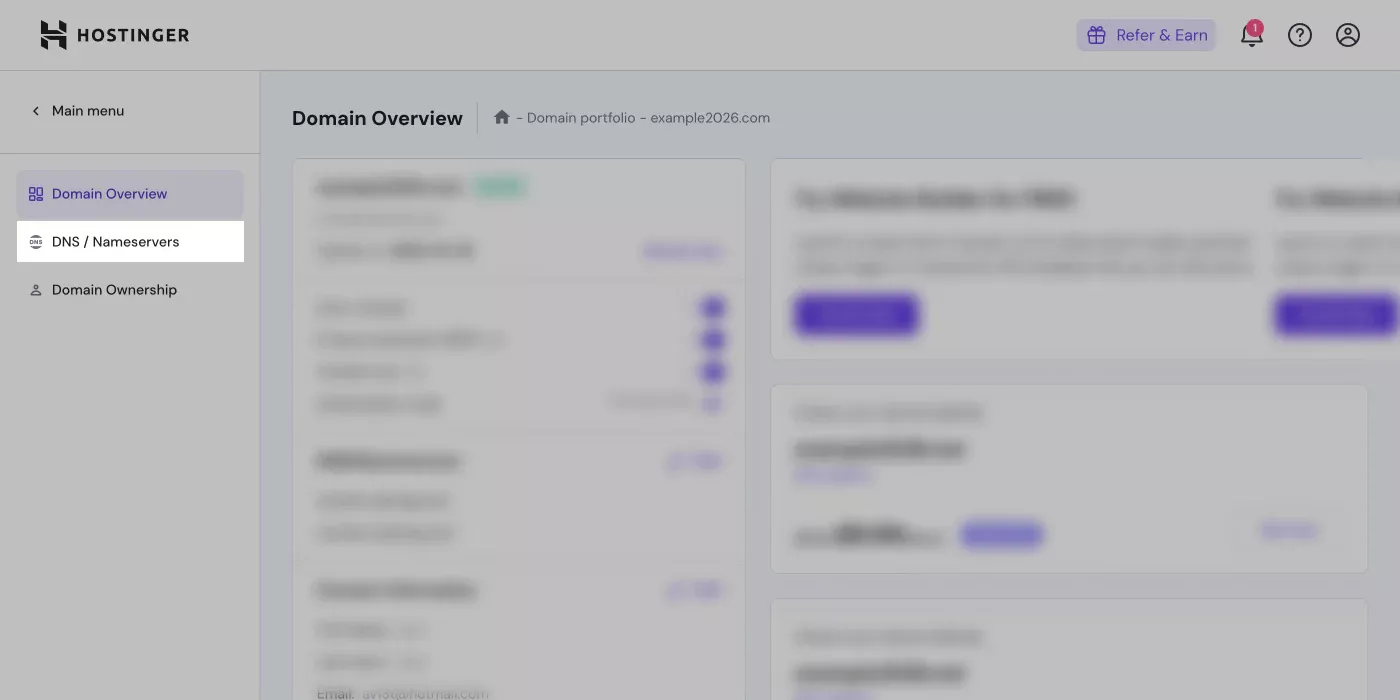
Shopify has Hostinger domain instructions if you get stuck.
Here are common issues you might face when connecting third-party domains to Shopify:
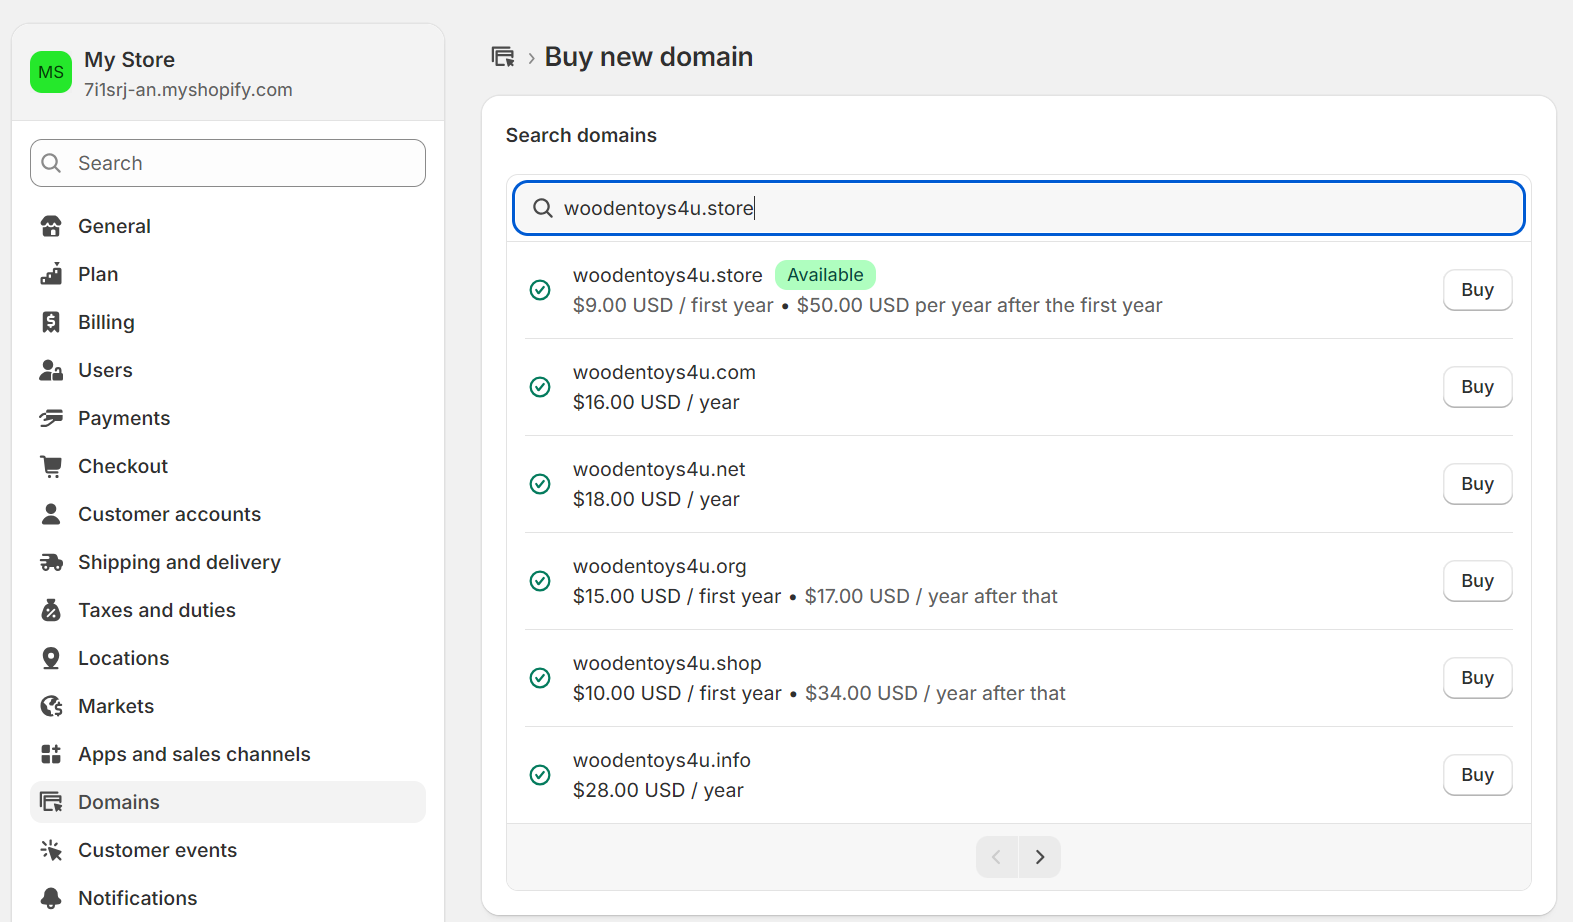
You probably already have a few ideas for your Shopify domain. But before you pull the trigger, it’s worth exploring all available options to find the best match for your business. A good place to start your Shopify domain search is its search tool.
Shopify’s built-in domain search tool checks availability instantly when you enter store names or keywords. The tool displays available domains with different extensions and suggests alternatives if your first choice isn’t available.
Navigate to Shopify’s domain search page and type your business name or keywords. Results show immediately with extensions like .com, .store, and .shop alongside availability status.
Here’s an example:
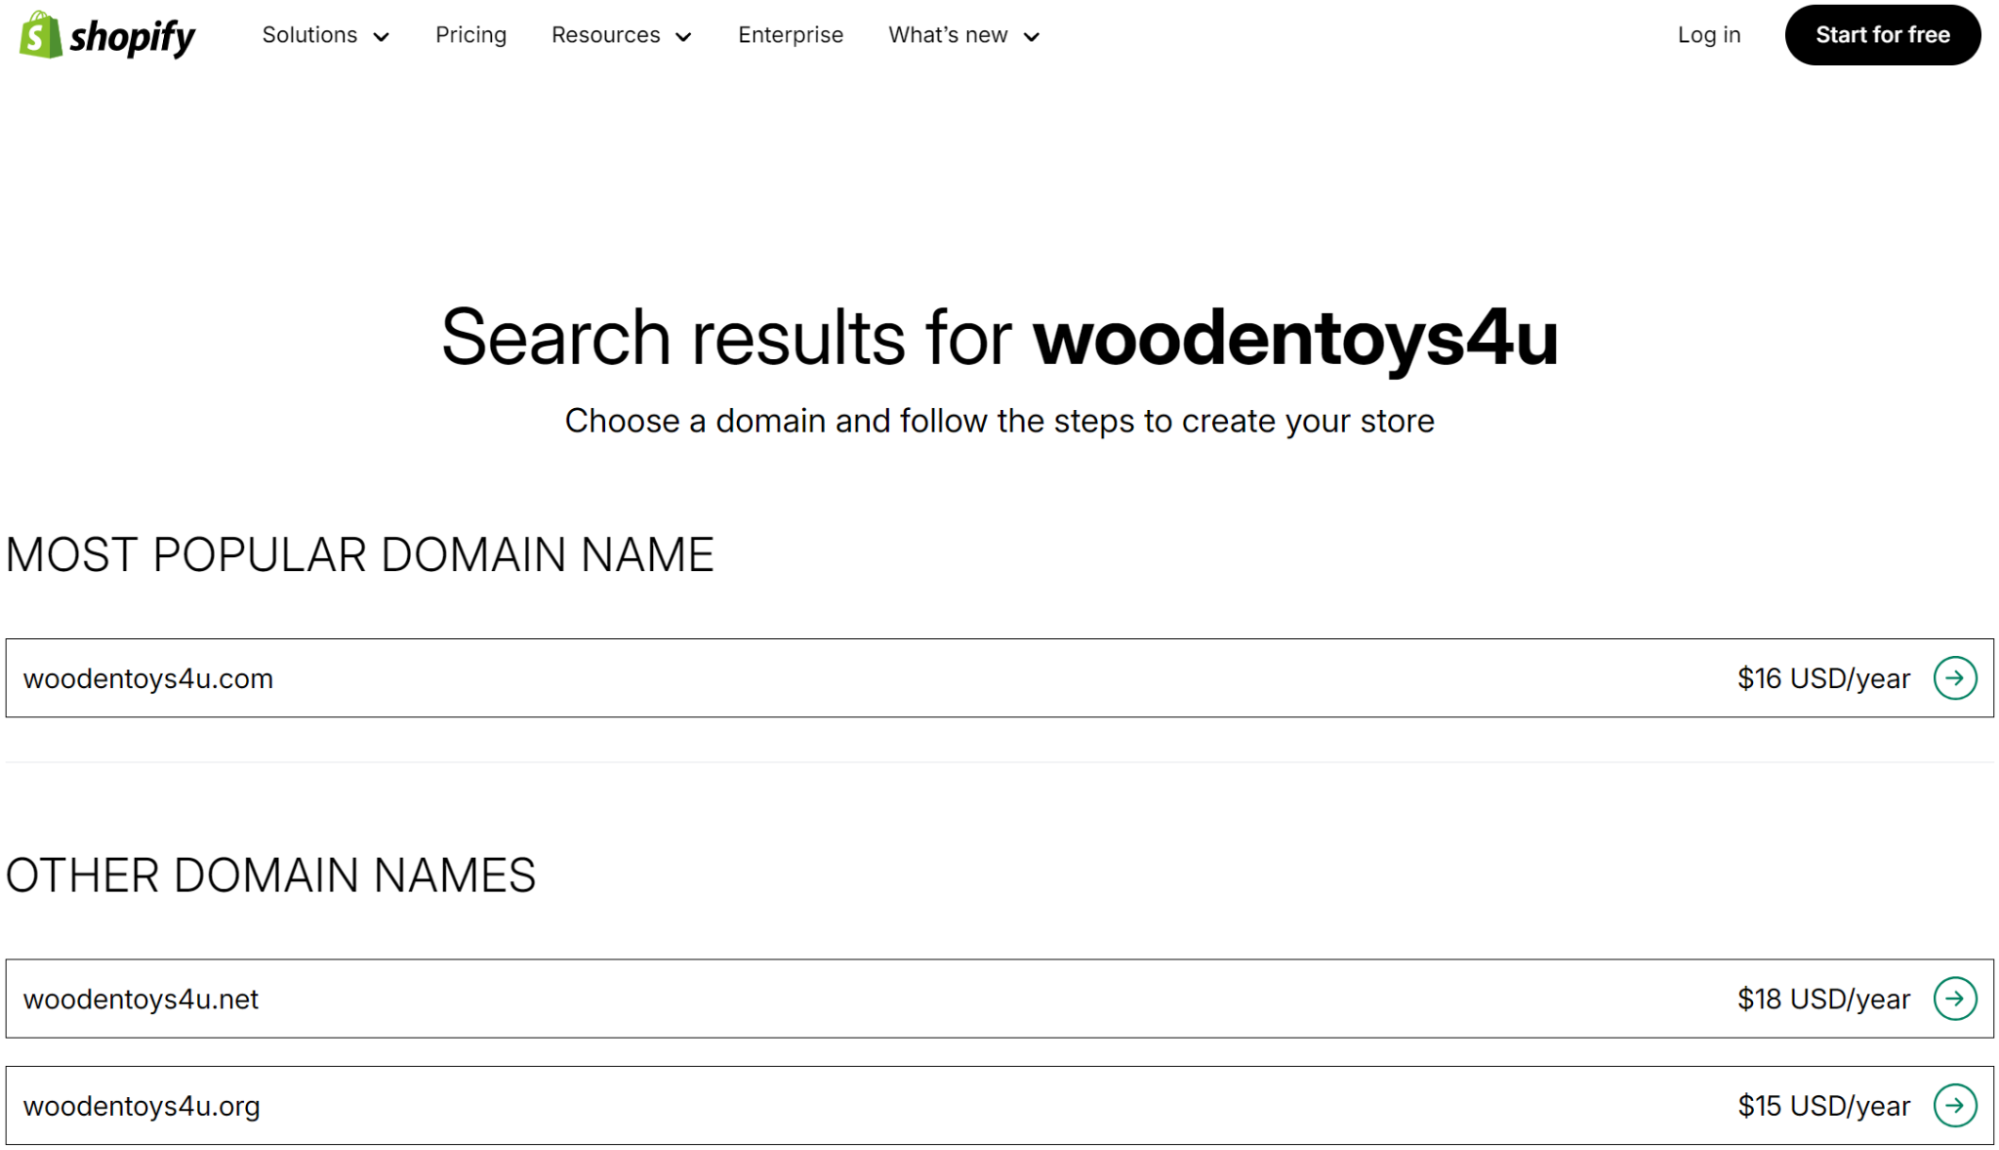
Browse the results and identify domains that align with your brand identity. Check the pricing, then add it to your cart for purchase.
If you have a Shopify plan, purchase completion triggers domain configuration for your store, and the technical setup happens behind the scenes.
Follow these pointers to pick a fantastic Shopify domain name for your business:
Domains under 15 characters are easier for customers to remember, type correctly, and share with others via word-of-mouth recommendations.
Catchy domains that roll off the tongue help customers remember your business name and return to your store more easily.
Choose domains that relate to your current products but leave room for business expansion into new categories or markets.
Extensions like .com, .store, and .shop signal legitimacy to customers who expect familiar domain endings from established businesses.
Securing the same username everywhere prevents competitors from grabbing your brand name and confusing your potential customers.
Research existing trademarks before choosing your domain to prevent legal disputes and protect your business from costly rebranding efforts.
If your favorite domain for Shopify is unavailable, consider different domain endings like .store or .shop instead of .com. These alternatives often perform well for ecommerce businesses and better reflect your industry.
Try variations of your business name by adding descriptive words or rearranging the order. Shopify’s generator tool can suggest alternatives you might not have considered.
You could also contact the current owner about purchasing the domain, though this often costs significantly more than registration.
Keywords in your domain won’t improve search rankings, but they can influence whether people click your link in results. People gravitate toward domains that mirror their search terms.
Easy-to-spell domains drive more direct visits and referrals than complex alternatives. Focus on domains people can type from memory rather than optimizing for search algorithms that no longer reward keyword-stuffed URLs.
More resources for your Shopify store:
Best Shopify experts and agencies for 2025
20 best free Shopify apps for ecommerce in 2025
Buying a domain on Shopify keeps your store and domain management in one dashboard instead of juggling multiple platforms.

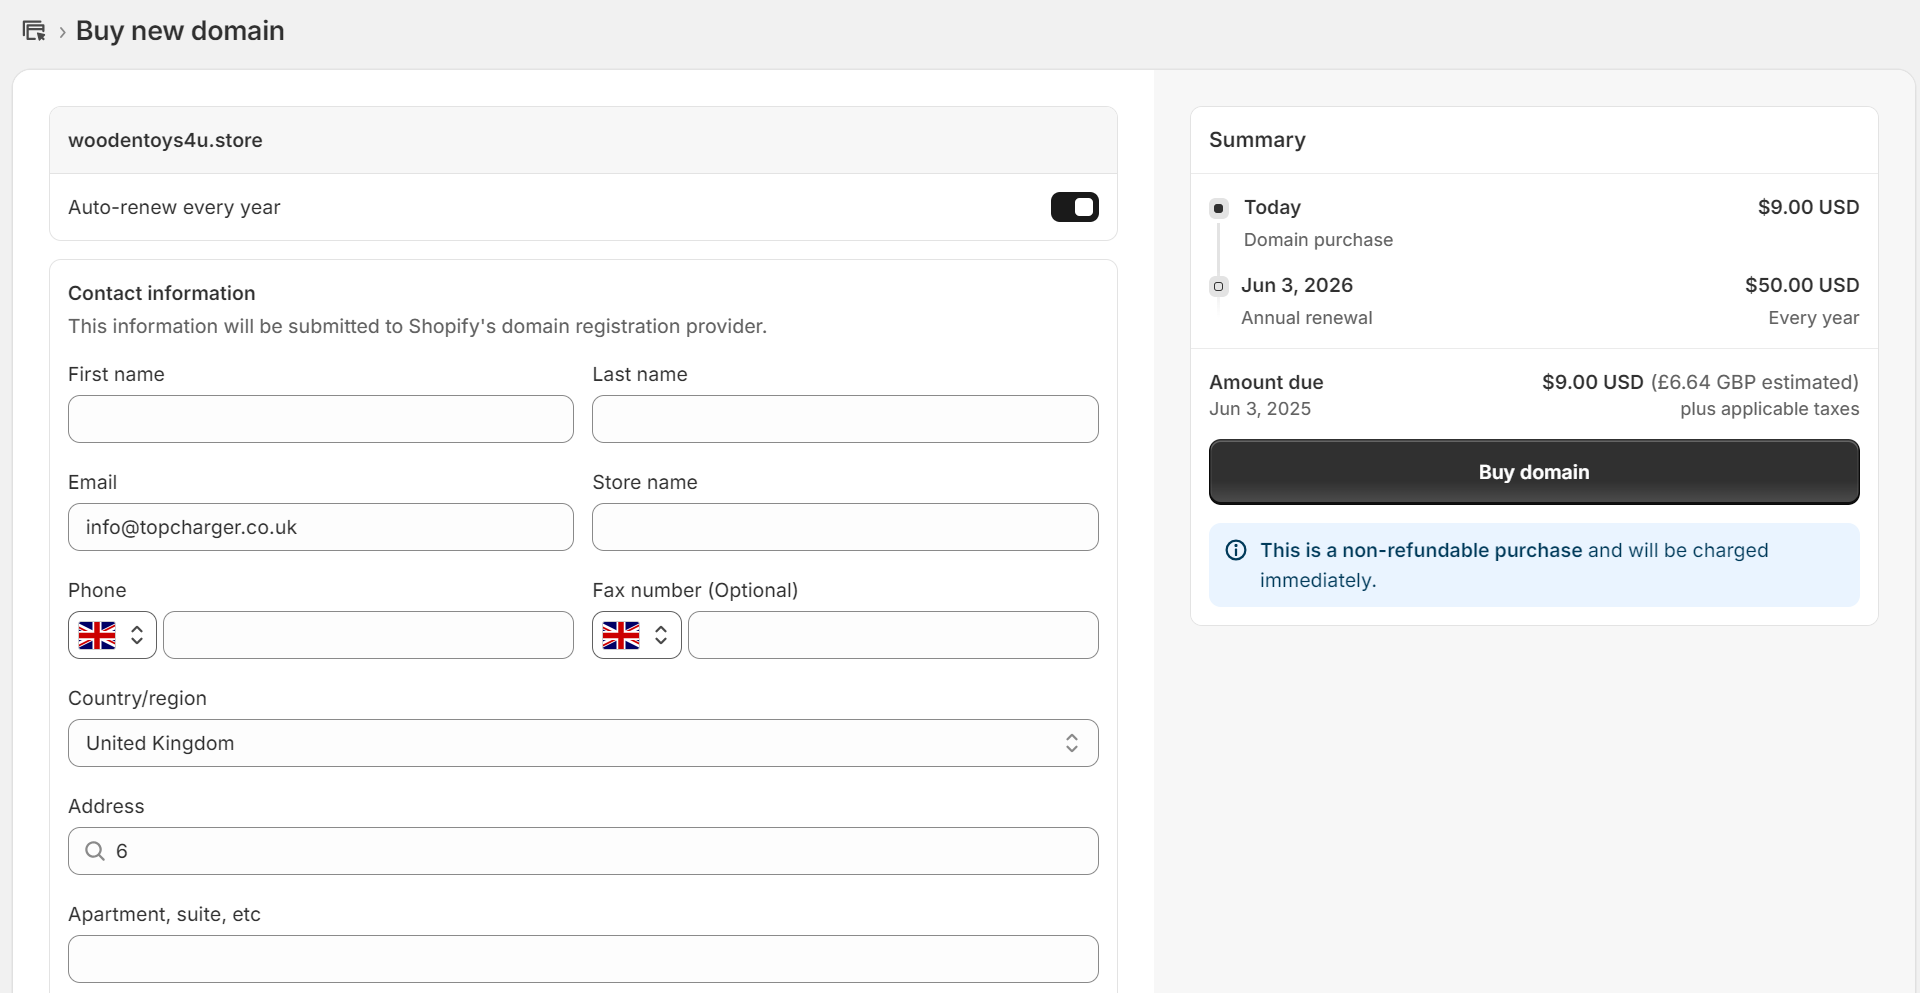

Your new domain automatically connects to your store without technical configuration. DNS settings become available if you need custom configurations for email marketing or other services.
Annual renewal charges appear separately from your Shopify subscription fees. Once your domain is live, you can connect your store to Omnisend to start sending branded emails, such as welcome series and abandoned cart flows, from your domain.
Additional reading:
Best email marketing apps for Shopify: Top 16 tools for 2025
Shopify domain pricing varies by extension, with the most popular options ranging from $9 to $33 annually for registration and renewal.
Here’s a pricing table for the most popular extensions:
| Domain extension | Shopify price annually in USD |
|---|---|
| .store | $9 |
| .shop | $10 |
| .online | $11 |
| .org | $15 |
| .us | $15 |
| .com | $16 |
| .ca | $17 |
| .net | $18 |
| .info | $28 |
| .co | $33 |
ICANN charges a small regulatory fee (typically under $1) that gets added to your domain cost. WHOIS privacy protection comes free with most extensions, though some country-specific domains don’t include this service. Check Shopify’s WHOIS exceptions list to find out more.
Domain renewals happen automatically if you enable auto-renewal during purchase. Shopify bills domain costs separately from your monthly subscription, so you’ll see them as distinct charges on your account.
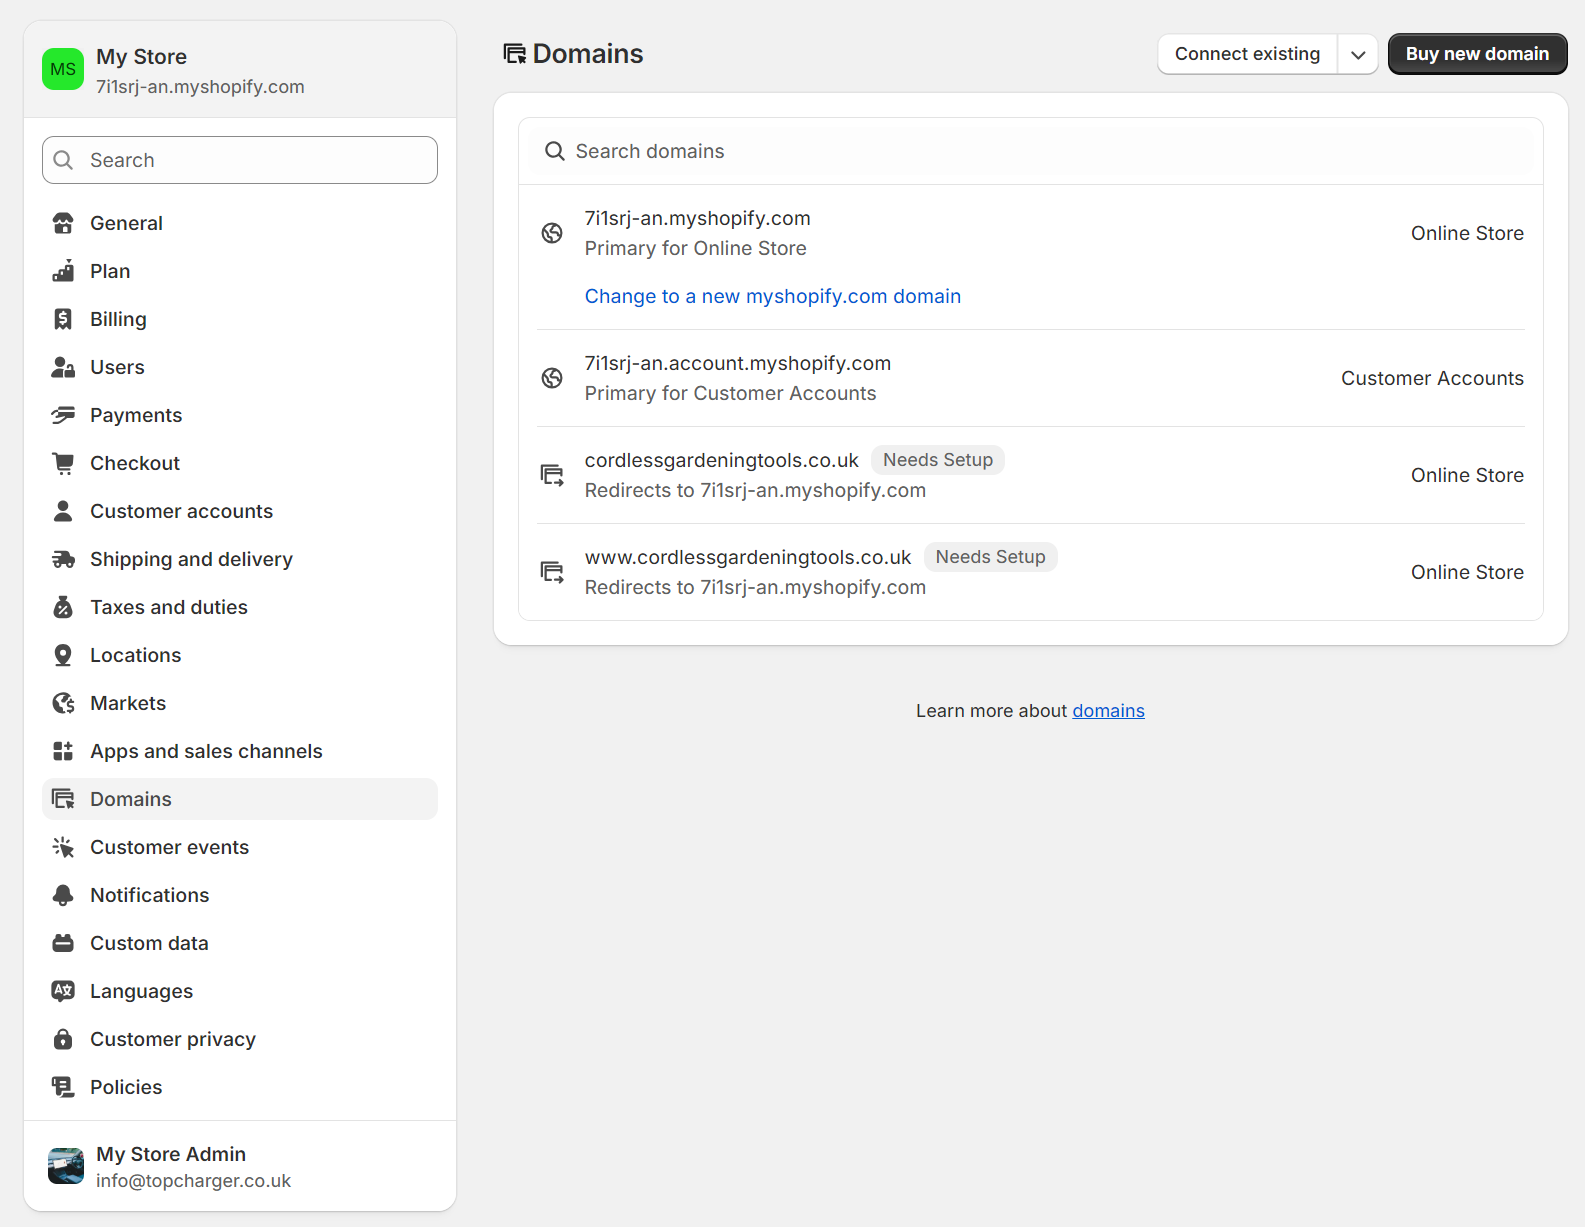
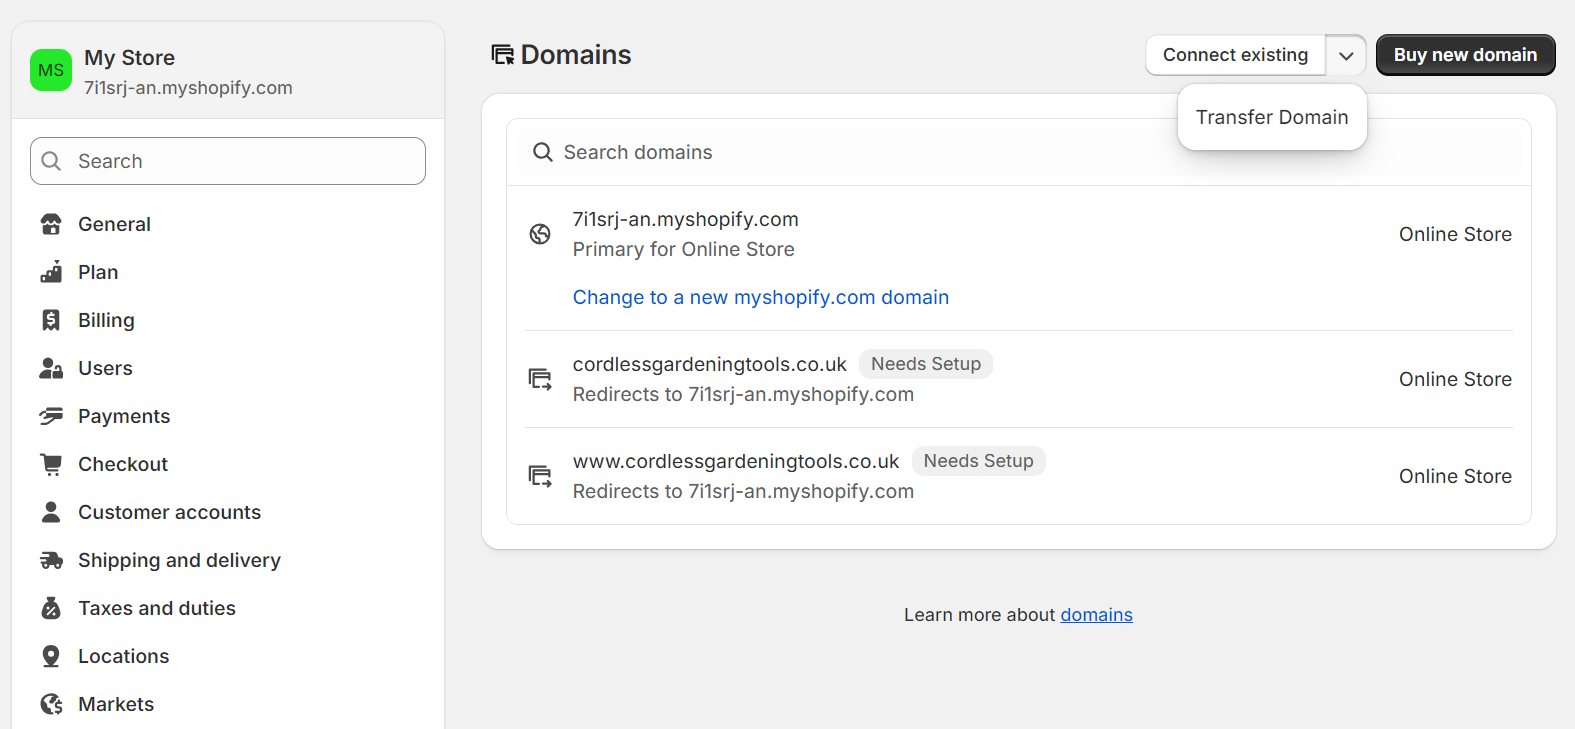
You can change to a new primary domain anytime within your Shopify account.
The easiest way is to buy your new domain via Shopify so that your store connects to it automatically. Alternatively, you can buy it from any registrar and point it to your Shopify store.
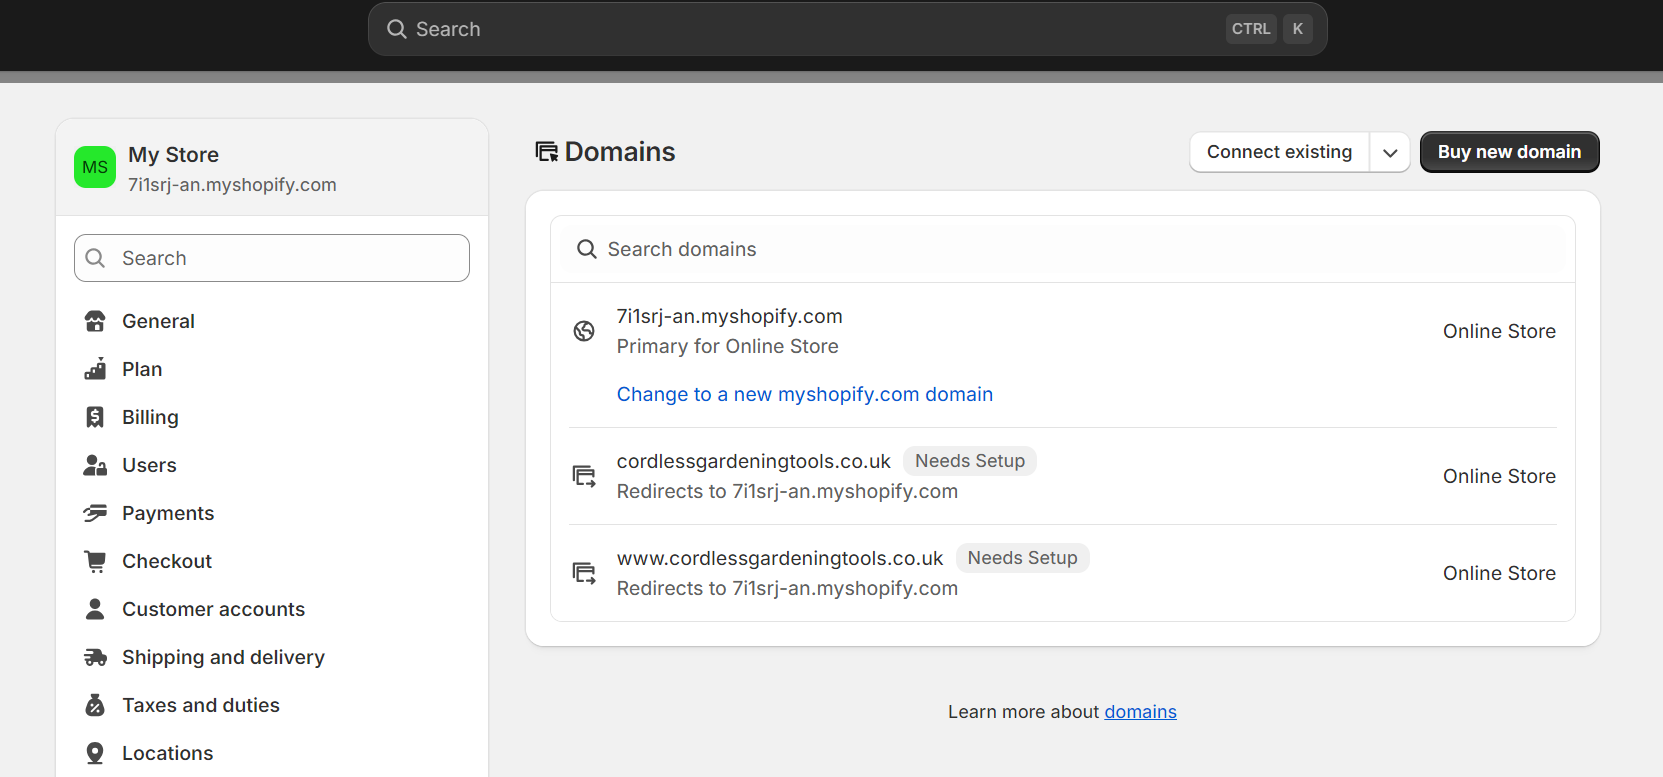
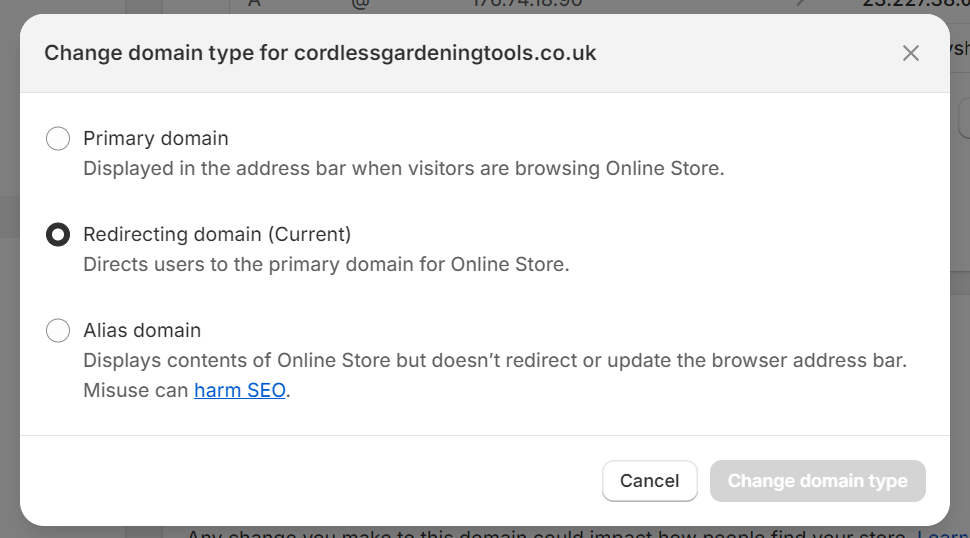


Your new primary domain becomes the main address customers see in their browsers, and all other domains in your account automatically redirect to it.
Shopify automatically creates 301 redirects from your old domain to the new primary domain when you make the switch.
Customers typing your old domain address get seamlessly redirected to the new URL without seeing error pages.
Your default myshopify.com domain and any other connected domains continue working, but redirect visitors to your new primary domain. You won’t lose traffic during the transition period.
Search engines need time to recognize your domain change, so expect temporary ranking fluctuations during the first few weeks after switching.
Add your new domain to Google Search Console and update your sitemap so Google can crawl your new address structure.
Keep an eye on your search performance during the first month after switching domains. If you’ve already integrated with tools like Omnisend, update your sender domain or verify the new one to maintain email deliverability.
Yes, you can connect multiple domains to one Shopify store, but only one serves as the primary domain that customers see.
Your old domain continues working with automatic redirects to your new primary domain so that customers won’t encounter broken links.
Moving your domain to Shopify gives you centralized management but requires preparation to avoid service interruptions during the transfer process.
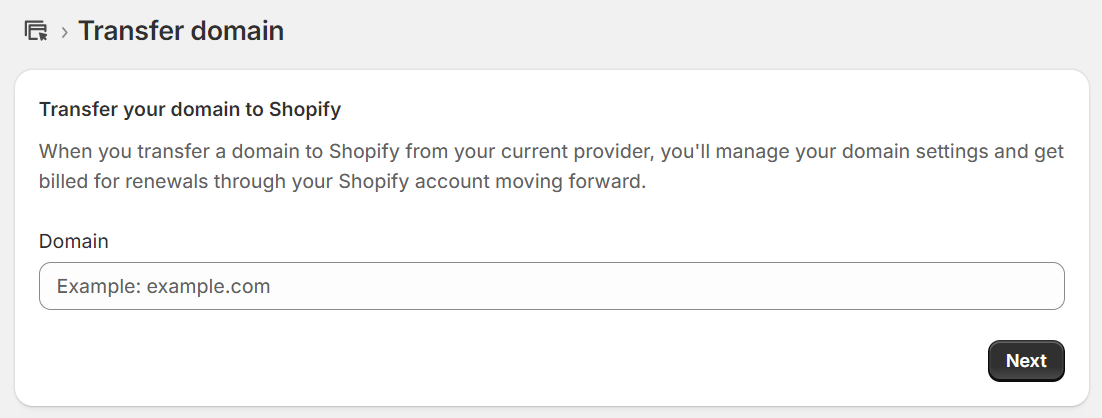
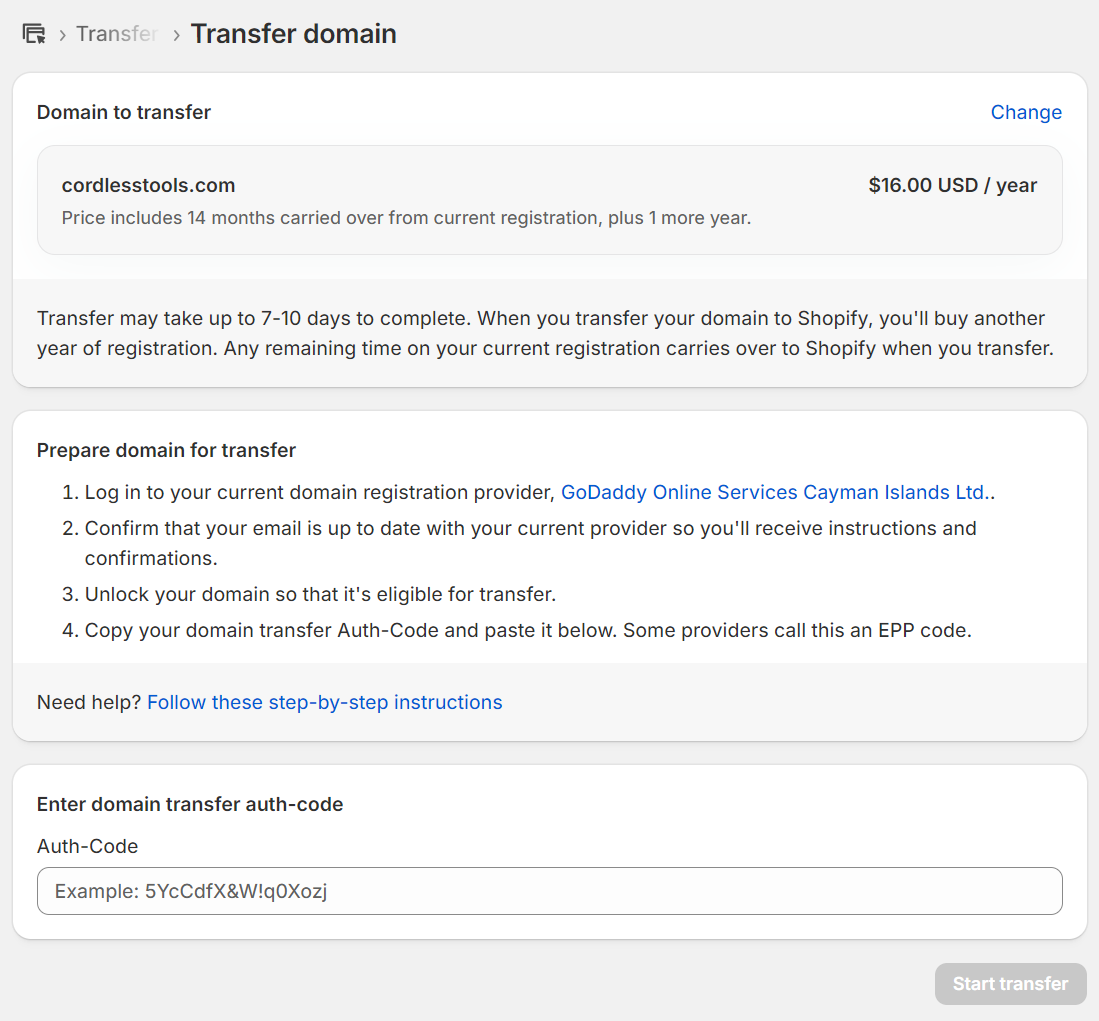
ICANN rules prevent domain transfers within 60 days of initial registration or registrant information changes. You cannot transfer newly registered domains or domains where you recently updated contact details, organization names, or email addresses.
Some registrars offer opt-outs from this protection period, but most enforce the 60-day waiting period to prevent unauthorized transfers.
Consider keeping your domain with your current registrar and simply connecting it to Shopify with DNS settings.
With this method, you maintain your existing domain management while pointing traffic to Shopify, avoiding transfer restrictions, and keeping familiar renewal processes with your current provider. Click here for instructions.
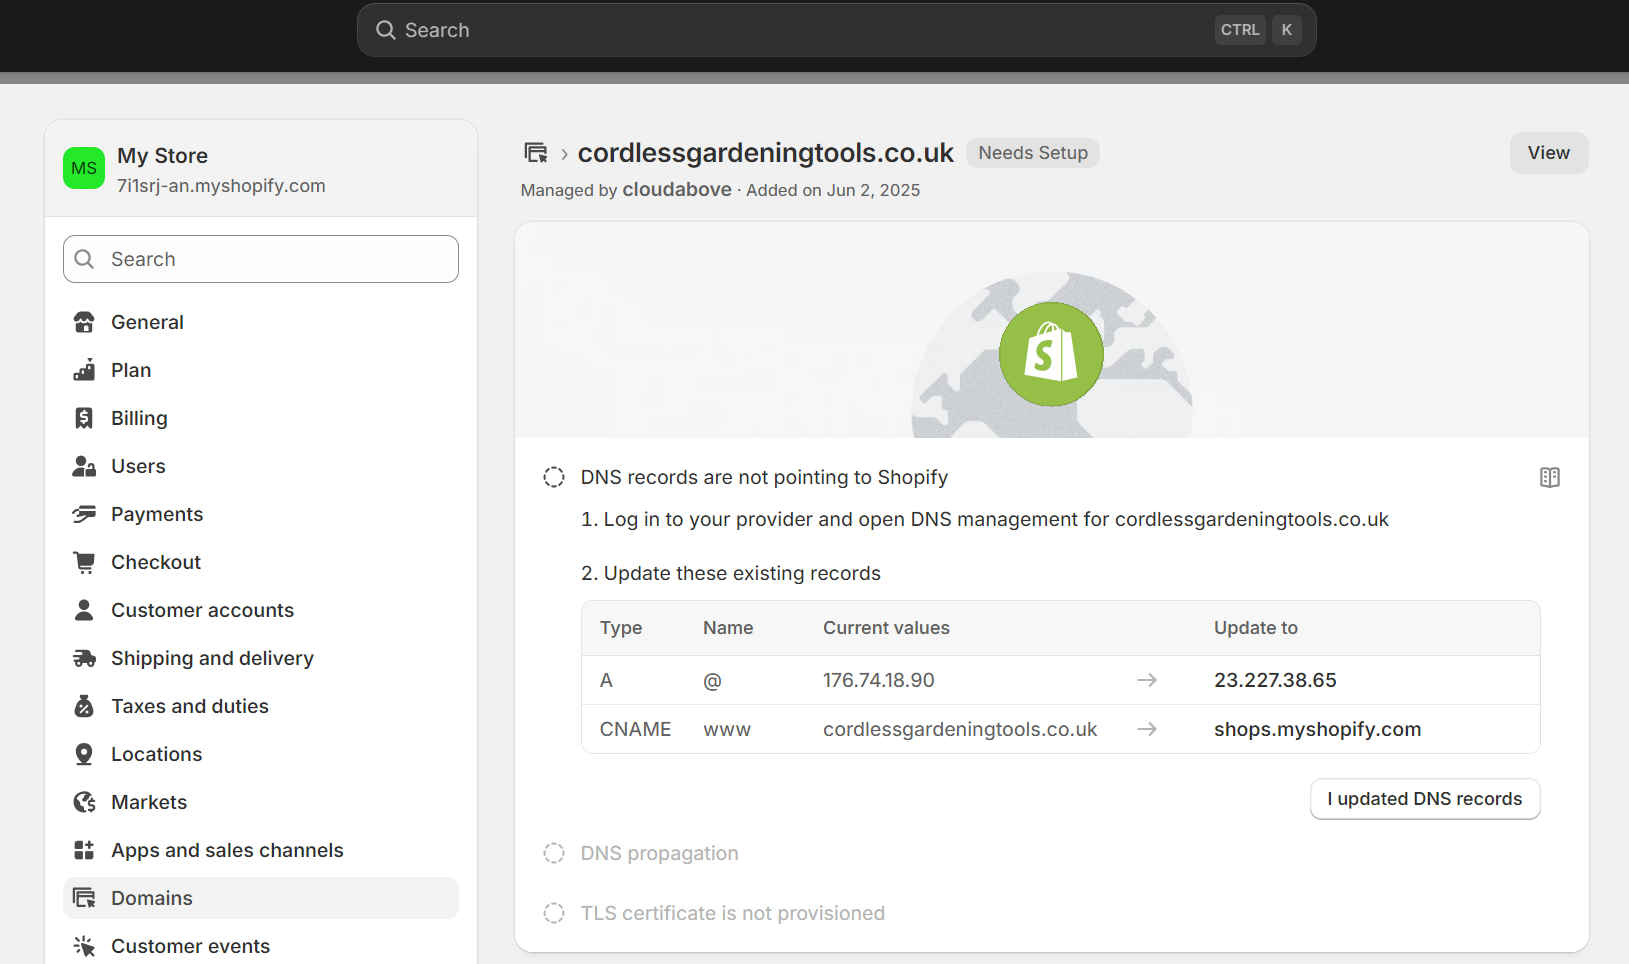
Domain connection problems usually stem from DNS configuration errors, propagation delays, or verification requirements that you can troubleshoot step-by-step.
Check for these Shopify domain issues during your initial setup:
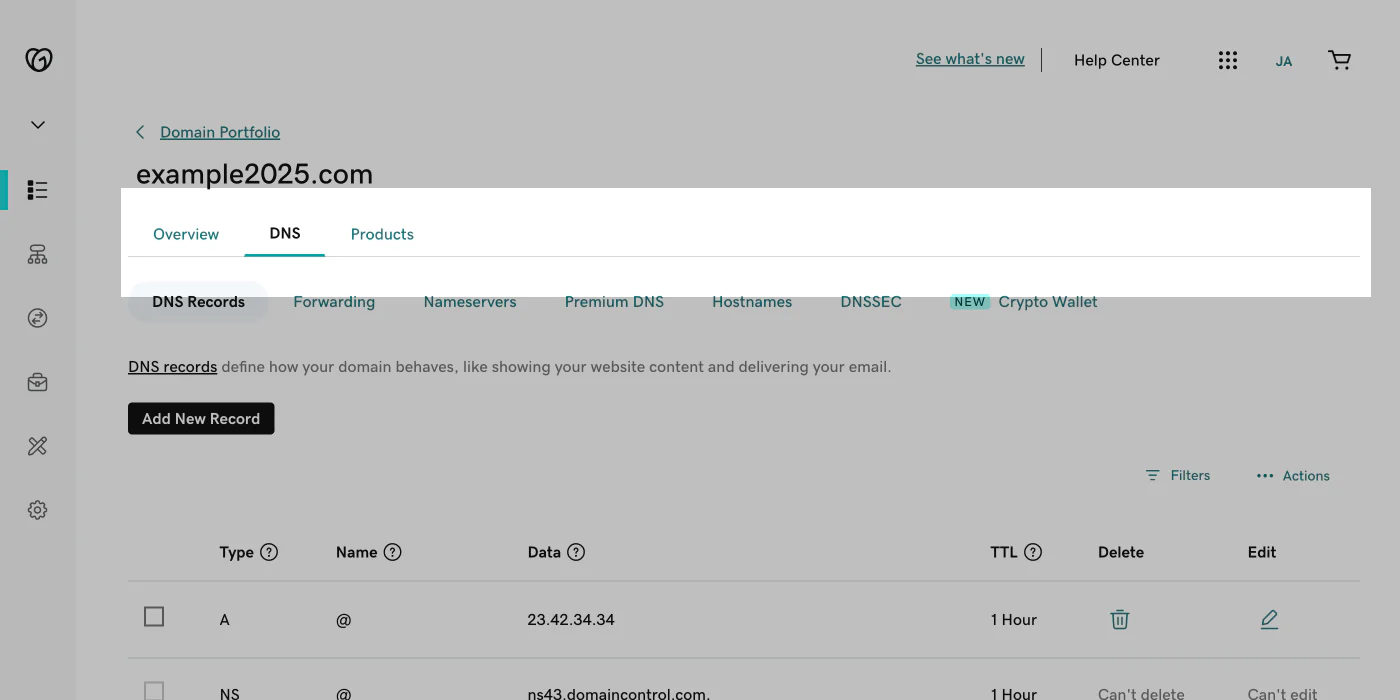
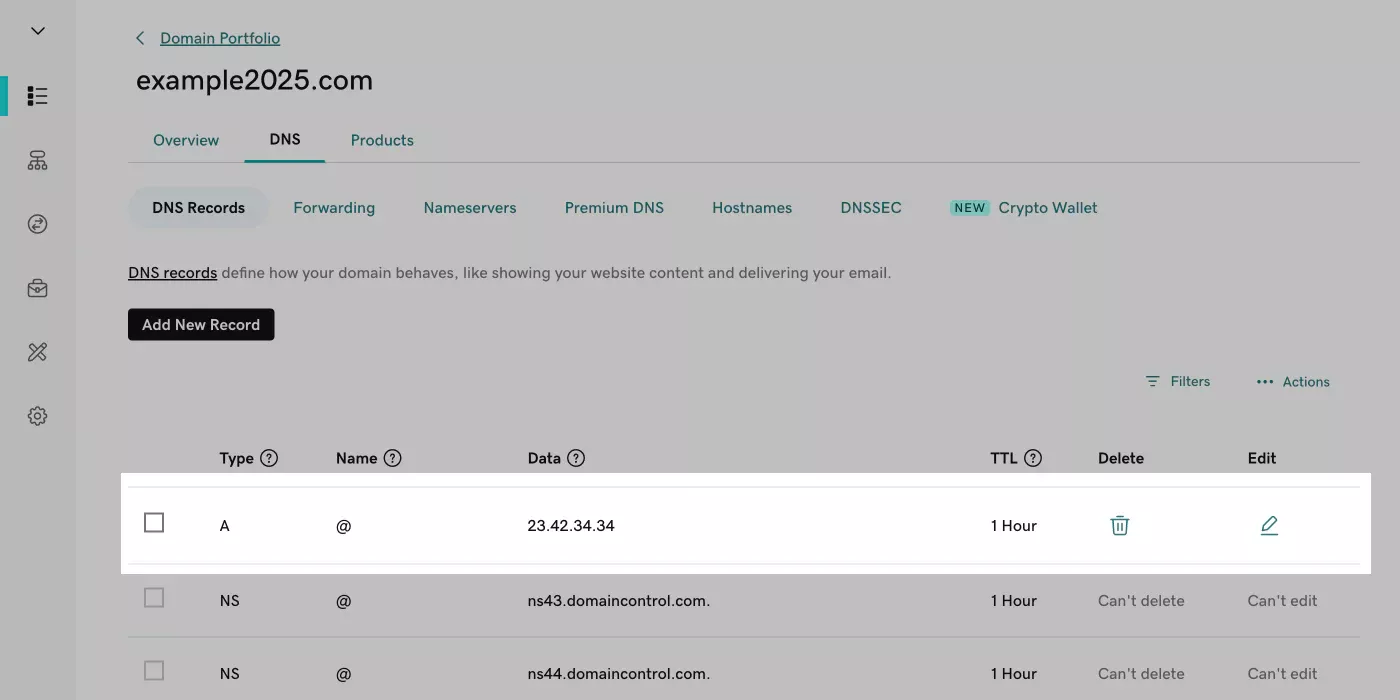
Navigate to your domain provider’s DNS management area and verify that A records show 23.227.38.65 as the destination address. CNAME records should point to shops.myshopify.com for proper routing.
Delete any duplicate A or CNAME records that create conflicts, as only one of each record type should exist for your domain connection.
Internet servers need up to 48 hours to update with your new DNS information, causing temporary connection delays during this transition period.
Check different devices and internet connections to confirm propagation status, or use online DNS checker tools to monitor when changes take effect globally.
Shopify generates SSL certificates automatically, but incorrect DNS settings or DNSSEC conflicts can block this process and trigger browser security warnings.
Verify that your A and CNAME records are correct, then contact your domain provider to disable DNSSEC if SSL provisioning continues to fail after proper DNS configuration.
Shopify sometimes requires a TXT record verification to confirm you own the domain before allowing connection to prevent unauthorized access.
Add the verification TXT record provided in your Shopify admin to your domain’s DNS settings, then click the verification button to complete the ownership confirmation process.
Multiple A records or wildcard records create routing conflicts that prevent your domain from connecting properly to Shopify’s servers.
Remove all existing A records except the one pointing to 23.227.38.65, and delete any wildcard records that might redirect traffic away from your store.
When your www subdomain doesn’t work, you’re missing the required CNAME record that routes www traffic to your store.
Add a CNAME record with www as the host and shops.myshopify.com as the destination to ensure both your root domain and www version direct visitors to your store.
Proper domain management protects your brand, maintains customer trust, and prevents costly security issues that could disrupt your business operations.
Follow these best practices to manage your domain:
Choose your main branded domain and mark it as Primary in your Shopify admin settings. All other connected domains automatically redirect traffic to your primary address, ensuring customers always land on your preferred URL regardless of which domain they type.
Navigate to Settings > Domains in your Shopify admin and enable automatic renewal for all your domains. Auto-renewal prevents accidental expiration that could result in domain loss to competitors or cybersquatters who monitor expired domains for acquisition opportunities.
Configure 301 redirects from old domains or alternative spellings to your primary domain to capture misdirected traffic. These redirects inform search engines that your content has moved, helping to preserve your SEO rankings.
Keep an eye on your SSL status in the domains section of your admin dashboard. SSL certificates should show as active, but DNS conflicts or configuration errors can cause certificates to become stuck in a pending status, requiring troubleshooting.
Review your DNS settings after installing new apps, changing email providers, or modifying hosting configurations. Use tools like DNSChecker to verify your records propagate correctly and don’t conflict with Shopify’s required A and CNAME records.
Purchase multiple extensions like .com, .store, and .co for your brand name to prevent competitors from registering similar domains. Redirect these variations to your primary domain to capture traffic from customers who might guess the wrong extension.
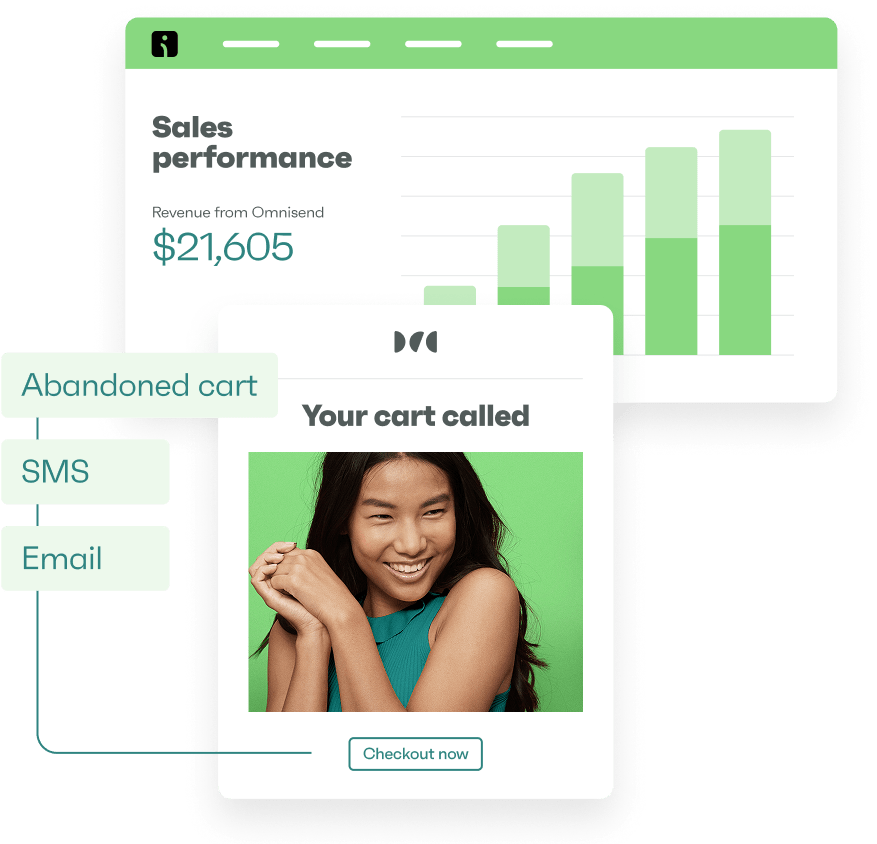
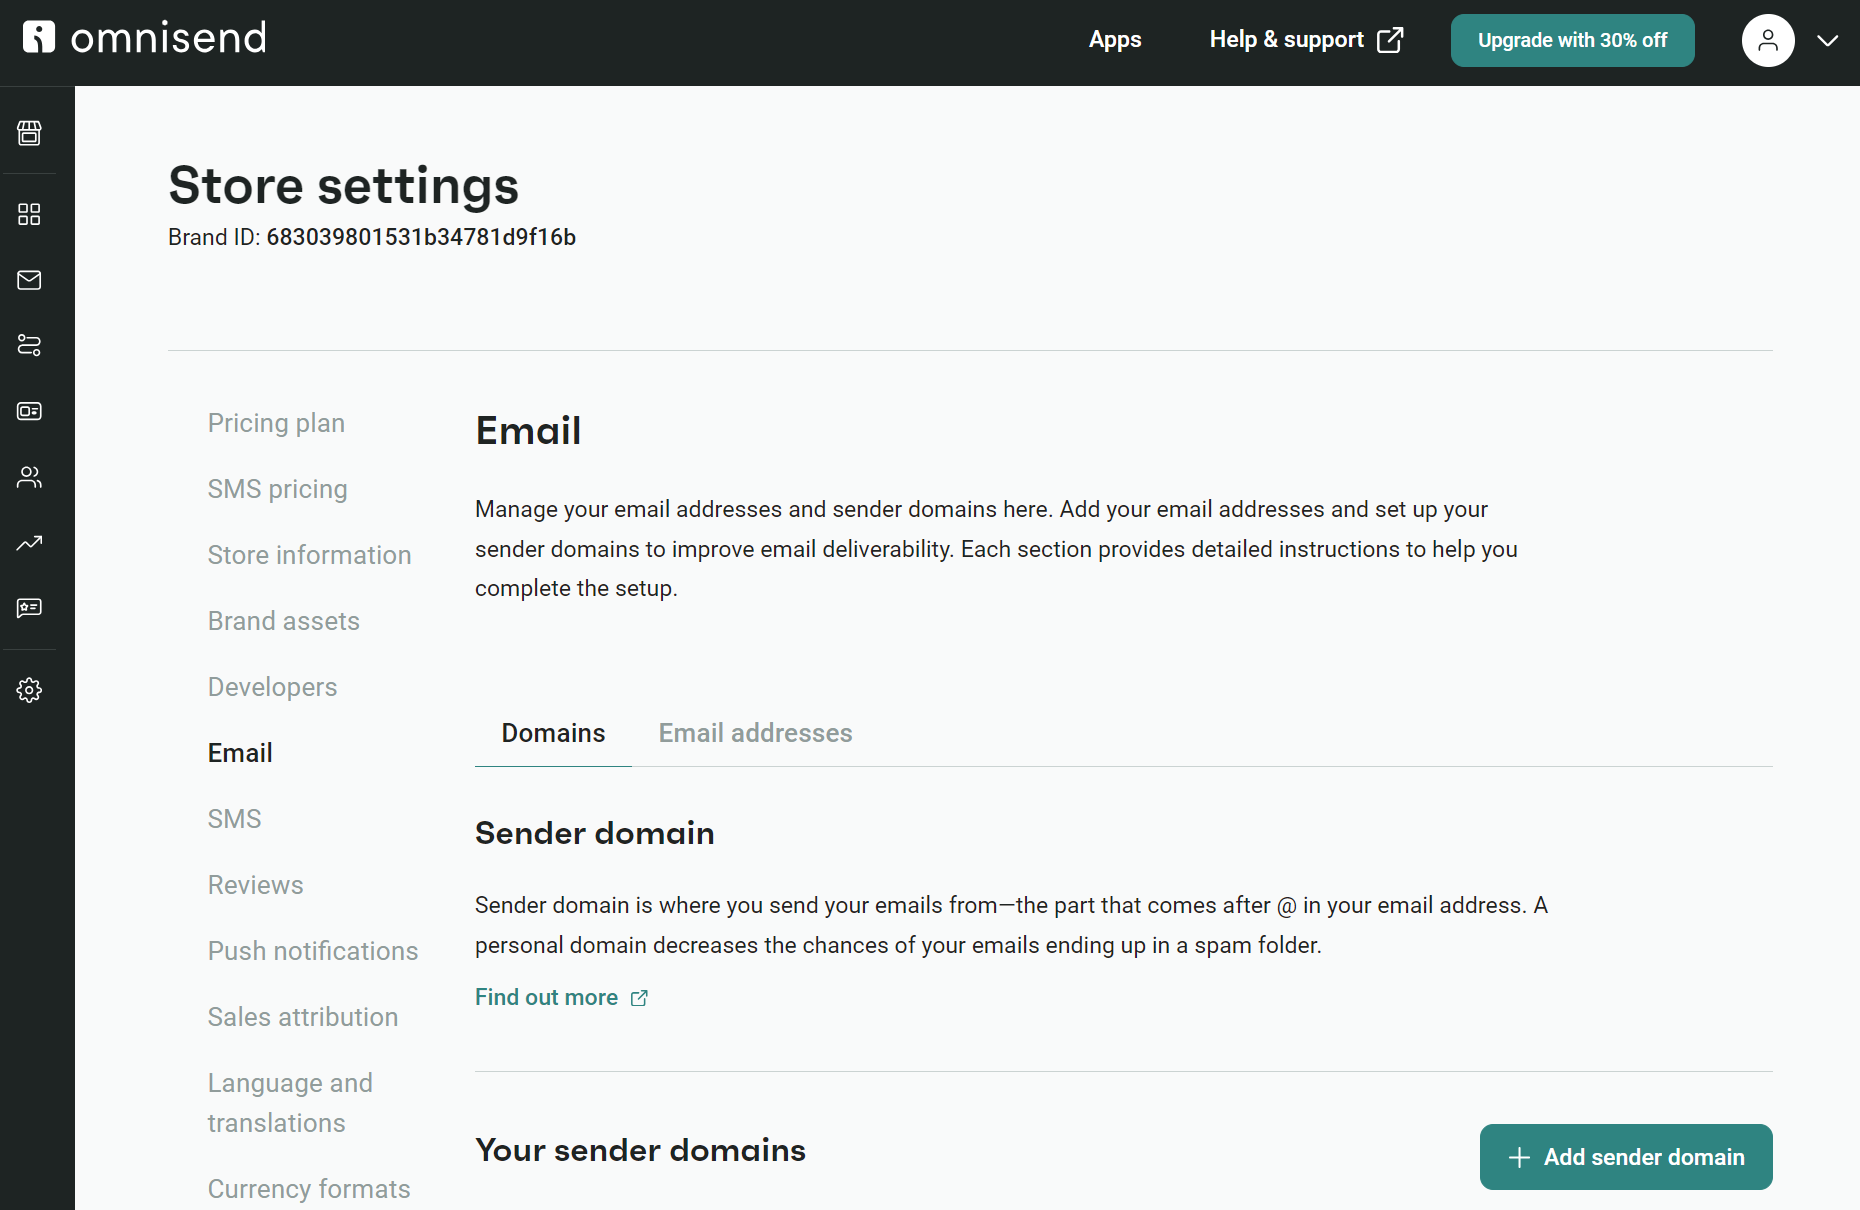
After setting up your domain, link it with your email marketing tool, such as Omnisend, so your messages reflect your store’s identity and domain name. Branded email addresses improve deliverability rates and customer recognition compared to generic email providers.
Connecting Omnisend to your Shopify domain lets you create automated flows that customers trust and improves message deliverability to their inboxes.
Email providers like Gmail evaluate sender reputation based on domain authenticity, treating emails from [email protected] as more trustworthy than generic addresses.
Omnisend’s domain verification adds SPF and DKIM authentication records that prove you own the sending domain.
Verified domains bypass many spam filters because they demonstrate legitimate business ownership. Your emails reach customer inboxes more reliably, ensuring your marketing efforts generate returns rather than disappearing into spam folders.
Omnisend displays your custom domain in email campaigns, automated flows, and popup forms, creating brand recognition throughout the customer journey. Shoppers see the same professional domain from their first website visit to post-purchase follow-ups.
Your abandoned cart flows, welcome series, and promotional campaigns all originate from your branded email address. Customers develop trust associations with your domain that carry across all marketing communications.
Follow these steps to authenticate your domain email address in Omnisend:
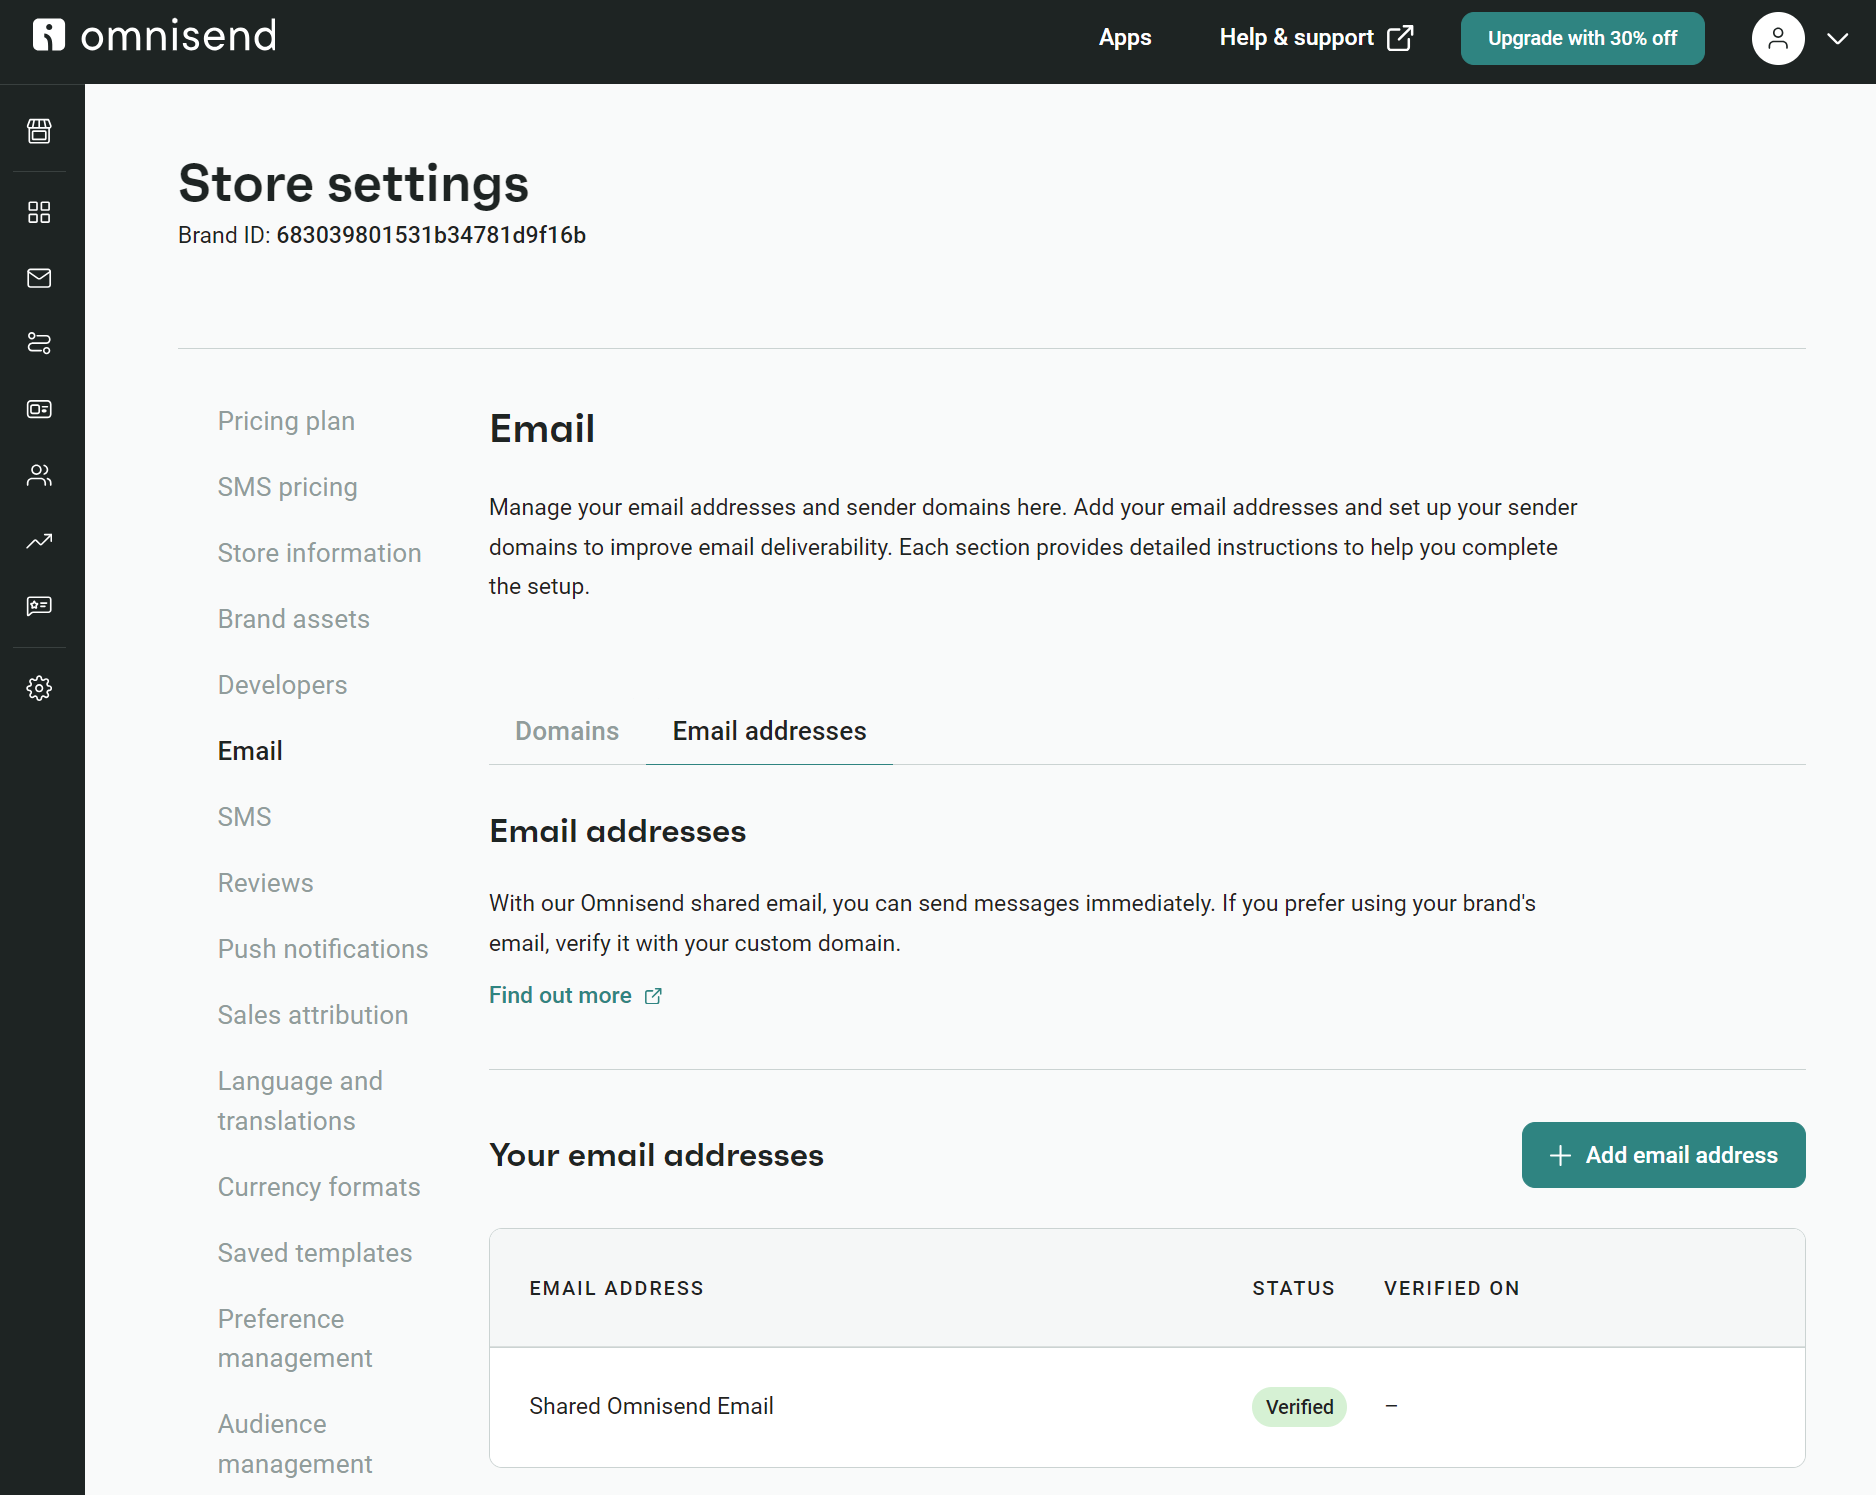
That’s it! You’ve successfully added your domain email address to Omnisend.
Quick sign up | No credit card required
Shopify provides every store with a free yourstore.myshopify.com domain automatically. You can replace this with a custom domain like yourbrand.com whenever you’re ready.
Your Shopify account includes a myshopify.com domain that works immediately to build your store. You can purchase a custom domain like yourbrand.com or mybrand.store for between $10 and $30/year. Prices vary by extension.
No custom domain is required to begin selling. Your free myshopify.com address works immediately for transactions, though customers prefer branded domains for trust.
You own domains purchased on Shopify and can transfer them to other providers anytime, should you choose to switch away from the platform.
While you can’t remove your myshopify.com domain name because you need it to access the app, you can remove a custom domain from your Shopify store. From the Shopify app, follow ☰ > Settings > Domains. Tap the domain you want to remove, press Delete, and confirm with ✓.
When a Shopify domain has the status “SSL pending,” it means Shopify is trying to issue an SSL certificate for your ecommerce store. SSL certificates verify a website’s identity and ensure customers can browse and purchase products and/or services securely.
There are several places you can see your Shopify domain, the easiest being from the Shopify dashboard. Log in to your account, click on the left-hand menu, and follow Online Store > Domains.
TABLE OF CONTENTS
TABLE OF CONTENTS
What’s next


No fluff, no spam, no corporate filler. Just a friendly letter, twice a month.