
 OFFER
OFFER


Drive sales on autopilot with ecommerce-focused features
See FeaturesCreating a contact form in WordPress enhances customer communication by allowing visitors to easily reach out without exposing your email address.
Choosing the right plugin, like Omnisend or WPForms, can streamline the process and improve user experience with customizable features.
Implementing best practices such as keeping forms simple, ensuring mobile optimization, and including clear confirmation messages can significantly boost engagement and trust.
Regularly testing and optimizing your contact form helps maintain its effectiveness and ensures timely responses to customer inquiries.
If you want to make it easy for customers to reach you and improve the overall customer experience, learning how to create a contact form in WordPress is essential. A well-designed contact form allows visitors to ask questions, share feedback, and clearly communicate their needs.
A contact form in WordPress also helps you track responses, record essential customer data, and build trust.
In this guide, we’ll show you how to create a contact form in WordPress step by step. We’ll cover both plugin-based and no-plugin methods, along with best practices for designing forms that are effective, user-friendly, and easy to manage.
Quick sign up | No credit card required
How to create a contact form in WordPress:
- Step 1: Choose a WordPress contact form plugin
- Step 2: Install and activate the contact form plugin
- Step 3: Create and customize your contact form
- Step 4: Configure form settings (notifications and confirmations)
- Step 5: Integrate the form with WordPress / Get the code
- Step 6: Add the code to WordPress (via widget area)
- Step 7: Add the contact form to a post or page
- Step 8: Test your form
- Step 9: Create automations in Omnisend
- Step 10: Monitor and optimize
What is a WordPress contact form
A WordPress contact form is a simple form on your website that allows visitors to send you messages directly without exposing your email address. It streamlines communication by keeping messages organized, reducing spam, and making it easier to capture leads or support requests in a structured way.
Here’s why adding a contact form is useful:
- Cuts down on spam compared to displaying your email publicly
- Improves the user experience on mobile
- Captures the correct information with customizable fields so that you can respond effectively
- Looks professional and shows visitors that you care about transparent, accessible communication
Here’s what a simple form looks like:

Best WordPress contact form plugins (comparison)
If you’re deciding how to create contact forms in WordPress, choosing the right plugin can save time and improve the visitor experience. Let’s examine some of the best contact forms for WordPress and what makes them stand out.
- WPForms: A popular drag-and-drop form builder that’s intuitive and beginner-friendly
- Contact form 7: A widely used free plugin that is simple but flexible
- Gravity forms: A premium plugin packed with advanced features for complex needs
- Ninja forms: Freemium options with drag-and-drop editing and useful add-ons
- Jetpack forms: Built into the Jetpack plugin, ideal for WordPress.com users
- Omnisend (Forms feature): Plugin designed for ecommerce with built-in marketing automation
| Plugin | Ease of use | Spam protection | Pricing |
|---|---|---|---|
| WPForms | Very easy | Yes | Free |
| Contact form 7 | Moderate | Basic | Free |
| Gravity forms | Advanced | Yes | Paid |
| Ninja forms | Easy | Basic | Free |
| Jetpack forms | Easy | Basic | Free |
| Omnisend | Easy | Yes | Freemium |
Each of these plugins allows you to create a contact form in WordPress quickly, but the best one depends on your specific goals.
How to add a contact form in WordPress with a plugin
Adding a contact form in WordPress is easier than it seems. Whether you want to capture leads, answer customer questions, or gather feedback, knowing how to create a contact form in WordPress is essential. Below is a simple, step-by-step process you can follow.
How to add a contact form in WordPress with a plugin:
- Step 1: Choose a WordPress contact form plugin
- Step 2: Install and activate the contact form plugin
- Step 3: Create and customize your contact form
- Step 4: Configure form settings (notifications and confirmations)
- Step 5: Integrate the form with WordPress / Get the code
- Step 6: Add the code to WordPress (via widget area)
- Step 7: Add the contact form to a post or page
- Step 8: Test your form
- Step 9: Create automations in Omnisend
- Step 10: Monitor and optimize
Step 1: Choose a WordPress contact form plugin
First, choose the WordPress plugin that best fits your goals. There are many reliable options available, including WPForms, Contact Form 7, and Gravity Forms.
For ecommerce sites, we recommend Omnisend. It is tailored for online stores, integrates with email and SMS campaigns, and comes with ready-to-use templates.
Here’s why Omnisend is a strong choice:
- Built specifically for ecommerce businesses
- Integrates with marketing campaigns automatically
- Highly customizable, with forms available on Omnisend’s free plan
- Works with the WordPress contact form widget for easy placement
Step 2: Install and activate the contact form plugin
This next step shows how to create a contact form in WordPress using a plugin like Omnisend.
Here’s the general process:

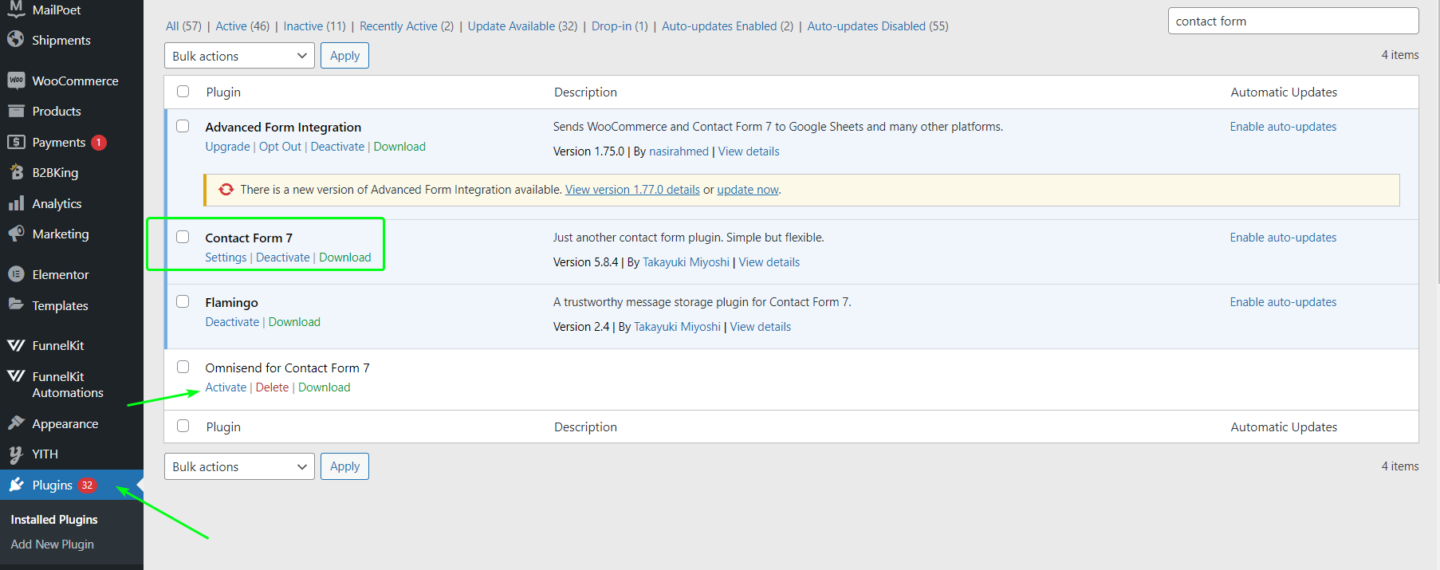
- Log in to your WordPress dashboard
- Go to Plugins > Add New
- In the search bar, type the name of your chosen plugin (for example, Omnisend)
- Click Install Now, then click Activate
If you’re using Omnisend, you may need to connect your account or add an API key after activation. Always keep your plugin up to date to ensure your forms remain secure and compatible with WordPress updates.
Once connected, you can select a template and start customizing your contact form.
From there, you can:
- Edit existing forms or create new ones
- Add fields for name, email, and message
- Adjust settings for email confirmations, notifications, and spam protection
After completing these steps, you’re ready to build and display your WordPress contact form widget.
Step 3: Create and customize your contact form
Now that your plugin is installed and active, it’s time to create a customizable contact form in WordPress.
Here’s how to get started:
- After installing your chosen plugin, open its form builder from your WordPress dashboard. For example, go to WPForms → Add New or Omnisend → Signup Forms.
- Choose a Contact Form template, if available, or start with a blank form. Many plugins, including Omnisend, offer templates to expedite the process.
- Add essential fields to your form. At a minimum, include Name, Email, and Message. Most plugins use drag-and-drop editors, making it easy to add, remove, or reorder fields.
- Keep the form simple. Three to five fields are usually enough. Only add extra fields if they are truly necessary.
- Customize the form’s appearance to match your website. You can adjust field labels, button text, colors, and fonts so the form aligns with your branding.
- Save your form once customization is complete. You can continually refine it later.
Plugins like Omnisend let you duplicate forms for reuse. This flexibility makes it easy to build a WordPress customizable contact form or a fully custom contact form that WordPress site owners can tailor to their needs.
Step 4: Configure form settings (notifications and confirmations)
Setting up notifications and confirmations ensures that you receive form submissions and your visitors know their messages have been received. Here’s how to start:
1. Set up the recipient email
Most plugins automatically send form submissions to your site admin email by default, but you might want them sent elsewhere.
- Open your plugin settings through Omnisend > Signup Forms > Settings
- Locate the Email Recipient field
- Enter the email address where form submissions should be delivered
- Submit the form yourself to confirm the message arrives correctly
Pro tip: If emails land in spam, consider using an SMTP plugin for reliable delivery.
2. Customize the confirmation message
After submission, visitors need instant reassurance. A simple thank-you message works wonders.
- Go to your form’s Confirmation Settings
- Choose Message or Redirect:
- Message: Display a thank-you note right on the page
- Redirect: Send users to a custom Thank You page, which is great for tracking conversions or offering special content
- Keep the message short and friendly: for example, “Thanks for reaching out! We’ll get back to you within 24 hours.”
Step 5: Integrate the form with WordPress / Get the code
Once your form is ready, you need to publish it on your WordPress site so visitors can see and use it.
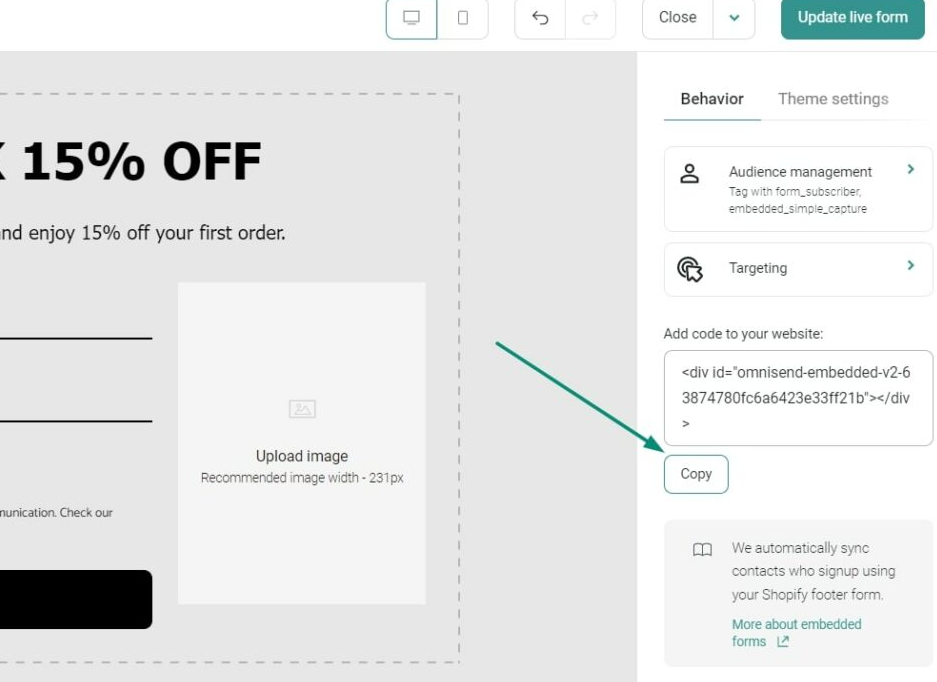
If you’re using Omnisend, you’ll receive a JavaScript code snippet after designing the form. This snippet publishes the form on your WordPress site exactly as configured.
To integrate it:
- Copy the code snippet exactly as provided
- Choose where the form should appear (page, post, sidebar, or footer)
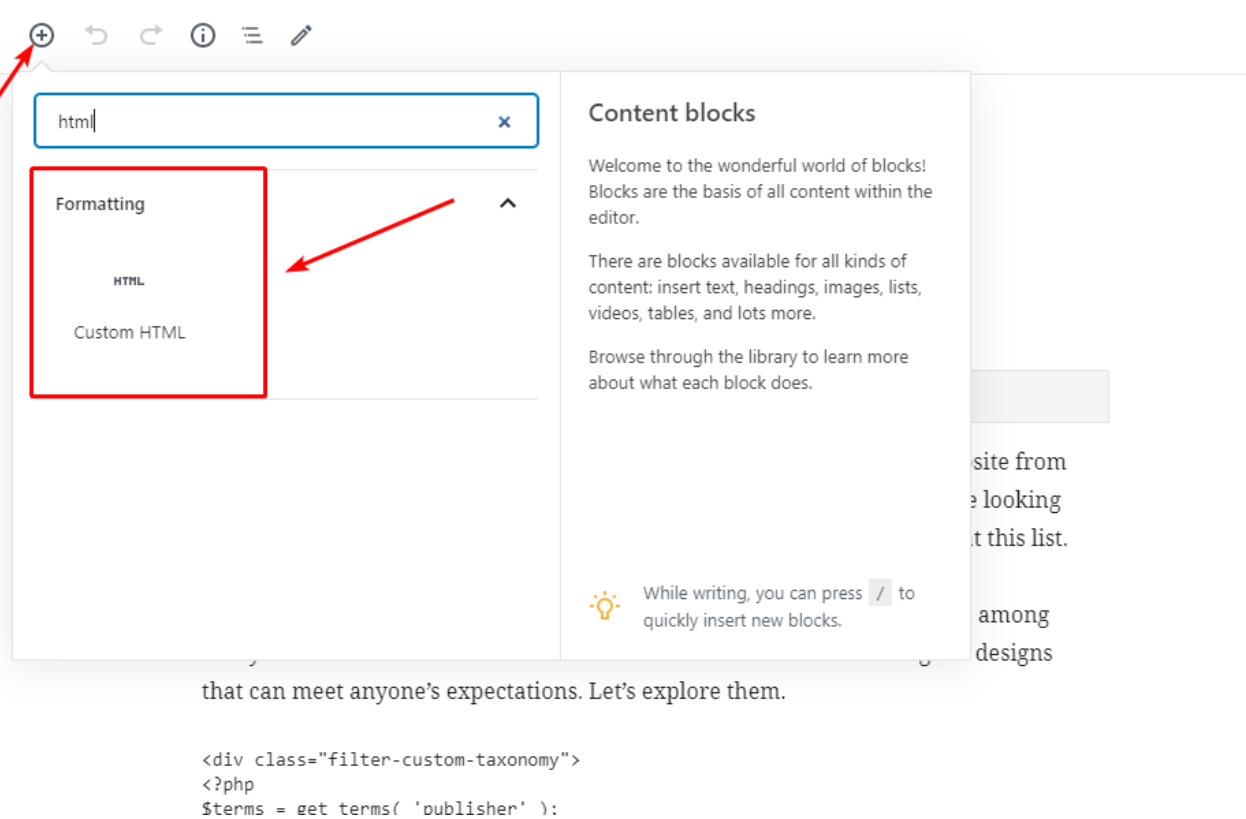
- Paste the snippet into a Custom HTML widget or a page/post HTML block
Accuracy matters. Any changes to the code may cause the form to display incorrectly.
If you’re using a different WordPress form plugin, this step works differently. Most plugins provide a shortcode or a block, rather than a code snippet.
For example, WPForms provides a Gutenberg block or shortcode you can insert directly in the editor.
And if you’re using the shortcode method, copying the code like [contact-form-7 id=”123″] will display the form.
Whether you use a code snippet, shortcode, or block, the goal is the same: display the form cleanly and securely on your site.
Step 6: Add the code to WordPress (via widget area)
Knowing how to create a contact form in WordPress only matters if visitors can actually see and use it. If you want your contact form to appear in your site’s sidebar or footer, adding it through a WordPress widget is a simple solution.
To do this,
- Log in to your WordPress dashboard
- Go to Appearance > Widgets
- Add a Custom HTML widget to the sidebar or footer
- Paste the form code into the widget and save
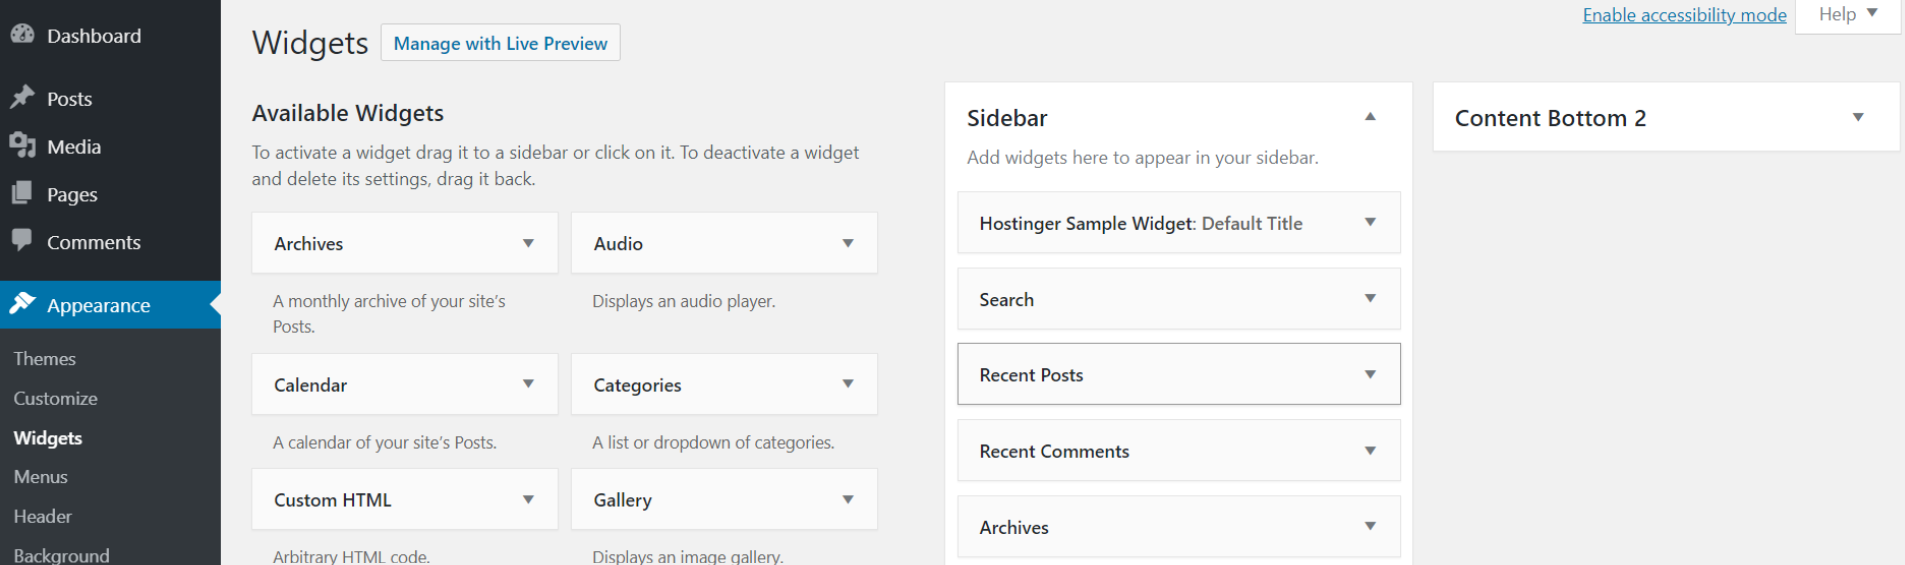
Many contact form plugins also include dedicated widgets or blocks. For example, WPForms offers a widget or block you can drag into a sidebar, making it easy to use a WordPress contact form widget without additional setup.
Using a sidebar or footer widget places the form site-wide, which is helpful if you want a quick contact option on every page. If your goal is only a contact page, you can skip this step.
Step 7: Add the contact form to a post or page
Once your form is ready, the next step is embedding it on a page or post so visitors can interact with it. This is typically done on a dedicated Contact Us page.
If you’re wondering how to create a Contact Us form in WordPress, here’s how to do it properly:
Using WordPress block editor (Gutenberg)
- Open the page or post where you want the form
- Click the (+) button to add a block
- Choose Custom HTML if using a code snippet, or Shortcode if your plugin provided one
- Paste the form code or shortcode into the block
- Preview to confirm the form displays correctly
- Publish or update the page
Classic editor method (Optional)
- Open the page/post editor
- Paste the plugin’s shortcode directly where you want the form
- Some plugins offer an Insert Form button for convenience
This method ensures your contact form appears on the page or post as intended. Using both page/post embedding and widgets/footer allows multiple access points for visitors.
Step 8: Test your form
Testing is a crucial step when creating a contact form in WordPress. It helps you catch errors early and ensures everything works as expected before real visitors start using it.

Here’s what to check:
- Submit a test message and ensure it’s received in your inbox or Omnisend dashboard
- Confirm any autoresponders or automation triggers fire correctly
- Check that Omnisend is capturing responses
- Confirm any connected notifications or automations fired
- Test validation by leaving required fields blank to see if errors appear
- Review how the form looks and functions on mobile, tablet, and desktop
- Test across devices, browsers, and form elements to ensure compatibility
Once all tests pass, your form is ready to capture leads and inquiries reliably.
Step 9: Create automations in Omnisend
Now you know how to create a contact form in WordPress, but don’t stop there! Automations can make your form work even harder.
For example, you can set up a WordPress autoresponder email to immediately acknowledge submissions. This means when someone uses your form, they instantly get a friendly reply.
In Omnisend, this could be a Welcome Series or a dedicated Contact Form thank-you workflow. Quick responses bring trust, improve customer satisfaction, and keep visitors engaged.
Here’s what you can do
- Send an immediate thank-you email after form submission
- Notify your team when a visitor submits the form
- Personalize replies using the visitor’s name or message details
Other plugins, like Contact Form 7 or WPForms, also send autoresponder emails or integrate with email services like Mailchimp.
The objective remains the same: to respond automatically and engage visitors without requiring manual effort. Adding automations turns your WordPress contact form into a tool that actually works for your visitors.
Step 10: Monitor and optimize
To get the most value after you create a contact form in WordPress, you need to track and improve its performance over time.
Here’s what to check:
- Track form views versus submissions to understand conversion rates
- Check response times to ensure inquiries are handled quickly
- Review submission quality to see if the inquiries are relevant
- Notice common questions to improve your FAQs or website content
- Test form placement on pages, sidebars, or WordPress footer contact form areas
- Consider A/B testing form titles, button text, or design for better engagement
Use Omnisend’s form reports to see analytics like views, submissions, and conversion percentages. You can also integrate with Google Analytics to gain insight into visitor behavior and optimize placement.
Additional tips for your WordPress contact form
Even after you create a contact form in WordPress, following a few extra best practices can make your forms more effective, user-friendly, and conversion-focused.
Tip 1: GDPR compliance
Add a short privacy notice or a visible link to your privacy policy near the form so users can review how their information will be handled.
Depending on where your customers are located, you may also need to consider other data protection laws, such as the CCPA for users in California.
Tip 2: Focus on aesthetics
Match the form’s colors, fonts, and buttons with your existing brand to create a cohesive experience that feels trustworthy.
Most form plugins include built-in styling options, and some allow light customization for finer control. Also, think about placement. A full-page form should have enough spacing to breathe, while sidebar forms should fit neatly without looking cramped.
Tip 3: Craft a clear CTA
Your call to action should be engaging and straightforward. Instead of a generic “Submit,” try “Send Message” or “Contact Us Now.” Clear CTAs help improve conversions and overall engagement.
Below are some additional tip ideas
- Keep it simple (minimize fields): Include only necessary fields to improve completion rates on your customizable contact form WordPress
- Placement matters: Make your contact form easy to find by placing it on a Contact Us page and in high-visibility areas like the footer
- Spam protection: Enable anti-spam features like CAPTCHA or honeypot if your plugin supports them to avoid junk submissions
- Test periodically: Re-test your form after WordPress or plugin updates to ensure it still works and that emails are being received
How to add a contact form in WordPress without a plugin
If you want more control over how your form works or prefer to avoid extra plugins, here’s how to create a contact form in WordPress without a plugin. You have two main options: coding the form manually or using an external form service.
How to add a contact form in WordPress without a plugin:
1.Using HTML and PHP (Manual Coding):
- Step 1: Create a template file
- Step 2: Add PHP to process submissions
- Step 3: Add HTML form fields
- Step 4: Assign template to a page
2.Using a third-party tool like JotForm
Using HTML and PHP (Manual Coding)
Step 1: Create a template file
Create a new PHP file in your theme folder, for example, contact-form.php. This file will hold your form.
Step 2: Add PHP to process submissions
This PHP code sanitizes inputs and uses WordPress’s wp_mail() to send emails. Place it at the top of your template:
<form action=”<?php echo esc_url($_SERVER[‘REQUEST_URI’]); ?>” method=”post”>
<label>Name:</label><input type=”text” name=”name” required>
<label>Email:</label><input type=”email” name=”email” required>
<label>Message:</label><textarea name=”message” required></textarea>
<input type=”submit” value=”Send”>
</form>
Step 3: Add HTML form fields
Below the PHP code in contact-form.php, add the HTML form fields:
form action=”<?php echo esc_url($_SERVER[‘REQUEST_URI’]); ?>” method=”post”>
<label>Name:</label><input type=”text” name=”name” required>
<label>Email:</label><input type=”email” name=”email” required>
<label>Message:</label><textarea name=”message” required></textarea>
<input type=”submit” value=”Send”>
</form>
Step 4: Assign template to a page
Create a page in WordPress, assign this template, and test the form to ensure it functions correctly. Verify submissions, validation, and error handling.
Using a third-party tool like JotForm
If you prefer not to code or install a plugin, external form builders like JotForm, Google Forms, Typeform, or Wufoo provide an easy, hosted solution. They’re easy to use but may include branding or submission limits on free tiers.
- Sign up for JotForm (or Google Forms, Typeform, Wufoo)
- Use the drag-and-drop builder to design your form
- Save your form and copy the provided HTML embed code
- Paste the embed code in a page/post using a Custom HTML block
- Preview to ensure it appears correctly
Compared to plugins, you get simplicity and a hosted solution, but less styling control. WordPress.com or Jetpack users can also use the built-in form block without installing a plugin.
Key features of an effective ecommerce contact form
Creating a contact form in WordPress that works for your ecommerce business improves communication, user experience, and operational efficiency. Focus on these key features:
1. Simplicity: Keep the form short and easy to complete. It encourages more interactions and higher satisfaction
2. Fields: Include only essential fields like Name, Email, Subject, and Message. Add extra fields only if they are truly necessary
3. Security: Protect your form from spam with CAPTCHA, reCAPTCHA, or built-in plugin features (for example, WPForms’ honeypot, Jetpack/Akismet)
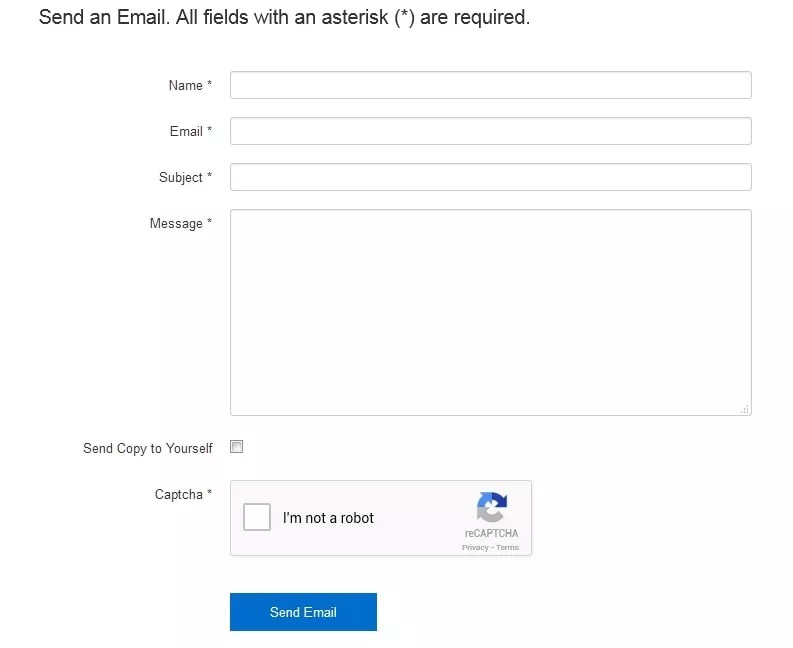
4. Confirmation message: Send a clear thank-you or confirmation email after submission to reassure users that their message was received and that someone will respond
5. Mobile optimization: Use a responsive design and test your form on phones and tablets to ensure all fields display correctly
6. Integration: Connect your form to CRM systems (HubSpot, Salesforce) or email marketing tools (Omnisend, Mailchimp) for efficient follow-up and contact management
7. Accessibility: Make your form usable for all visitors. Use proper <label> tags, high-contrast colors, and accessible navigation, so screen readers and assistive technologies can interpret your form correctly
Best practices for ecommerce contact forms
To get the most from this tool, you need to adhere to best practices for effective communication.
Response time: Importance of timely replies
A swift response time is key to maintaining customer trust and satisfaction. Customers who reach out through your WordPress contact form expect a prompt resolution or response. So, here’s how to meet those expectations:
- Immediate acknowledgment: Use an autoresponder to confirm the message was received as soon as the form is submitted
- Quick follow-up: Aim to provide a comprehensive response within 24 hours
- Resource allocation: Assign a team member to monitor submissions daily so inquiries don’t go unanswered
Personalization: Using plugins or integrations
Personalized responses improve the customer experience by showing attentiveness and care.
- Use the customer’s name: Addressing the visitor by name makes automated responses feel more human
- Reference the inquiry context: Tailor replies to the specific request. For example, if the form asks for the topic of inquiry, reference it in your response: “Regarding your question about shipping times…” This shows the message was read carefully.
- Integrate with a CRM or email platform: Connecting your form to a CRM software or email tool lets you store submissions and personalize future communications automatically
Pro tip: Utilize multi-step forms to gather more detailed information about your prospects or customers, which will enable you to personalize your emails more effectively.
Data protection
Every customer needs assurance that their personal information is handled securely. Follow these steps to maintain data protection and compliance:
- SSL encryption: Use SSL encryption to secure data transmitted through your contact form
- Compliance with regulations: Include a consent checkbox for GDPR and clearly outline data usage
- Clear privacy policy: Communicate your privacy policy clearly, highlighting how customer data will be used and protected
- Database security: If you’re storing form submissions, ensure your database is secure, or use a plugin that emails the data to you without storing it publicly
Feedback analysis: Turning feedback into actionable insight
Feedback from your contact form is a goldmine of insights. Here’s how to use it effectively:
- Regular review: Set aside time to review feedback and inquiries regularly so you don’t miss key insights
- Categorization: Organize feedback by category (sales, support, suggestions, etc.) to identify trends
- Actionable insights: Analyze feedback to extract actionable improvements for products, services, or customer experience, and share these insights with your team
Consistency and multi-channel communication
Providing consistent responses and multiple contact options helps build trust with potential customers.
- Consistent follow-up: When someone contacts you through your form, reply via email (or phone, if appropriate) and reference their web inquiry
- Multiple contact options: Listing a business email address or phone number as a backup can be reassuring, especially for users who prefer direct communication
Pro tip: Omnisend’s research on signup forms shows that certain form styles consistently convert at higher rates. Applying these best practices (clear and compelling CTAs, minimal required fields, and strong incentives) can offer engagement on your contact form as well.
Wrap up
Choosing an effective plugin like Omnisend or WPForms and following best practices is crucial. Omnisend, for example, offers comprehensive features for building responsive, user-friendly forms that integrate seamlessly with email and SMS campaigns.
You can create a contact form in WordPress using a powerful plugin or manually code it. Regardless of the method you choose, always keep the user experience in mind. A secure, intuitive, and efficient form encourages engagement and builds trust with your visitors.
Continually optimizing your contact forms ensures they remain effective over time. Integrating them into email and SMS campaigns will amplify your marketing efforts.
Remember, every inquiry could be a potential sale or lifelong customer. So investing time in a great contact form experience pays off.
Quick sign up | No credit card required
FAQs
Let these answers to frequently asked questions about adding contact forms to your WordPress site provide further guidance:
You can install a contact form plugin directly from your WordPress dashboard, customize the fields, and enable email notifications. Alternatively, WordPress also allows you to create forms without plugins using HTML and PHP.
Yes. Popular free options include Contact Form 7, WPForms Lite, Jetpack Forms, and Ninja Forms. These let you create basic contact forms without any coding knowledge.
The “Best” option depends on your needs. Contact Form 7 works well for simple free forms. WPForms and Ninja Forms are beginner-friendly. Formidable Forms and Gravity Forms are well-suited for advanced use cases. For ecommerce sites, Omnisend forms stand out due to built-in marketing automation.
You can build a form using HTML and PHP and send submissions with wp_mail(). WordPress.com and Jetpack users can also use the built-in Form block. Always test thoroughly and implement security measures, such as field validation and CAPTCHA, to protect your site.
A contact form reduces spam because your email address isn’t exposed. It allows you to guide what information users submit, provides a smoother experience (especially on mobile), and gives a more professional appearance. Forms can also connect to automated follow-ups, unlike a simple mailto link.
TABLE OF CONTENTS
TABLE OF CONTENTS

No fluff, no spam, no corporate filler. Just a friendly letter, twice a month.